
How to ensure the safety and maintenance of YOKOGAWA LS3300 AC power calibrator?
How to ensure the safety and maintenance of YOKOGAWA LS3300 AC power calibrator?
Product basic information
1. Product positioning and core functions
LS3300 is an AC power calibrator that uses the "phantom load method" to generate AC voltage, current, and power signals. It is mainly used for calibrating power meters and other equipment, supporting multiple wiring systems and synchronous operations to meet calibration needs in different scenarios.
2. Manual system and language version
Supporting manual: In addition to this manual, it also includes Chinese specific documents (IM LS3300-92Z1), European language safety manual (IM 00C01C01-01Z1), and global contact list (PIM 113-01Z2).
Language code: The "EN" in the manual number represents English, and "Z1" represents other languages such as Chinese. Users can obtain the corresponding version according to their needs.
Manual update: The content may change without prior notice due to product performance/feature upgrades. The latest version should refer to the official website; As of April 2025, it is the 8th edition, and the historical version gradually iterates from the 1st edition in August 2017.
Preparation before use
1. Packaging content inspection
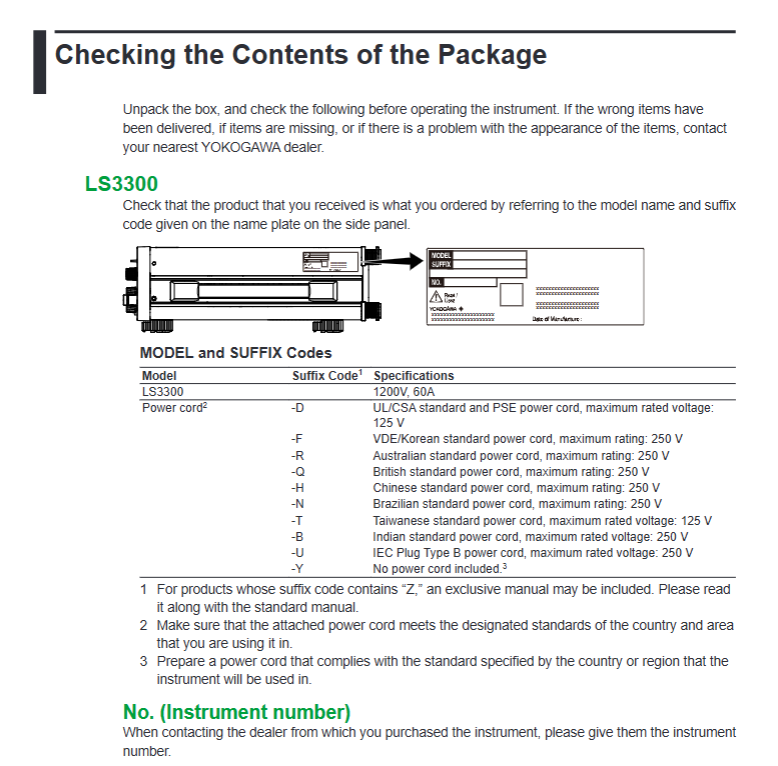
Host and identification: Confirm that the host model is LS3300 (specification 1200V, 60A), and verify the model and suffix code through the side panel nameplate to avoid misdelivery.
Standard accessories: including 1 power cord with matching suffix code (such as - H for Chinese standard, - Q for British standard, etc., - Y without power cord needs to be provided), measuring wire (B8506ZK/B8506WA), crocodile clip adapter set, rubber foot cap, and complete manual. Confirm that the accessories are intact.
Optional accessories: Measurement wire, crocodile clip adapter, BNC cable, rack installation kit, etc. need to be purchased separately, and the selection needs to match the rated parameters of the equipment (such as 758917 measurement wire rated 1000V, 32A).
2. Installation and power connection
Installation requirements: It should be installed in a well ventilated area, with sufficient space reserved for the top/bottom air outlet and rear air inlet (top/bottom ≥ 20cm), avoiding direct sunlight, humidity, strong magnetic fields, and other environments; Supports desktop placement (adjustable movable feet) or rack installation (requires specialized kit), and is prohibited for outdoor or water environments.
Power specifications:
Rated voltage: 100-120VAC or 200-240VAC, allowable fluctuation range 90-132VAC, 180-264VAC, frequency 50/60Hz (allowable fluctuation range 48-63Hz).
The power cord must be designed specifically for the device and comply with local standards (such as the - H type used in China, rated at 250V). It must be plugged into a three hole socket with protective grounding. It is prohibited to cut off the grounding wire or use ungrounded extension cords.
Core functions and operations
1. Output parameter settings
(1) Voltage output setting
Range and Range: Supports ranges of 1V, 10V, 30V, 100V, 300V, and 1000V, with an output range of 0-125% of each range (set by "output level x level ratio", level ratio 0-120%). For example, a 10V range can output a maximum of 12.5V.
Key parameters: frequency 40-1200Hz, phase -180 ° to+359.999 °, power factor -1.0 to 1.0 (lead/lag can be set); When the voltage is ≥ 150V, a buzzing warning will be issued, and when the range is ≥ 300V, the "high voltage indicator light" will light up.
(2) Current output setting
Range and Range: The basic range is 30mA, 100mA, 1A, 10A, 50A, and can be extended to 20A, 30A, 100A, 150A when synchronizing multiple devices; Supports "external sensor mode" (500mV/5V output, voltage current conversion ratio needs to be set), with the same output range as the voltage logic (0-125% range).
Key parameters: Frequency, phase, power factor settings should be consistent with voltage. For high current outputs (such as 20A and above), the wiring system should be set to "1P2W (HI Current)" and multiple devices should be synchronized.
(3) Scanning function (Sweep)
Function purpose: By linearly adjusting the level ratio, the output can smoothly change within a specified range (such as checking for meter pointer sticking), supporting separate scanning of voltage/current.
Parameter settings: Scanning range 0-100%/105%/110%/120% (relative to output level), scanning time 8s/16s/32s/64s (time from 0% to 100%), can be set to "UP" or "DOWN", and will automatically hold when reaching the limit value.
2. Synchronous operation and wiring system
(1) Synchronization function
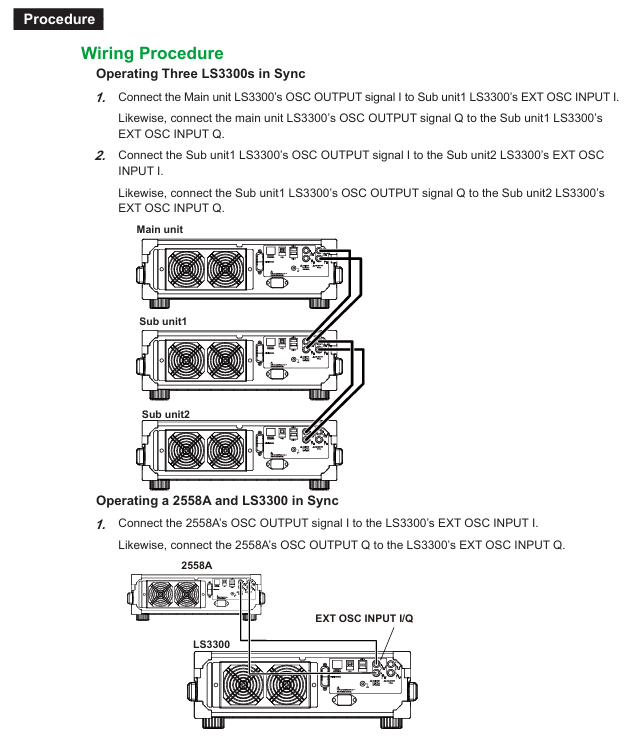
Multi device synchronization: Supports up to 3 LS3300 devices for synchronization, or synchronization with external devices such as 2558A; The master device is connected to the slave device's "OSC INPUT" terminal through the rear "OSC OUTPUT" terminal, synchronizing frequency and phase (external device synchronization only ensures frequency consistency, phase needs to be manually adjusted).
Synchronization settings: Set the master device to "INTernal" and the slave device to "EXTernal"; The "LINE" mode can also be set to synchronize the output with the power frequency.
(2) Wiring system
Supports 6 types of wiring systems, which need to be selected according to the calibration scenario. Different systems correspond to different device connection methods:
The number of devices required for the applicable scenarios of the wiring system
Single phase two-wire (1P2W) independent calibration of one device
Single phase two-wire (1P2W HI Current) high current output (20A and above) 2-3 units
Calibration of 2 single-phase three wire (1P3W) single-phase three wire systems
Three phase three wire (3P3W) calibration of two three-phase three wire systems
Three phase three wire (3V3A) three-phase three wire (three voltage three current method) calibration for 3 units
Three sets of three-phase four wire (3P4W) three-phase four wire system calibration
3. Other functions
Beeming control: Beeming can be turned on/off (such as voltage ≥ 150V, scan hold, etc.), but it cannot be turned off due to equipment failure (such as fan stoppage, overheating).
Display settings: Supports LCD screen off (wake up by pressing any key), brightness adjustment (0-10 levels), phase display is divided into Type1 (0 ° to the right) and Type2 (0 ° to the top).
Error log: Record error codes that occur during device operation (such as E.030 amplitude control error), clear after power failure, and can be viewed or cleared through the "UTILITY" menu.
Initialization: The device settings can be restored to factory default (except GP-IB and Ethernet settings), and in synchronous mode, the master device initialization will synchronize with the slave devices.
Communication interface
1. Interface type and specifications
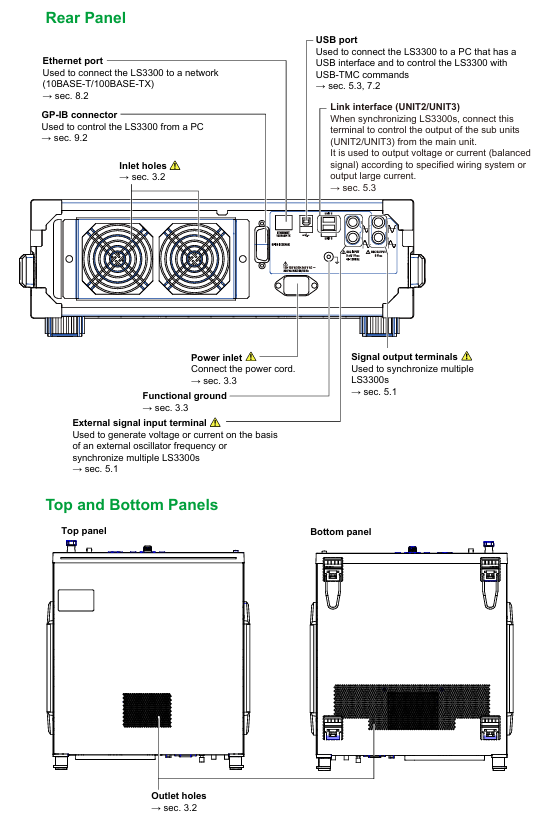
The device supports three interfaces: USB, Ethernet, and GP-IB, which cannot be used simultaneously. Configuration needs to be switched through the "CONFIG" menu:
Interface type, specification parameters, purpose
USB 2.0 (HS/FS mode), supports USB-TMC protocol, connects to PC via Type B interface, and controls devices through USB-TMC commands
Ethernet 10BASE-T/100BASE-TX, RJ-45 interface, supports TCP/IP (VXI-11), DHCP network control, up to 3 devices can be connected simultaneously
GP-IB complies with IEEE 488.2 standard, addresses 0-30, supports NI GP-IB card traditional instrument control, and is suitable for GP-IB compatible systems
2. Remote/Local Mode Switching
Remote mode: After receiving a PC command, enter and the "REMOTE" indicator light will turn on. Only the "UTILITY" key can switch back to local mode, and other panel operations are invalid.
Local mode: Press the "UTILITY" key or receive a PC local switch command to enter, and the panel operation will return to normal.
Safety and Maintenance
1. Safety regulations
High voltage protection: The maximum output of the equipment is 1250Vrms. Before operation, remove metal jewelry and do not touch the output terminals or wires (even if the output is turned off, residual voltage may still cause electric shock).
Wiring safety: Before outputting, it is necessary to confirm that the wiring is correct (voltage wire connected to voltage terminal, current wire connected to current terminal, without short circuit/looseness); Do not touch the terminals during output, regularly check if the terminals are overheated or loose.
Fault handling: If there is smoke, odor, or abnormal noise, immediately cut off the power and disconnect the load; When the output automatically shuts off (such as overload protection), the fault needs to be eliminated (such as replacing the load) and then restarted.
2. Maintenance and repair
Filter cleaning: The rear air inlet filter needs to be checked and cleaned every 3 months. If it is dirty, clean it with neutral detergent and let it dry naturally. Blocking can cause the equipment to overheat; The filter screen is damaged and needs to be replaced by contacting a Yokogawa dealer.
Self check function: Automatically perform self check (check fan, voltage/current range, internal circuit) when turned on, or manually through the "UTILITY" menu. If the self check fails, an error code will be displayed (such as E.901 indicating fan failure).
Calibration and replacement: It is recommended to calibrate once a year to ensure accuracy. Cooling fans (3 years), filters (1 year), and LCDs (approximately 40000 hours) should be replaced according to the recommended cycle, and maintenance should be carried out by Yokogawa certified personnel.
- OMRON
- ABB
- General Electric
- EMERSON
- Honeywell
- HIMA
- ALSTOM
- Rolls-Royce
- MOTOROLA
- Rockwell
- Siemens
- Woodward
- YOKOGAWA
- FOXBORO
- KOLLMORGEN
- MOOG
- KB
- YAMAHA
- BENDER
- TEKTRONIX
- Westinghouse
- AMAT
- AB
- XYCOM
- Yaskawa
- B&R
- Schneider
- KONGSBERG
- NI
- WATLOW
- ProSoft
- SEW
- ADVANCED
- Reliance
- TRICONEX
- METSO
- MAN
- Advantest
- STUDER
- DANAHER MOTION
- Bently
- Galil
- EATON
- MOLEX
- DEIF
- B&W
- ZYGO
- Aerotech
- DANFOSS
- Beijer
- Moxa
- Rexroth
- Johnson
- WAGO
- TOSHIBA
- BMCM
- SMC
- HITACHI
- HIRSCHMANN
- Application field
- XP POWER
- CTI
- TRICON
- STOBER
- Thinklogical
- Horner Automation
- Meggitt
- Fanuc
- Baldor
- SHINKAWA
- Other Brands
- UniOP
- KUKA
- Iba
- Beckhoff
- ADLINK
-
 Sigmatek MDD111-1 DIAS Drive Axis Module
 -
 Sigmatek DKL042 05-024-042 Terminal Module
 -
 Sigmatek DM822 Control Module
 -
 Sigmatek CDM167 12-008-167-O Module
 -
 Sigmatek TAE151 Touch Display Unit
 -
 Sigmatek DCC041 SLIDES Module 05-700-041-D
 -
 Sigmatek AKM65M-ANC2GBB0 PM Servo Motor
 -
 Sigmatek ETT221 01-230-221 Operator Terminal
 -
 Sigmatek SLIDES DAM 124 Analog Module
 -
Sigmatek AKM31C-ANCNGBB0 Servo Motor
-
 Mannesmann Demag Sigmatek CP626 Central Unit
 -
 SIGMATEK 0332.554.03 Board 371071000154
 -
 SIGMATEK 12-250-021 Base Plate Back Panel CM5V020
 -
 SIGMATEK DM162 S-DIAS Digital Mix Module
 -
 DEMAG ERGOTECH 061 381 66 Sigmatek 9842.243.02 Circuit Board
 -
 SIGMATEK CP313-1 PLC Module
 -
Sigmatek ETV0551-2 VARAN Touch Terminal
-
 Sigmatek SDM 081 FS S-Dias Safety Module
 -
 DEMAG 05-250-023 Ergotech Motherboard with Sigmatek TMS012
 -
Sigmatek CM5V020 12-250-023-K Wiring Base
-
 Sigma Tek 5000B-37 Attitude Gyro Indicator
 -
 Sigmatek SDD120-2 DIAS Drive
 -
 Sigmatek CME221 Memory Module
 -
 Sigmatek DCP640 DIAS Central Unit
 -
 Sigmatek STO040 Safety Output Module
 -
Sigmatek CET281 Control Panel
-
 Sigmatek CIPC LX800 Demag NC5 CPU
 -
 Sigmatek DKL093 05-024-093 Terminal Module
 -
 Sigmatek AI088 20-009-088 Analog Input Module
 -
Sigmatek CAI888 Analog Input Module
-
SIGMATEK CCA021 12-025-021 Analog Output Module
-
SIGMATEK 1104.579.05 Control Module
-
SIGMATEK SDI100 Digital Input Module
-
 SIGMATEK C-IPC 256MB LX800 Compact Dias
 -
 SIGMATEK 9423.090.02 Control Module
 -
SIGMATEK C-IPC 256 Power Supply 148498
-
 SIGMATEK CAI025 Analog Input Module
 -
 SIGMATEK CTO166 Digital Output Module
 -
 SIGMATEK CP112 20-004-112 Processor Module
 -
SIGMATEK CAI887 12-009-887 Safety Module
-
 Sigma-Tek 4000B-31 Directional Gyro 1U262-002-42
 -
Sigmatek C-IPC 256MB LX800 IPC Controller
-
Sigmatek C-IPC 01-450-031 Industrial PC LX800
-
Sigmatek C-IPC 256 Industrial PC Controller
-
Sigmatek CCP-531 PLC Processor Module
-
Sigmatek CDI163 Digital Input Module
-
 Sigmatek ETV0501 VARAN Terminal 12-230-0501
 -
 Sigmatek CTMS020 C-DIAS Technology Module
 -
 Sigmatek CIV512 VARAN Switch Module
 -
 Sigmatek HU011 20-080-011 Interface Module
 -
SIGMATEK SLIDES DAM 124 Module
-
 SIGMATEK C-IPC 161 01-450-161L Industrial PC
 -
SIGMATEK C-IPC 128MB VIA 733MHz 01-450-024-K
-
 SIGMATEK 12-780-012 R8-IPC Geode LX800 Module
 -
SIGMATEK CAM124 Analog Module
-
 SIGMATEK S1 032-8AF61-R4 EZ Servo Motor
 -
 SIGMATEK CTO163 Digital Output Module
 -
 SIGMATEK CCP082 12-004-082 Processor Module
 -
 SIGMATEK CRCH081 C-DIAS Temperature Module
 -
 SIGMATEK PC322-K 01-310-322-K Industrial PC
 -
SIGMATEK SDD310-2 Servo Drive
-
 SIGMATEK AI084 Analog Input Module
 -
SIGMATEK CRCH081 12-752-081 Temperature Module
-
Sigma-Tek 5000L-4 Attitude Gyro 1U284-001-3
-
 SIGMATEK CM5V020 12-250-023-K Wiring Module
 -
Sigma-Tek 4000H-6 Directional Gyro IU262-035-7
-
 SIGMATEK Dias DCP160 05-004-160 Processor Module
 -
SIGMATEK 0147.395.02 Control Module
-
SIGMATEK A1084 Control Module
-
SIGMATEK DI200 20-006-2000 Digital Input Module
-
Sigmatek DNC115 Encoder Module
-
 Sigmatek DAM122 05-017-122 Analog Module
 -
Sigmatek 9802.289.01 Control Board TA71 Display
-
Sigmatek TO127 20-007-127 Digital Output Module
-
Sigmatek DNC031 05-011-031 Digital Module
-
Sigmatek VI022 20-003-022 Interface Module
-
Sigmatek CAI085 Analog Input Module
-
 Sigmatek CP111 S-DIAS CPU Module
 -
Sigmatek CTMS030 Krauss Maffei Module
-
 Sigmatek CAM123 Control Module
 -
 Sigmatek TAE732-P 01-240-732-P Touch Display Unit
 -
Sigmatek MDM021 Digital Mixed Module
-
Sigmatek DCP642 DIAS Central Unit
-
 Sigmatek CST022 12-014-022 C-DIAS Module
 -
 Sigmatek SRO021 20-893-021 Safety Relay Output
 -
 Krauss Maffei MC5 Control System Sigmatek
 -
 Sigmatek DC061 Module 18-24VDC 300mA
 -
 Herrmann EVT0855 Ultrasonic Welder Touch Panel
 -
Sigmatek CIV521 Control Module 1.4A 2W
-
Sigmatek DDI61 05-006-161 Digital Input Module
-
SIGMATEK ETT312-E Touch Terminal 01-230-312
-
Cessna S3326-1 Sigma Tek 5000B-67 Gyro 1U149-015-9
-
SIGMATEK PS101 Power Supply Module
-
SIGMATEK 0332.554.03 Control Module 371071000154
-
 SIGMATEK ETT312-E Touch Terminal 01-230-312
 -
SIGMATEK CDM163 Control Module
-
 SIGMATEK VSV046 16-023-046 Module
 -
SIGMATEK AM221 20-017-221 Analog Module
-
SIGMATEK CTS051 12-053-051 Control Module
-
SIGMATEK AM221 20-017-221 Analog Module
-
Sigmatek CSDI161 12-891-161 Safety Input Module
-
Sigma Tek 4000C-1 Directional Gyro Indicator
-
Sigmatek ETV0501 12-230-0501 VARAN Terminal
-
Sigmatek DDM165 SLIDES Module
-
Sigmatek N100 20-011-100 Control Module
-
Sigmatek AKM54K-ANC2R-B0 PM Servo Motor
-
Sigmatek CTO166 Digital Output Module
-
Sigmatek CP212-K 20-004-212-K CPU Module
-
Sigmatek CDI161 Digital Input Module
-
Sigmatek DCC080 05-700-080-2 Control Module
-
 SIGMATEK SCP011 S-DIAS Safety CPU
 -
SIGMATEK SCP011 S-DIAS Safety CPU
-
SIGMATEK SRO022 Relay Output Module
-
SIGMATEK MDD 121 Drive Axis Module
-
SIGMATEK DSI021 SLIDES Siemens Interface
-
SIGMATEK DIAS DCP161 Module 05-004-161
-
 Sigmatek ETT312 Built-in Touch Terminal
 -
SIGMATEK DCP 643 DIAS Controller System
-
SIGMATEK CIO021 Multi I/O Module
-
SIGMATEK CTMS020 Control Module
-
 Sigmatek CME 221 Memory Module
 -
Sigmatek 0420.615.01 Control Board
-
Sigmatek CP111 20-004-111 CPU Module
-
Sigmatek 9405.065.03 Control Board
-
Sigmatek ETEK 01-450-032-K C-IPC 256MB Industrial PC
-
Sigmatek CTO163 12-007-163 Safety Output Module
-
Sigmatek TO081 20-007-081 Digital Output Module
-
 Sigmatek SI021 20-022-021 Safety Input Module


