
How to install and maintain the Bently Nevada 3500 monitoring system rack?
Core advantage: Enhanced operator information (providing multi-dimensional data, Windows) ® Basic display software, better integration of factory control computers (multi protocol communication gateway, time synchronization data), reduced installation and maintenance costs (reduced wiring, backward compatibility, easy configuration), improved reliability (redundant power supply, TMR system), intrinsic safety options, multiple output interfaces (supporting multiple display and control systems).
Bently Nevada 3500 Monitoring System Rack Installation and Maintenance
Receiving and Processing Instructions
Receiving inspection
Visually inspect the system for any obvious transportation damage. If there is any damage, file a claim with the carrier and submit a copy to Bently Nevada, LLC.
Handling and storage precautions
The circuit board is susceptible to static damage and requires the use of a grounding strap (such as 3M Velostat) before operation ® No.2060) Grounding: Avoid using tools/materials that are prone to static electricity, such as ungrounded soldering irons and non-conductive plastics.
Transport and storage of circuit boards require the use of conductive bags or foil, and special attention should be paid to static electricity accumulation in dry weather (humidity<30%).
When the system loses power, it will lose its mechanical protection function; When operating correctly, the module can be plugged in and out while powered on (see Chapter 4 for details).
Basic Information
System Overview
The 3500 monitoring system is used to continuously monitor the status of rotating and reciprocating machinery (such as imbalance, misalignment, shaft cracks, bearing failures, etc.) to improve factory safety, product quality, equipment availability, and reduce operating costs.
Core advantage: Enhanced operator information (providing multi-dimensional data, Windows) ® Basic display software, better integration of factory control computers (multi protocol communication gateway, time synchronization data), reduced installation and maintenance costs (reduced wiring, backward compatibility, easy configuration), improved reliability (redundant power supply, TMR system), intrinsic safety options, multiple output interfaces (supporting multiple display and control systems).
General characteristics
Hot swappable module: When operated correctly, any module can be plugged in and out while the system is powered on, without affecting the operation of unrelated modules (plugging in and out of the power supply does not interrupt the system when dual power is available).
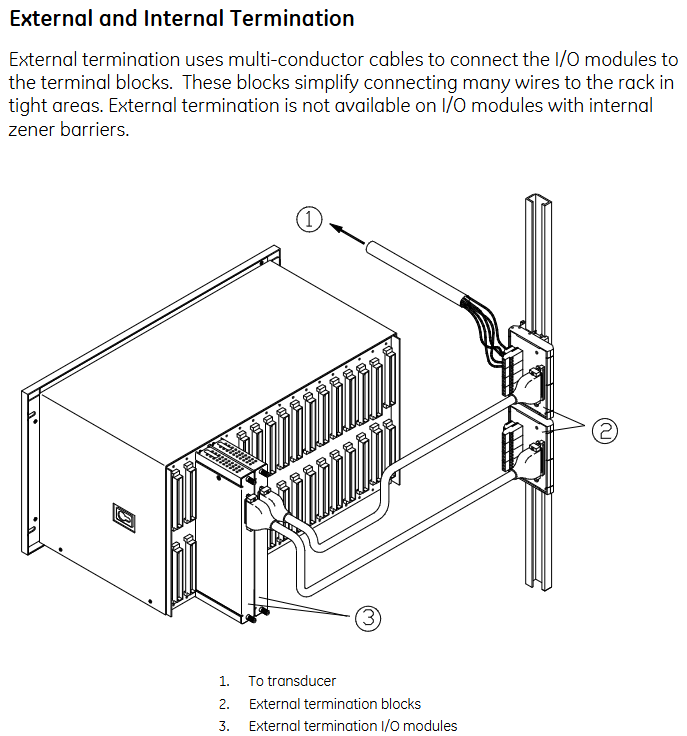
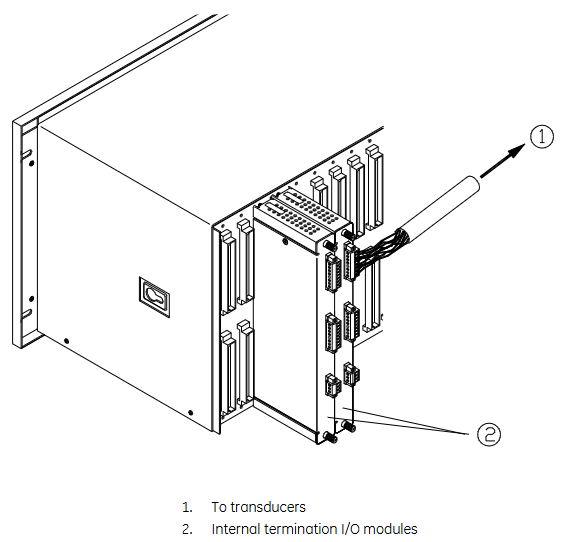
Internal and external terminals: External terminals are connected to I/O modules and terminal blocks through multi-core cables (suitable for narrow space areas); Internal terminals allow sensors to be directly connected to I/O modules (I/O modules with internal Zener barriers have no external terminals).
System components
Including a weatherproof enclosure (protecting the rack from moisture and dust), rack (full-size 19 inch/compact 12 inch Mini rack), power supply (half height module, supporting 1-2 redundant installations), Rack Interface Module (RIM, communicating with the host and other modules, maintaining event lists), communication gateway module (allowing external devices to access information), monitoring module (collecting sensor data), relay module (controlling relays based on channel status) Keyphasor ® Modules (supplying power to sensors and processing signals), display modules (supporting multiple display devices), grounding modules (providing low impedance grounding, used in conjunction with internal barrier I/O modules), etc.
Relays and Safety Systems
Standard rack relay options: independent relay (each monitoring module is equipped with more than one relay module), bus relay (multiple monitoring channels share a single relay), Triple Modular Redundancy (TMR) system (high reliability configuration, triple redundancy function, avoiding single point failure).
Intrinsic safety internal barrier system: suitable for hazardous environments, needs to be used in conjunction with grounding modules, has strict installation restrictions (such as prohibiting the use of bus sensors, requiring isolation of RS-232 connections, etc.), and has characteristics such as dual IS grounding and safe/hazardous area wiring separation.
Initial rack installation
General installation process
Refer to the installation checklist (confirm conditions such as power supply, space, ventilation, grounding, etc.);
Install weatherproof casing (if required);
Install the rack;
Set rack jumpers and switches;
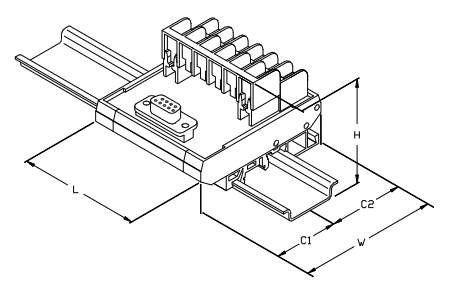
Install external terminal blocks (if necessary);
Install modules;
Connect sensors, relays, and power wiring;
Complete the software configuration for rack installation.
Key installation details
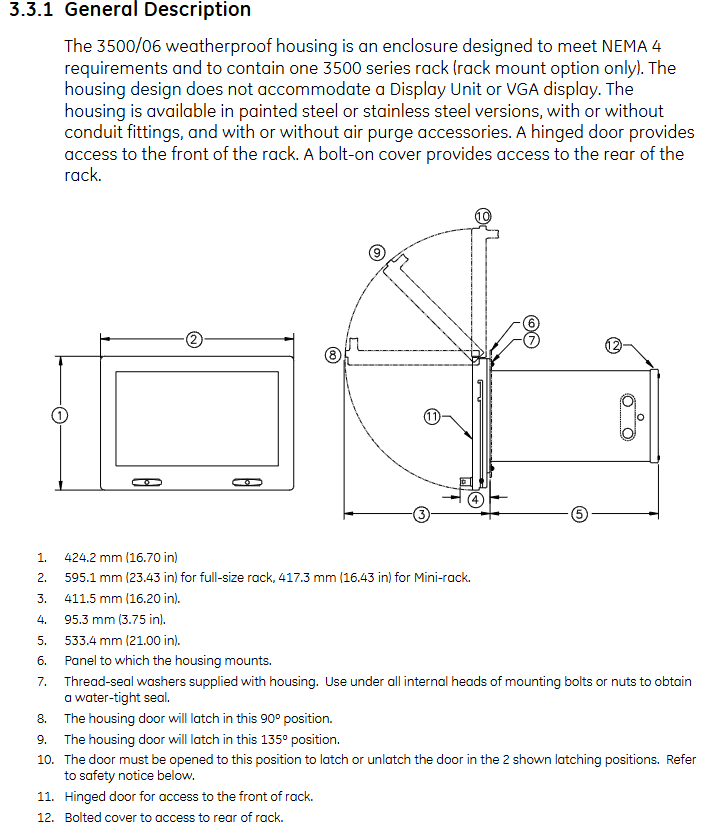
Weather resistant enclosure: Meets NEMA 4 requirements, not compatible with display units; Attention should be paid to temperature derating (due to limited ventilation), panel cut size, conduit fittings (to avoid mixing power and signal wiring), and air purification options (to meet specific pressure and flow requirements).
Rack installation: Ensure ventilation (minimum gap of 50.4mm between top and bottom), support panel installation, rack installation (19 inch EIA cabinet), Bulkhead installation, etc. Different installation types have specific size and fixing requirements.
Intrinsic safety operation: Ensure that the grounding resistance is less than 1 Ω, use 4-10mm ² cables to connect to the factory's IS grounding, and use a single point grounding to avoid loops.
High electromagnetic noise/CE installation: The system rack, EMI shielding, and cables must be thoroughly grounded to shield all wiring out of the metal cabinet. CE installation must comply with EN61000.3.2 standard.
Module installation and removal
Installation steps
Power supply: First install the Power Input Module (PIM), configure single point grounding, connect the power cord (in a non powered state), then install the main module and tighten the screws.
Full height module: First install the I/O module (configuration options, fastening screws, connection wiring), and then install the main module (ensure that the ejectors are in place, inserted along the guide rail, and fastened).
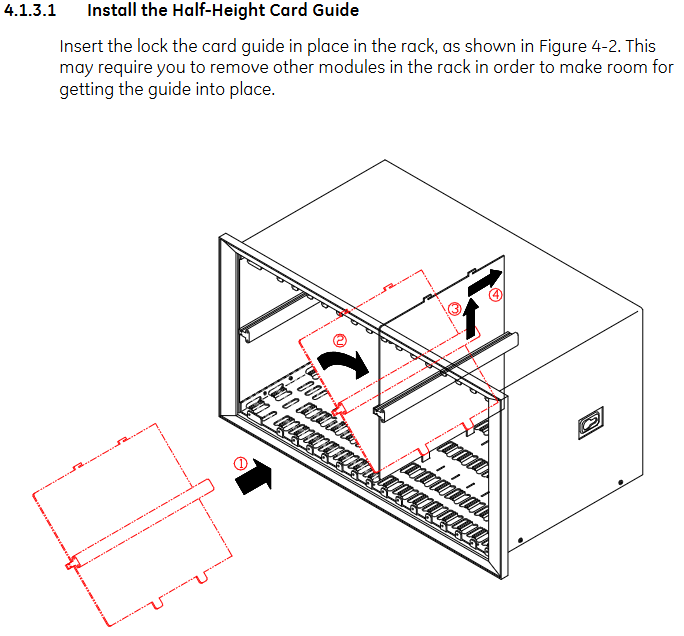
Half height module: First install the half height card guide rail, then install the I/O module and main module, similar to the steps for full height modules.
Remove steps
After power off, loosen the module screws and use ejectors (full height) or screws as handles (half height/power) to pull out the module; The I/O module needs to remove the wiring first, and then loosen the screws to remove it.
Replace module
Main module: Save the configuration before removing the old module, reconfigure and verify after installing the new module.
I/O module: The main module and wiring need to be removed first, replaced, reconnected, and verified.
Maintenance
General maintenance
The internal components of the module cannot be repaired on site, and maintenance mainly involves testing whether the channel is normal and replacing faulty modules (spare parts are required).
Support live plugging and unplugging modules (follow the steps in Chapter 4), the system does not require calibration, but the functionality needs to be verified regularly.
Maintenance interval
The initial interval is 1 year; If the monitoring machine is a critical equipment or the rack is in an extreme temperature, high humidity, or corrosive environment, the interval needs to be shortened; Adjust the interval based on the verification results and ISO 10012-1 after each maintenance.
Order Information
Rack ordering: Specify the size (19 inches/12 inches Mini rack), installation method (panel/rack/Bulkhead installation), institutional certification (CSA-NRTL/C), European compliance (CE), etc. through code.
Windproof shell ordering: optional materials (painted steel/stainless steel), conduit fittings, air purification options, etc., incompatible with display units, Mini rack requires adapter panel.
Grounding module and spare parts: The grounding module needs to occupy one rack slot; Spare parts include TMR/SIM jumpers, blank panels, adapters, etc.
Specification parameters
Dimensions: Detailed length, width, and height data for different installation types (panel/rack/Bulkhead installation, full-size/Mini rack) (such as full-size panel installation rack width 482.6mm, height 265.9mm).
Weight: The weight of different configurations (empty/full load, with internal barriers) (such as a full-size full load panel installation of approximately 31.07kg).
Environmental parameters:
Working temperature: -30 ° C to 65 ° C (0 ° C to 65 ° C with internal barrier); Storage temperature: -40 ° C to 85 ° C.
Humidity: 0% -95% without condensation.
Mechanical performance: 10g impact (11ms); 3g sine vibration (5-100Hz).
- OMRON
- ABB
- General Electric
- EMERSON
- Honeywell
- HIMA
- ALSTOM
- Rolls-Royce
- MOTOROLA
- Rockwell
- Siemens
- Woodward
- YOKOGAWA
- FOXBORO
- KOLLMORGEN
- MOOG
- KB
- YAMAHA
- BENDER
- TEKTRONIX
- Westinghouse
- AMAT
- AB
- XYCOM
- Yaskawa
- B&R
- Schneider
- KONGSBERG
- NI
- WATLOW
- ProSoft
- SEW
- ADVANCED
- Reliance
- TRICONEX
- METSO
- MAN
- Advantest
- STUDER
- DANAHER MOTION
- Bently
- Galil
- EATON
- MOLEX
- DEIF
- B&W
- ZYGO
- Aerotech
- DANFOSS
- Beijer
- Moxa
- Rexroth
- Johnson
- WAGO
- TOSHIBA
- BMCM
- SMC
- HITACHI
- HIRSCHMANN
- Application field
- XP POWER
- CTI
- TRICON
- STOBER
- Thinklogical
- Horner Automation
- Meggitt
- Fanuc
- Baldor
- SHINKAWA
- Other Brands
- UniOP
- KUKA
- Iba
- Beckhoff
- ADLINK
-
 Sigmatek CME 221 Memory Module
 -
Sigmatek 0420.615.01 Control Board
-
 Sigmatek CP111 20-004-111 CPU Module
 -
 Sigmatek 9405.065.03 Control Board
 -
 Sigmatek ETEK 01-450-032-K C-IPC 256MB Industrial PC
 -
 Sigmatek CTO163 12-007-163 Safety Output Module
 -
 Sigmatek TO081 20-007-081 Digital Output Module
 -
 Sigmatek SI021 20-022-021 Safety Input Module
 -
 Sigmatek 05-052-014 Control Module HW 1.0
 -
 Sigmatek TO127 20-007-127 Digital Output Module
 -
 Sigmatek SV141 20-023-141 VARAN Splitter
 -
 SIGMATEK CIV513 C-DIAS VARAN Control Module
 -
 Sigmatek DCP 642 SLIDES Control Module with DKL002
 -
 Sigma-Tek 5000B-36 Attitude Gyro
 -
SIGMATEK 01-450-024 C-IPC Industrial Computer
-
 SIGMATEK CP102 S-DIAS Processor Module
 -
 Sigmatek CRCH081 12-752-081 PLC Module
 -
 SIGMATEK SDD340-46 Series Drive
 -
 SIGMATEK TAE731 Touch Display Unit
 -
 SIGMATEK CDM167 Module 12-008-167-O
 -
 SIGMATEK TO161 Digital Output Module
 -
 Sigmatek NC4 45291000003 Control Board
 -
 Sigmatek HGW1033-3 Handheld Wireless Unit
 -
Sigmatek CAI0811 Analog Input Module
-
 Sigmatek STO081 S-DIAS Safety Output Module
 -
 Sigmatek C-IPC 01-450-171-V Industrial PC
 -
 Sigmatek S1 032-8AF61-R4 EZ Servo Motor
 -
 Sigmatek CM5V020 Baseplate 12-250-021-K
 -
 Sigmatek HGT833-W Panel
 -
 Sigmatek NC4 45291000003 Control Module
 -
 SIGMATEK 12-780-012 R8-IPC Geode LX800
 -
 SIGMATEK CCP081 Processor Module
 -
SIGMATEK SCP011 S-DIAS Safety CPU
-
 SIGMATEK ETT1533 Touchscreen 01-230-1533
 -
SIGMATEK AI043 Analog Input Module
-
 SIGMATEK CTMS020 Control Module
 -
 SIGMATEK SLIDES VARAN Interface VAC 012
 -
 SIGMATEK Compact Control Unit 06038666
 -
 SIGMATEK CP112 Control Module
 -
 SIGMATEK MDP 101-1 Power Supply Module
 -
 Sigmatek CCP621 C-SLIDES Processor Module
 -
Sigmatek MDD111 Axle Module
-
 Sigmatek CCL912 C-SLIDES CPU PSU Module
 -
Demag NC4 0332.554.03 Sigmatek Control Board
-
Sigmatek Krauss Maffei PC321-K Control Cabinet PC
-
 Sigmatek CNC W150 Circuit Board Wittmann Robot
 -
 Sigmatek AKM44G-ANCNGBB0 Servo Motor
 -
 Sigmatek CSCP011 Safety Module 12-890-011
 -
Mannesmann Demag Sigmatek CP126 Central Unit
-
 Sigmatek ISE021 Interface Module 20-101-021
 -
Sigmatek CCP251 C-DIAS Processor Module
-
 SIGMATEK ET 352 Terminal
 -
SIGMATEK SV141 Module 20-023-141
-
 SIGMATEK NC-337 3 Axis Module
 -
 Sigmatek MDP 101 Power Module
 -
SIGMATEK HGT834-W Teach Pendant
-
Sigmatek C-DIAS Processor Module CCL912
-
 SIGMATEK CP627 Module
 -
 SIGMATEK PC 323-K Controller
 -
SIGMATEK MDD121 Controller Module
-
 SIGMATEK ICA111 Module
 -
SIGMATEK MDD 121-1 Drive Axis Module
-
SIGMATEK M5V121 12-300-121 Krauss Maffei M5 Display Unit
-
SIGMATEK CTMS 020 CD Technology Module 12-250-011
-
 SIGMATEK PCT122 Touch Panel
 -
Stöger MCS4100 SIGMATEK Control Module
-
 SIGMATEK Krauss Maffei M5 Keyboard Unit M5K902 12-310-902
 -
 SIGMATEK SD310-2 Servo Drive Module
 -
SIGMATEK CM5V020 CD Wiring Circuit Module
-
SIGMATEK ENGEL Robot Drive M3 02220-8748
-
 Sigmatek CFF011 Drive Module
 -
 Sigmatek DCP642 DIAS Central Unit
 -
 Sigmatek SDM081 S-DIAS Safety Module
 -
Sigmatek C-IPC 01-450-024 Industrial PC
-
Sigmatek Kompakt NC4 Control Module
-
Sigmatek VI021 VARAN Interface Module
-
Sigmatek Engel RD-M6-2 Robot Drive
-
Sigmatek CNC031 Positioning Module
-
Sigmatek TO161 Digital Output Module
-
Sigmatek CCL912 CPU PSU Module
-
Sigmatek ETV0821 Operator Terminal
-
 SIGMATEK ET 261 Operator Terminal
 -
 SIGMATEK CP731-K Control Module 20-004-731-K
 -
 SIGMATEK ETEK Motherboard 12-250-021-K CM5V020
 -
Sigmatek DEZ 181 DIAS Input Output Module
-
 Sigmatek IPC111-D Industrial PC
 -
SIGMATEK AKM54L-ANC2GBB0 Servomotor with Gearhead
-
SIGMATEK CTMS020 CM5V020 CNC Controller
-
 DEMAG ERGOTECH 061 381 66 Sigmatek Control Unit
 -
 Sigmatek DAI 883 Module
 -
 Sigmatek ETV1521 Control Panel Installation Terminal
 -
 Sigmatek 9802.289.01 Board Control TA71 Display
 -
 Wittmann Sigmatek EU-252 proDrive W4 Servo Drive
 -
Sigmatek CDM166 C-DIAS Module
-
Sigmatek DCP082 DIAS Central Unit
-
Sigmatek CCP081 C-DIAS Processor Module
-
Sigmatek MD111-1 Drive Module
-
Sigmatek ETV0821 Operator Terminal
-
 Sigmatek ISE021 Interface Module
 -
 Sigmatek DCC080L Slide Control Module
 -
Sigmatek AI075 Analog Input Module
-
SIGMATEK TO161 20-007-161 Module
-
SIGMATEK CIC011 Module
-
 SIGMATEK AE0000318502 Hand Terminal Pendant
 -
 Sigmatek Krauss Maffei PC323-K Control Unit
 -
Sigmatek Krauss Maffei PC321-K Control Cabinet PC
-
SIGMATEK CIV521 Control Module
-
SIGMATEK C-IPC-171 Industrial PC
-
 SIGMATEK MDP101-L DIAS Drive Network Module
 -
 Sigmatek Krauss Maffei PC323-K Control Cabinet PC
 -
SIGMATEK CRCH081 C-SLIDES Temperature Module
-
 Sigmatek PC301-E6 Industrial PC SSD
 -
 Sigmatek SDI101 S-SLIDES Safety Input Module
 -
 Sigmatek CIV521 VARAN Control Module
 -
Kollmorgen Sigmatek AKM42G-ANCNGBB0 Servo Motor
-
Sigmatek PC 521 Process Controller
-
 Sigmatek Geode LX800 12-780-012 Industrial PC
 -
 Sigmatek STO081 S-DIAS Safety Output Module
 -
 Sigmatek SCP111 S-DIAS Safety CPU Module
 -
 Sigmatek CDI161 Industrial I O Module
 -
Sigmatek Wiring Board V2 DIAS 05-250-023
-
Sigmatek CP102 20-004-102 S-DIAS CPU Module
-
SIGMATEK SLIDES CNC 115 Module
-
 SIGMATEK DCC080 05-700-080-2 Control Module
 -
SIGMATEK MDD 121 Drive Axis Module
-
 SIGMATEK CIO011 C-DIAS Multi I/O Module
 -
SIGMATEK CIV512 Servo Drive
-
SIGMATEK CM5V020 12-250-021-K Wiring Module


