
Bender LifeGuard® LG2-Series Protection Panels
Bender LifeGuard ® LG2-Series Protection Panels
LifeGuard® Protection Panels
This document is intended as a reference guide for installing and using a Bender LifeGuard® LG2-series protection panel. This document includes installation, setup, and usage instructions.
Only qualified maintenance personnel shall operate or service this equipment. These instructions should not be viewed as sufficient for those who are not otherwise qualified to operate or service this equipment. This document is intended to provide accurate information only. No responsibility is assumed by Bender for any consequences arising from use of this document.
Use of this document
This quick start applies to standard LifeGuard models with lighted push button front panels, as pictured above, as well as open panels with no enclosure.
Standard model
Installation
Mounting - NEMA 4X Polycarbonate Enclosure (enclosure code P)
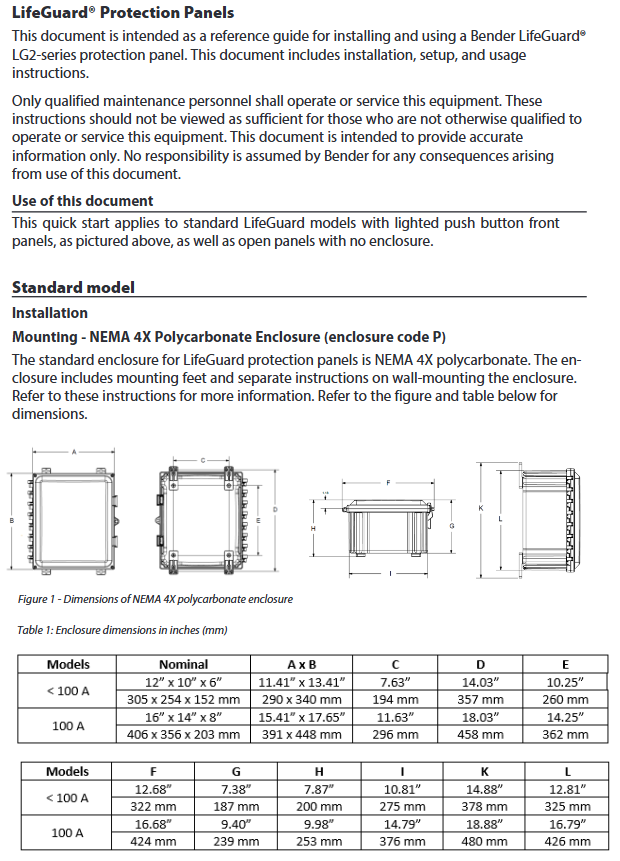
The standard enclosure for LifeGuard protection panels is NEMA 4X polycarbonate. The enclosure includes mounting feet and separate instructions on wall-mounting the enclosure. Refer to these instructions for more information. Refer to the figure and table below for dimensions.
| Models | Nominal | A x B | C | D | F | | <100 A | $12^{prime prime} ×10^{prime prime} ×6^{prime prime}| 11.41" x 13.41" | 7.63" | 14.03" | 10.25" | | 305 x 254 x 152 mm | 290 x 340 mm | 194 mm | 357 mm | 260 mm | | 100 A | $16^{prime prime} ×14^{prime prime} ×8^{prime prime}| 15.41" x 17.65" | 11.63" | 18.03" | 14.25" | | 406 x 356 x 203 mm | 391 x 448 mm | 296 mm | 458 mm | 362 mm |
| Models | F | G | H | I | K | L | | <100 A | 12.68" | 7.38" | 7.87" | 10.81" | 14.88" | 12.81" | | 322 mm | 187 mm | 200 mm | 275 mm | 378 mm | 325 mm | | 100 A | 16.68" | 9.40" | 9.98" | 14.79" | 18.88" | 16.79" | | 424 mm | 239 mm | 253 mm | 376 mm | 480 mm | 426 mm |
NEMA 4X Stainless Steel Enclosure (enclosure code S Option)
LifeGuard protection panels are available with a NEMA 4X stainless steel enclosure. The enclosure includes separate instructions for wall-mounting the enclosure. Refer to those instructions for more information. Dimensions below are in inches (mm.
| Type | Enclosure | A x B x C | D x E | G x H | | Standard | 16x12x6 | 1 6 “ x 12“ x 6“ | 14.2“ x 10.2“ | 14.5“ x 10.5“ | | ( 406 x 305 x 152) | (361 x 259) | (368 x 267) |
If the LifeGuard was purchased without an enclosure (backplate only), consult the following section “Wiring,” and the section “Backplate Only Models”.
| Voltage | Conductors ( not including ground) | Referenced Wiring Diagram | | 120 VAC | 1ph / 2w (L1, N) | Figure W1 | | 208 VAC | 3ph / 3w (L1, L2, L3) | Figure W2 | | 208/120 VAC | 3ph / 4w (L1, L2, L3, N) | Figure W3 | | 240/120 VAC | 1ph / 3w (L1, L2, N) | Figure W4 | | 480 VAC | 3ph / 3w (L1, L2, L3) | Figure W2 | | 480/277 VAC | 3ph / 4w (L1, L2, L3, N) | Figure W3 | | 600 VAC | 3ph / 3w (L1, L2, L3) | Figure W2 | | 600/347 VAC | 3ph / 4w (L1, L2, L3, N) | Figure W3 |
Additional requirements - Backplate-Only Models (enclosure type N)
This section applies to LifeGuard models purchased without an enclosure and on a backplate only. Refer to instructions below for additional requirements for installation and wiring. Backplate-only models must be installed in a suitable enclosure.
Mounting - Backplate Only
Refer to the figure below for dimensions. The unit must be mounted in a location sufficient to protect live electrical equipment. Use four #10 screws for mounting. It should be placed X inches away from other equipment. This vertical clearance X (minimum depth of enclosure, measured from the installed backplate) of the backplate is:
• 6” (152 mm) for models less than 100 A
• 8” (203 mm) for 100 A models.
The mounting hole diameter is 1/4“ (6.4 mm).
| Type | A x B | C x D | | < 100 A | 8. 2 5“ x 10. 2 5 (2 10 x 2 60 ) | 8. 88 “ x 10. 88 “ (2 25 x 2 76 ) | | 100 A | 12. 2 5“ x 14. 2 5“ (3 11 x 3 62 ) | 12. 88 “ x 14. 88 “ (3 27 x 3 78 ) |
green:tripped / RESET button: Resets the panel if faults have been cleared (momentary push). red:TRIPPED LED / TEST button: Illuminates when tripped / TEST button: Performs a functional test (hold for at least 2 seconds).

Apply Power
To apply power, close the customer-supplied circuit breaker / disconnect on the line side of the LifeGuard panel. If there are no ground faults present on the system, the green POWER ON LED will light.
Perform Test (Trip Level Option F)
To perform a test on fixed 6-mA models with trip level option F:
• Push TEST for at least two seconds.
• The unit will trip, the green POWER ON LED will go out, and the red CIRCUIT TRIPPED LED will illuminate. Power to connected loads will be interrupted.
• An internal self-test will initiate, taking approximately ten seconds.
• Push RESET for at least one second.
• If the internal self-test has completed, the unit will reset, the red CIRCUIT TRIPPED LED will go out, and the green POWER ON LED will illuminate. Power will be restored to the load.
Perform Test (Trip Level Option A)
To perform a test on field-adjustable models with trip level option A:
- OMRON
- ABB
- General Electric
- EMERSON
- Honeywell
- HIMA
- ALSTOM
- Rolls-Royce
- MOTOROLA
- Rockwell
- Siemens
- Woodward
- YOKOGAWA
- FOXBORO
- KOLLMORGEN
- MOOG
- KB
- YAMAHA
- BENDER
- TEKTRONIX
- Westinghouse
- AMAT
- AB
- XYCOM
- Yaskawa
- B&R
- Schneider
- KONGSBERG
- NI
- WATLOW
- ProSoft
- SEW
- ADVANCED
- Reliance
- TRICONEX
- METSO
- MAN
- Advantest
- STUDER
- DANAHER MOTION
- Bently
- Galil
- EATON
- MOLEX
- DEIF
- B&W
- ZYGO
- Aerotech
- DANFOSS
- Beijer
- Moxa
- Rexroth
- Johnson
- WAGO
- TOSHIBA
- BMCM
- SMC
- HITACHI
- HIRSCHMANN
- Application field
- XP POWER
- CTI
- TRICON
- STOBER
- Thinklogical
- Horner Automation
- Meggitt
- Fanuc
- Baldor
- SHINKAWA
- Other Brands
- UniOP
- KUKA
- Iba
- Beckhoff
-
 Basler D90 96801 100 PCB Card
 -
 Basler XR2002F Voltage Regulator (110 VAC, 48-480 Hz)
 -
 Basler SR8A-2B14B3A Regulator
 -
 Basler 9561500100 Module
 -
 Basler DECS-400 BE1-11 System
 -
 Basler DECS-100-B15 Excitation Control
 -
 Basler SCP 210 Frequency Controller
 -
 Basler SR4A-2B15B3A Static Voltage Regulator
 -
 Basler BE1-32R Power Relay
 -
 Basler PIA2400-17GM Power Interface Adapter
 -
 Basler MVC 232 Manual Voltage Control Module
 -
 Basler SSR 32-12 Static Voltage Regulator
 -
 Basler 5MW AVR Generator Voltage Regulator
 -
 Basler VR63-4B Voltage Regulator
 -
 Basler DECS-100-A05 AVR for Engine Generator
 -
 Basler DECS-100-B15 Automatic Voltage Regulator
 -
 Basler BE1-32R Directional Power Relay
 -
 Basler BE1-87B Differential Relay
 -
 Basler UFOV 260A Protective Module
 -
 Basler 9-2614-02-100 PCB Rev M
 -
Basler DECS-100-B15 Digital AVR
-
 Basler 9284900103 PS DECS-400N
 -
 Basler D4N3H1U Intertie Protection
 -
 Basler DECS-100-B15 A15 AVR
 -
 Basler KR4F Voltage Regulator
 -
 Basler BE26434 T14 Transformer
 -
 Basler SR8A-2B15B3A Regulator
 -
 Westinghouse 774B472A12 AR Relay
 -
Basler DECS-100-B15 AVR
-
Basler XR2002F Regulator 110V
-
Basler SR125-E Static Regulator
-
 Basler SSR 125-12 Regulator
 -
 Basler MOC2599 Motor Pot
 -
 Basler BE1-DFPR Feeder Relay
 -
 Basler CBS 305 Current Boost
 -
 Basler BE1-25 AutoSync
 -
 Basler MVC 300 Voltage Control
 -
 Basler BE3-25A AutoSync
 -
 Basler KR7FF Static Regulator
 -
 Basler 90-49000-100 Regulator
 -
 Basler 880 kVA Dry Type Transformer Specs
 -
 Basler Electric BE1-25 Sync-Check Relay Specs
 -
 Basler SSR 125-12 Voltage Regulator Specs
 -
 Basler Electric BE1-851 Overcurrent Relay Review
 -
Basler Electric 149D930G02 Control Sub-Assembly
-
 Basler Electric BE1-81O/UT Frequency Relay Specs
 -
 Basler Electric BE1-51/27C Overcurrent Relay
 -
 Basler Electric 149D956G02 Industrial Component
 -
Basler Electric BE1-51A Overcurrent Relay Specs
-
 Basler Electric BE1-40Q Loss of Excitation Relay
 -
 Basler DECS-200 Excitation Control System
 -
 Basler DECS-200 Voltage Regulator 56-277V AC / 125V DC
 -
Basler BE1-87T Transformer Differential Relay
-
 Basler RDP-110-S1 Protection Relay
 -
 Basler BE1-700V Digital Protective Relay
 -
 Basler BE1-951 Overcurrent Protection System
 -
 Basler DECS-300 Digital Excitation Control
 -
 Basler DECS-200 Digital Excitation Control
 -
 Basler DECS-200-1C Excitation Control System
 -
Basler DECS-200-1L Digital Excitation Control
-
 Basler Electric BE1-GPS Generator Protection System
 -
Basler Electric DECS-200-1C Digital Excitation Controller
-
 Basler Electric DECS125-15 Excitation Control with Power Module
 -
 Basler Electric BE1-87G Differential Relay
 -
 Basler Electric BE1-11 Protection System I5A3M2P2N0EA00
 -
Basler Electric DECS-200-1C Excitation Control System
-
Basler Electric BE1-11g Generator Protection Relay
-
Basler Electric DECS 125-15-B2C1 V2.0.9 Excitation Control
-
 Basler Electric BE1-81O/UT3ED1JA7N2F Frequency Relay
 -
Basler Electric BE1-81O/UT3EE1YB7N1F Frequency Relay
-
 Basler Electric DECS-200-1L Digital Excitation Control System
 -
Basler DECS125-15-B2C1 Excitation Control
-
 Basler 9507900205 SSR Retrofit Voltage Regulator
 -
 Basler BE2000E Digital Voltage Regulator
 -
 Basler BE1-GPS Generator Protection System
 -
Basler DECS-250-CN1CN1N Digital Excitation Control
-
 Basler DGC-2020 Genset Controller
 -
 Basler BE1-81O UT3ED1LA7N0F Frequency Relay (Variant)
 -
 Basler BE1-81O UT3EE1YA9S0F Frequency Relay (Variant)
 -
Basler BE1-81O Over/Under Frequency Relay
-
Basler DECS125-15 Digital Excitation Control
-
Basler Electric BE1-951 Overcurrent Protection System
-
 Basler Electric BE1-700V Digital Protective Relay
 -
 Basler Electric APR63-5 Automatic Voltage Regulator
 -
Basler Electric BE1-851 Overcurrent Protection System
-
Basler Electric DECS-250-LN1SN1N Excitation Control
-
 Basler Electric BE1-87T Transformer Differential Relay
 -
Basler Electric DECS-200-1L Excitation Control System
-
 Basler Electric 9310300100 DECS-300 Excitation Control
 -
 Basler Electric SSE-N 125-4.5KW Shunt Exciter Regulator
 -
 Basler Electric DGC-2020HD-5NS1DNSBA Genset Controller
 -
Basler Electric BE1-81-O/UT3EE1JB7N1F Frequency Relay
-
Basler Electric BE1-81T1EE1WA0N1F Frequency Relay
-
 Basler Electric BE1-25M1EA6PN5R1F Sync-Check Relay
 -
 Basler Electric BE1-GPS Generator Protection System
 -
Basler Electric DECS-250-LN1SN1N Excitation Control Rev V
-
 Basler Electric DECS-250-CN2CN1N Excitation Control
 -
Basler Electric BE1-50/51B-207 Overcurrent Relay
-
Basler Electric DECS-300-C0N0 Excitation Control System
-
Basler Electric DECS-200 Digital Excitation Control System
-
Basler Electric DECS-250-LN1CN1N Excitation Unit
-
Basler Electric DECS-250 LN2SA1D Excitation Unit Specs
-
Basler Electric BE1-87T Transformer Relay Review
-
Basler Electric BE1-11 Protection System
-
Basler Electric BE1-GPS100-E4N1H1N Protection System
-
 Allen-Bradley 442G-MABH-R Safety Module
 -
 Beckhoff CX1030-0111 PLC Assembly Profile
 -
 FANUC IC693CPU364 PLC Module
 -
 Orange Denmark Type 200816 220 PLC Specs
 -
 OMRON C200H-SNT31 Sysmac PLC Module
 -
 Allen Bradley 20AB022A3AYNANC0 PowerFlex 70
 -
 OMRON C200HW-PCU01 Position Control Unit
 -
 ABB AO845A-eA Analog Output Module
 -
 OMRON CJ1M-CPU22 CPU Unit
 -
 Allen Bradley 100-E265ED11 Contactor
 -
 Honeywell 51304511-100 Interface Module
 -
 SOLEXY BXF3S0101N0018 Gateway Module
 -
 OMRON CJ2H-CPU65 CPU Unit
 -
 Automation Direct GS2-45P0 AC Drive
 -
 M68-2000 2-Axis Motion CNC Controller
 -
 OMRON CJ1M-CPU11 V3.0 PLC CPU Unit
 -
 OMRON CJ1W-NC413 4-Axis Positioning Controller
 -
 OMRON 3G2A3-PRO16 Programming Console HMI
 -
 Siemens 3VT8440-2AA04-2GA2 Molded Case Circuit Breaker
 -
 Siemens 3RT5045 Contactor Series
 -
 OMRON C200HS-CPU01-E SYSMAC PLC Controller
 -
 OMRON C500-NC103-E Positioning Control Unit
 -
 OMRON CJ1W-TC001 Temperature Control Unit


