
Honeywell Midas-M Multi Gas Transmitter
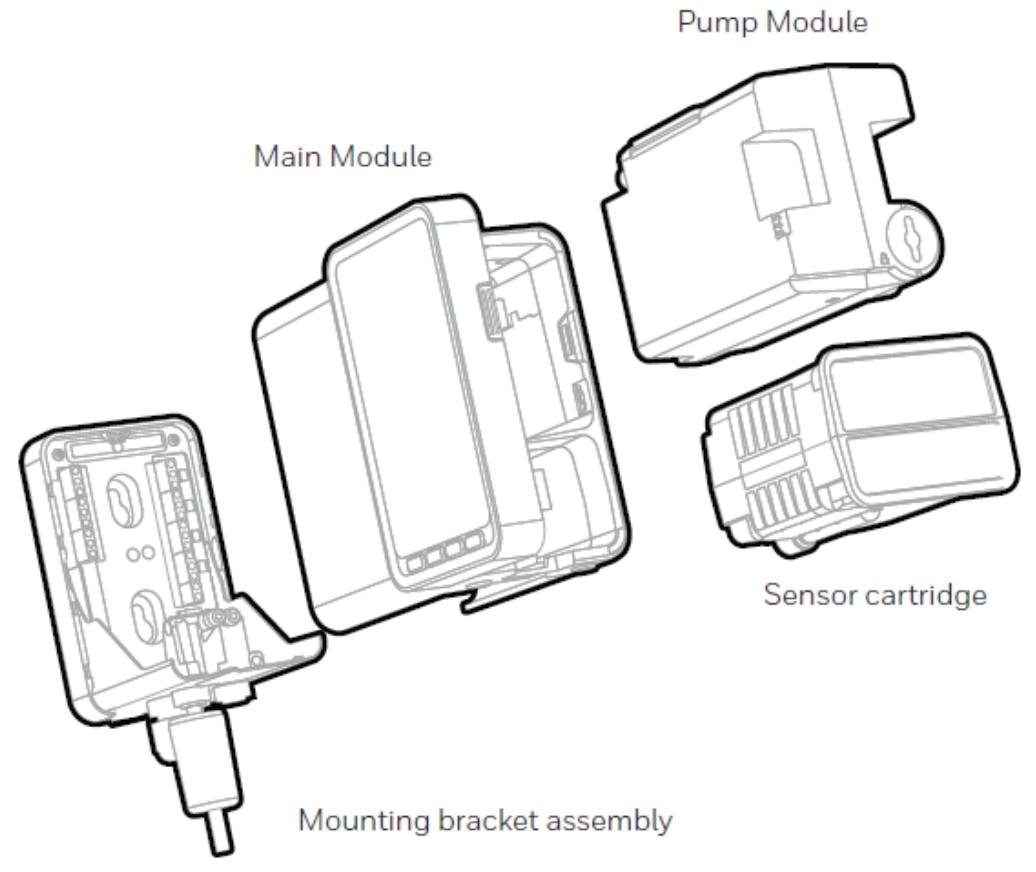
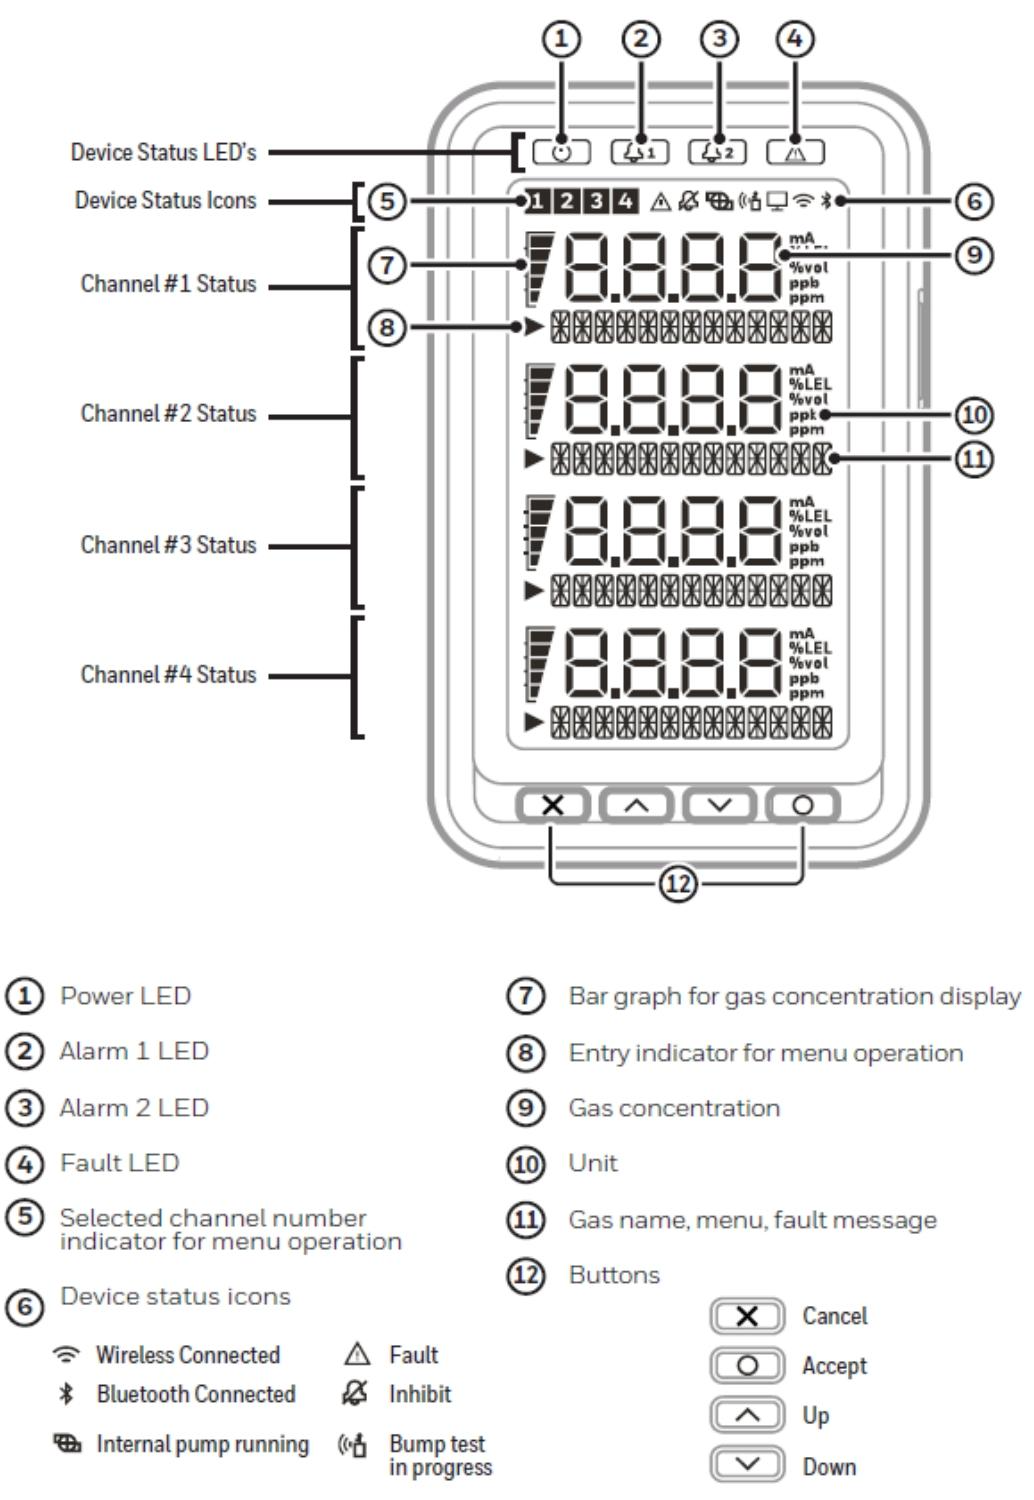
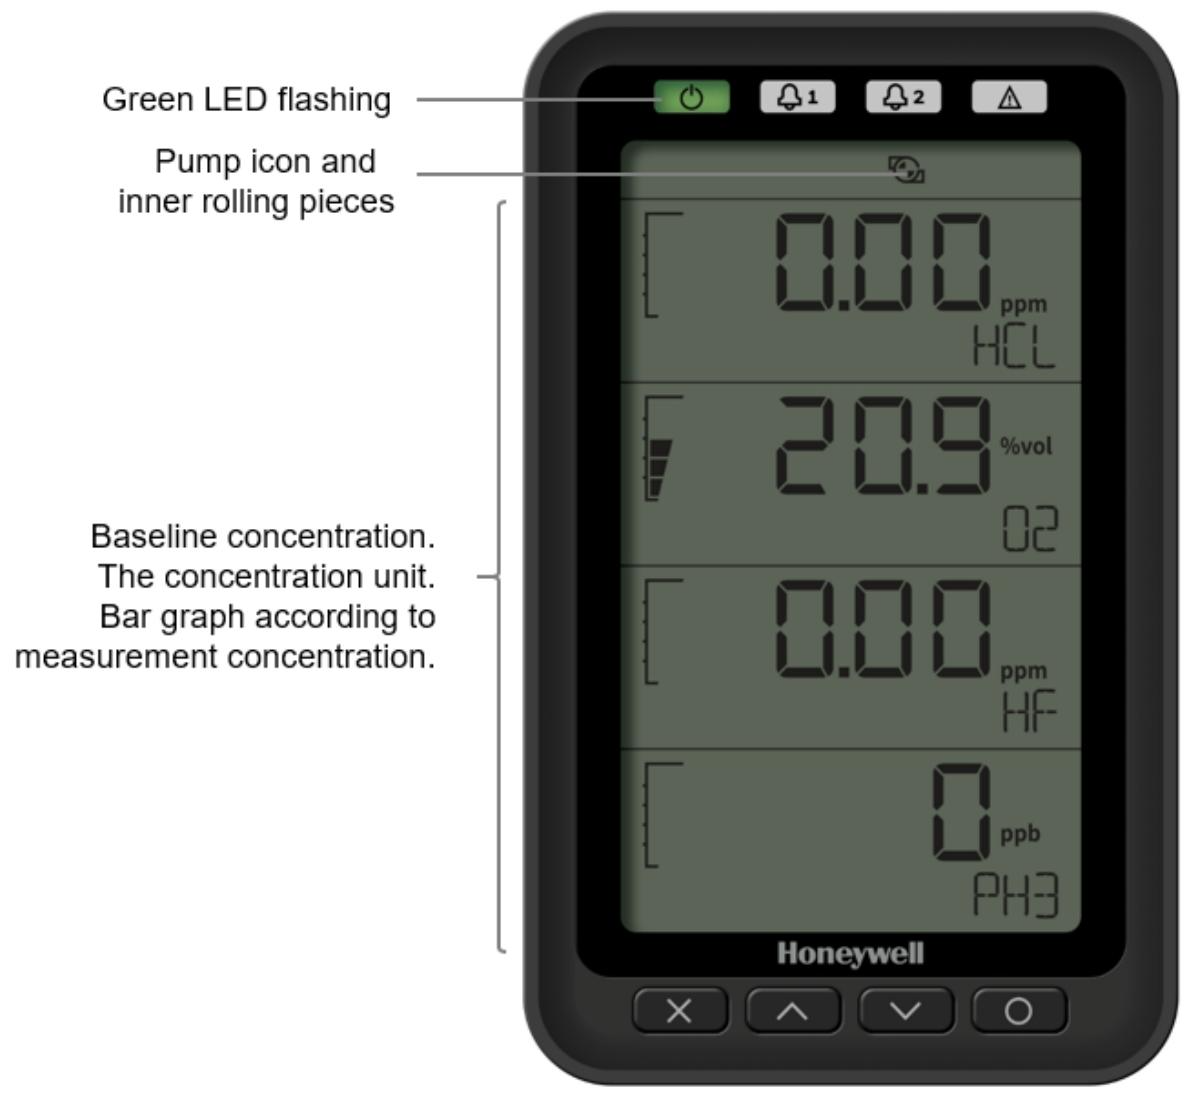
The overall architecture of the equipment consists of four core components: the main module, installation bracket assembly, sensor box, and pump module. This modular design not only facilitates installation and maintenance, but also allows for flexible configuration according to different detection requirements. The user interface includes a backlit LCD display screen, LED indicator lights, and a four key operation keyboard, which can intuitively display information such as gas concentration and alarm status, and support parameter settings and functional operations.
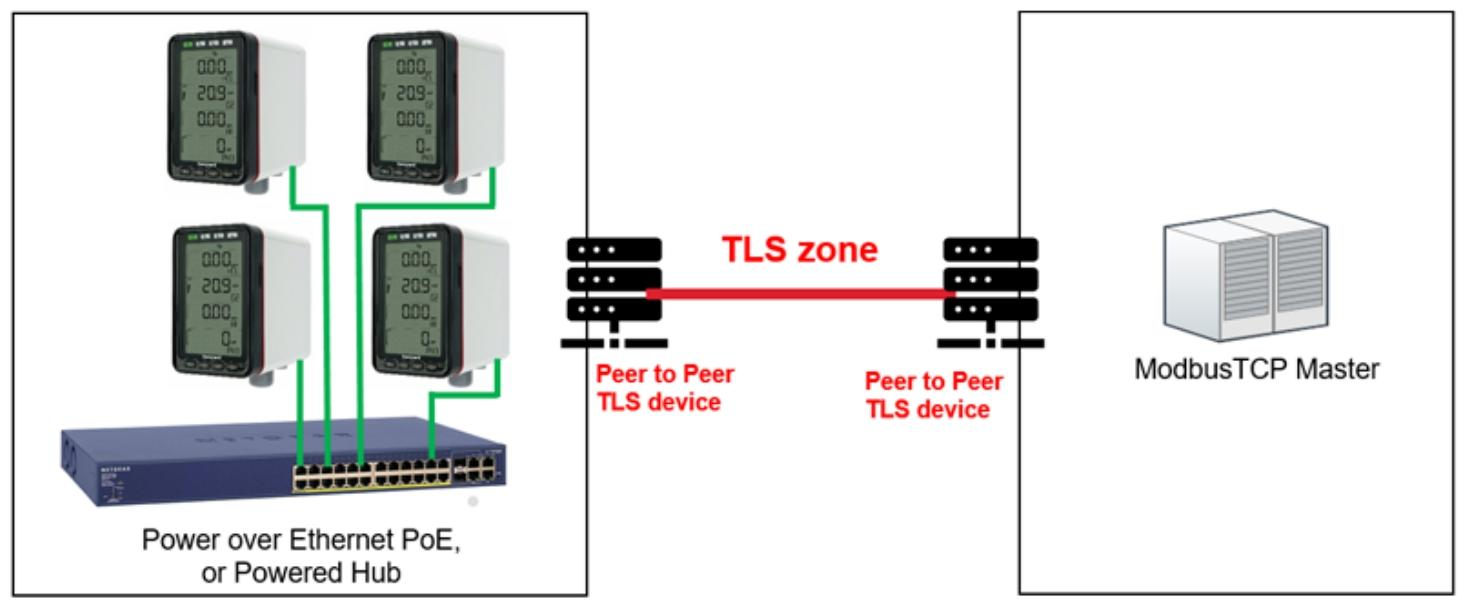
In terms of communication and power supply, Midas-M has high flexibility, supporting 3 onboard relays, 0-21mA analog output, Modbus/TCP digital communication, and Power over Ethernet (PoE). It can achieve the integration of power, control, and data transmission through a single Ethernet connection, greatly simplifying system wiring.
Honeywell Midas-M Multi Gas Transmitter
Product core positioning and design architecture
As a fixed single point extraction multi gas transmitter, Honeywell Midas-M adopts an innovative 4-in-1 multi gas detection design. Its core function is to extract gas samples from local or remote sampling points to the sensor box inside the chassis for analysis. Its design goal is to meet the detection requirements of toxic, flammable gases and oxygen in the semiconductor and other manufacturing industries, suitable for non explosive environments in indoor safe areas.
The overall architecture of the equipment consists of four core components: the main module, installation bracket assembly, sensor box, and pump module. This modular design not only facilitates installation and maintenance, but also allows for flexible configuration according to different detection requirements. The user interface includes a backlit LCD display screen, LED indicator lights, and a four key operation keyboard, which can intuitively display information such as gas concentration and alarm status, and support parameter settings and functional operations.
In terms of communication and power supply, Midas-M has high flexibility, supporting 3 onboard relays, 0-21mA analog output, Modbus/TCP digital communication, and Power over Ethernet (PoE). It can achieve the integration of power, control, and data transmission through a single Ethernet connection, greatly simplifying system wiring.
Installation process and technical specifications
(1) Mechanical installation details
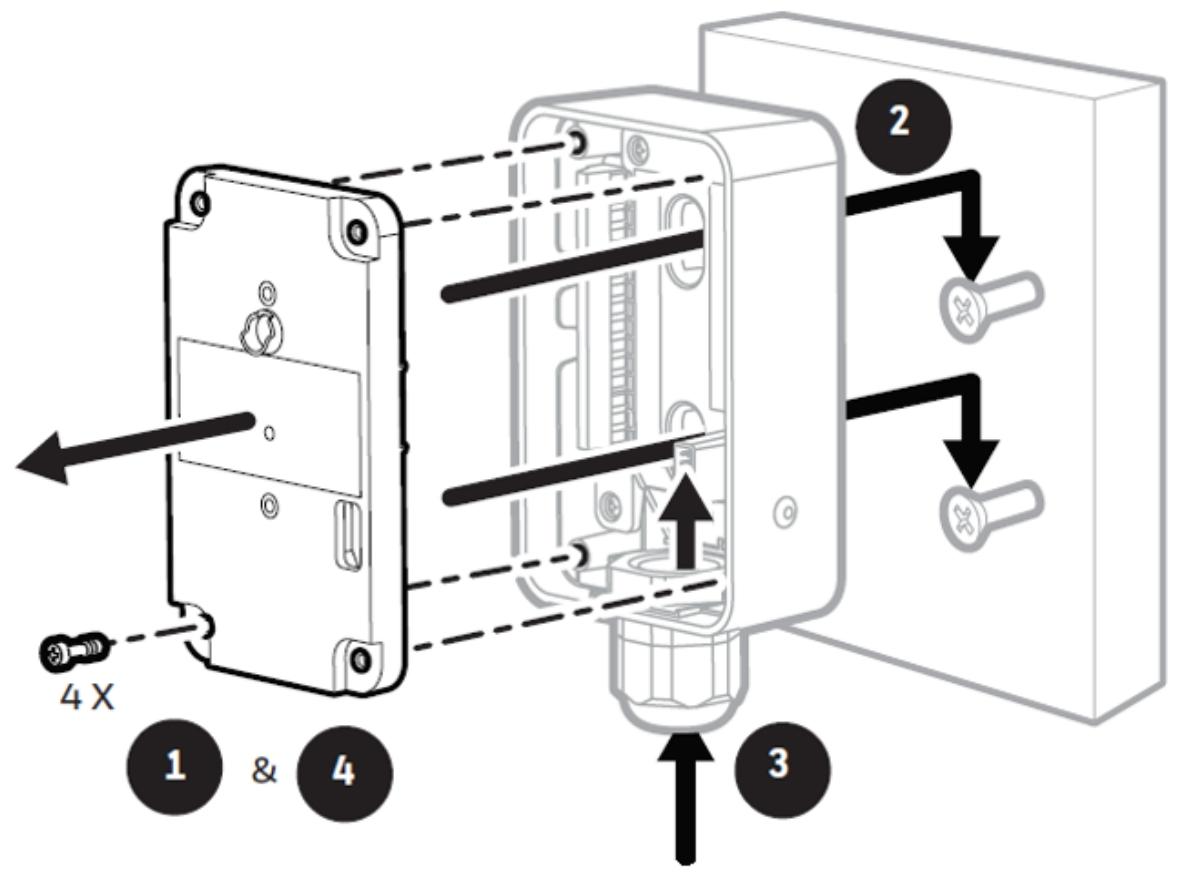
Transmitter installation: Adopting a step-by-step installation strategy, first fix the installation bracket, and then install the main module. The specific steps are: remove the equipment door → loosen the fixing screws → pull out the main module → drill holes according to the template (hole spacing 55.9mm) → fix the bracket with M4 screws → align the main module with the bracket's rounded corner positioning → horizontally push in the main module to fully connect the connector and pipeline → tighten the bottom fixing screws. Special attention should be paid to removing the internal packaging card of the fixed pump, otherwise it may cause equipment damage.
Relay module installation: independent of the main module installation, the steps include: removing 4 screws and cover plate → positioning the module on the pre installed screws and tightening it → threading and connecting to the terminal block → resetting the cover plate and screws → docking the module connector → fixing the bracket and module with special screws.
(2) Fluid system configuration
Sampling and exhaust pipeline parameters:
Inlet sampling: the maximum length is 30m (100ft), the vacuum degree at the sampling point is ≤ -25.4cm H ₂ O. It is recommended to use a 1/8-inch ID thick wall Teflon FEP tube, the flow is stable at 600cc/min, and different pipe diameters correspond to different transmission times (25 seconds for 1/8-inch ID, 53 seconds for 3/16 inch ID).
Export exhaust: maximum length 30m (100ft), back pressure ≤ 20.3cm H ₂ O, pipeline specification 4.76mm ID × 6.35mm OD.
Pipeline preparation and filtration: The pipeline needs to be vertically cut and deburred, and the depth of insertion into the equipment port should be 15.5mm (marked for confirmation). External filters must be used: 780248 for ordinary gases and 1830-0055 or 1991-0147 for corrosive gases. It is recommended to replace them every 3 months.
(3) Electrical Connection Specification
Power requirements: Supports 24VDC discrete power supply or 48VDC PoE power supply (IEEE 802.3af standard), both cannot be connected simultaneously. Maximum power consumption: Under normal operating conditions, it is about 5W, and at full load (4-channel alarm+maximum pipeline load), it is ≤ 11.45W.
Terminal definition and wiring: The terminal supports 24-14 AWG wires (recommended 16 AWG), including interfaces for power supply, 4-20mA output, relays, etc. Among them, the 4-20mA output can be configured as a 3-wire source type, 3-wire drain type, or 4-wire isolation type. When wiring, attention should be paid to the switch settings (INT/NEXT).
Grounding requirements: If the metal casing of the equipment is not directly connected to the grounded metal surface, a dedicated grounding terminal must be connected to the external grounding electrode through PG16 glass; When using PoE, shielded CAT5 cables should be used to avoid interference from grounding loops.
(4) Installation of sensor box
The sensor box supports plug and play, and it is necessary to confirm that the model matches the detected gas before installation. The steps are: power off → open the door → remove the BiAS battery module and plug cap → align the sensor box pins and slots → gently push until fully engaged → close the door → press the "O" key to clear the "Detect New Cartridge" prompt → confirm that the green light is flashing, the yellow/red light is off, and the displayed concentration is zero.
Operational functions and system configuration
(1) Core working mode
Monitoring mode: The default operating mode of the device displays real-time gas concentration (with units and bar charts), channel status, and system icons (pump running, wireless connection, etc.). The output performance under different states is as follows:
Alarm 1: Relay 1 is activated, 4-20mA varies with concentration, corresponding to a constant red light on the channel and a red backlight.
Fault: Yellow light on, 4-20mA output 1mA, fault relay activated.
Suppression: Output 2mA, green light flashes, alarm output is suppressed.
Setting mode: Enter by long pressing the up and down keys to configure key parameters:
Alarm settings: Each channel can define 2 levels of alarm thresholds, hysteresis, delay time, and lock/unlock modes.
4-20mA output: Map 0-100% range to 4-20mA, supporting special state outputs such as fault (1mA) and suppression (2mA).
Network configuration: Supports static IP or DHCP, default IP is 169.254.60.47, subnet mask is 255.255.255.0.
(2) Calibration and maintenance functions
Calibration process:
Zero point calibration: It needs to be performed in an environment without target gas, and confirmed after the reading stabilizes. It is suitable for sensors other than O ₂.
Range calibration: Introduce a known concentration standard gas and confirm after the reading stabilizes. The O ₂ sensor is calibrated with 20.9% air as the calibration point.
Flow calibration: Adjust the pump speed to stabilize the flow at 600cc/min, and recalibrate after replacing the pump or filter.
Bump Test: A functional test to verify the responsiveness of sensors. The steps are: enter test mode → enable collision testing → introduce test gas → confirm alarm triggering → reset ventilation. It is recommended to use target gas or cross sensitive gas (such as O3 can be replaced by NO ₂) every 6 months.
(3) Network and Remote Management
The device is equipped with a built-in web server that supports access through browsers such as IE and Chrome. Its features include:
Status monitoring: Real time display of concentration, flow rate, temperature and other data for each channel.
Configuration management: remotely modify alarm thresholds, network parameters, and other settings.
Log query: View event records such as alarms, faults, calibration, etc., and support graphical display.
Certificate Management: When enabling HTTPS secure access, device certificates need to be installed (detailed steps apply to Chrome and IE browsers).
Maintenance strategy and fault diagnosis
(1) Preventive Maintenance Plan
Component maintenance project frequency note
External filter replacement takes 3-6 months. Corrosive environments require a shortened cycle
Internal filter replacement 2-year model 780248
Pump module replacement 2-year model MM-PM
Leakage inspection, pressure testing for 6 months, sealing of inlet/outlet after component replacement, verification of flow failure alarm
Adjust the pump speed through flow calibration and replace the pump or filter to ensure a stable flow rate of 600cc/min
(2) Common fault handling
Flow failure (F41): manifested as a flow rate<70% of the nominal value for 24 seconds. Troubleshooting steps: check if the filter is clogged → confirm that the pipeline connection is tight and leak free → check the pump operating status → replace the pump module.
Sensor malfunction (F50): REFLEX ® Test failed, possible reasons: sensor aging → exposure to interfering gases → physical damage, the solution is to replace the sensor box.
Communication failure: Web access failed, check network connection → verify IP configuration → restart device → update firmware.
Technical parameters
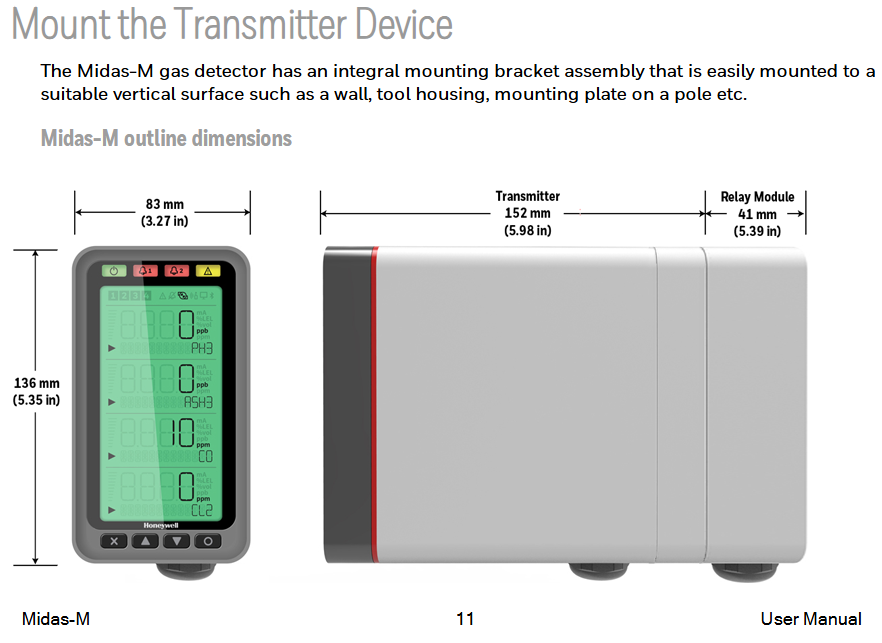
Dimensions: transmitter 136mm × 83mm × 152mm, relay module 137mm × 84mm × 41mm
Weight: transmitter 1.3kg, sensor box 0.17-0.22kg
Working environment: temperature 0-40 ℃, humidity 20-90% RH (non condensing), pressure 700-1300hPa
Certification: CE (EN 50270), ETL (UL 61010-1), PoE (IEEE 802.3af)
Application scenarios and selection suggestions
Midas-M is suitable for scenarios that require simultaneous monitoring of multiple gases, such as:
Semiconductor cleanroom: detecting special gases such as SiH ₄ and HCl
Chemical storage tank area: monitoring toxic gases such as NH3 and H2S
Laboratory ventilation system: monitoring O ₂ content and VOC leakage
Pharmaceutical production workshop: detecting process gases such as CO and Cl ₂
- OMRON
- ABB
- General Electric
- EMERSON
- Honeywell
- HIMA
- ALSTOM
- Rolls-Royce
- MOTOROLA
- Rockwell
- Siemens
- Woodward
- YOKOGAWA
- FOXBORO
- KOLLMORGEN
- MOOG
- KB
- YAMAHA
- BENDER
- TEKTRONIX
- Westinghouse
- AMAT
- AB
- XYCOM
- Yaskawa
- B&R
- Schneider
- KONGSBERG
- NI
- WATLOW
- ProSoft
- SEW
- ADVANCED
- Reliance
- TRICONEX
- METSO
- MAN
- Advantest
- STUDER
- DANAHER MOTION
- Bently
- Galil
- EATON
- MOLEX
- DEIF
- B&W
- ZYGO
- Aerotech
- DANFOSS
- Beijer
- Moxa
- Rexroth
- Johnson
- WAGO
- TOSHIBA
- BMCM
- SMC
- HITACHI
- HIRSCHMANN
- Application field
- XP POWER
- CTI
- TRICON
- STOBER
- Thinklogical
- Horner Automation
- Meggitt
- Fanuc
- Baldor
- SHINKAWA
- Other Brands
- UniOP
- KUKA
- Iba
- Beckhoff
- ADLINK
-
 SIGMATEK ICA111 Module
 -
 SIGMATEK MDD 121-1 Drive Axis Module
 -
 SIGMATEK M5V121 12-300-121 Krauss Maffei M5 Display Unit
 -
SIGMATEK CTMS 020 CD Technology Module 12-250-011
-
 SIGMATEK PCT122 Touch Panel
 -
 Stöger MCS4100 SIGMATEK Control Module
 -
 SIGMATEK Krauss Maffei M5 Keyboard Unit M5K902 12-310-902
 -
 SIGMATEK SD310-2 Servo Drive Module
 -
 SIGMATEK CM5V020 CD Wiring Circuit Module
 -
SIGMATEK ENGEL Robot Drive M3 02220-8748
-
 Sigmatek CFF011 Drive Module
 -
 Sigmatek DCP642 DIAS Central Unit
 -
 Sigmatek SDM081 S-DIAS Safety Module
 -
 Sigmatek C-IPC 01-450-024 Industrial PC
 -
Sigmatek Kompakt NC4 Control Module
-
 Sigmatek VI021 VARAN Interface Module
 -
 Sigmatek Engel RD-M6-2 Robot Drive
 -
Sigmatek CNC031 Positioning Module
-
Sigmatek TO161 Digital Output Module
-
Sigmatek CCL912 CPU PSU Module
-
Sigmatek ETV0821 Operator Terminal
-
 SIGMATEK ET 261 Operator Terminal
 -
 SIGMATEK CP731-K Control Module 20-004-731-K
 -
 SIGMATEK ETEK Motherboard 12-250-021-K CM5V020
 -
 Sigmatek DEZ 181 DIAS Input Output Module
 -
 Sigmatek IPC111-D Industrial PC
 -
 SIGMATEK AKM54L-ANC2GBB0 Servomotor with Gearhead
 -
SIGMATEK CTMS020 CM5V020 CNC Controller
-
 DEMAG ERGOTECH 061 381 66 Sigmatek Control Unit
 -
 Sigmatek DAI 883 Module
 -
 Sigmatek ETV1521 Control Panel Installation Terminal
 -
 Sigmatek 9802.289.01 Board Control TA71 Display
 -
 Wittmann Sigmatek EU-252 proDrive W4 Servo Drive
 -
 Sigmatek CDM166 C-DIAS Module
 -
Sigmatek DCP082 DIAS Central Unit
-
 Sigmatek CCP081 C-DIAS Processor Module
 -
Sigmatek MD111-1 Drive Module
-
Sigmatek ETV0821 Operator Terminal
-
 Sigmatek ISE021 Interface Module
 -
 Sigmatek DCC080L Slide Control Module
 -
 Sigmatek AI075 Analog Input Module
 -
SIGMATEK TO161 20-007-161 Module
-
 SIGMATEK CIC011 Module
 -
 SIGMATEK AE0000318502 Hand Terminal Pendant
 -
 Sigmatek Krauss Maffei PC323-K Control Unit
 -
Sigmatek Krauss Maffei PC321-K Control Cabinet PC
-
SIGMATEK CIV521 Control Module
-
SIGMATEK C-IPC-171 Industrial PC
-
 SIGMATEK MDP101-L DIAS Drive Network Module
 -
 Sigmatek Krauss Maffei PC323-K Control Cabinet PC
 -
 SIGMATEK CRCH081 C-SLIDES Temperature Module
 -
 Sigmatek PC301-E6 Industrial PC SSD
 -
 Sigmatek SDI101 S-SLIDES Safety Input Module
 -
 Sigmatek CIV521 VARAN Control Module
 -
 Kollmorgen Sigmatek AKM42G-ANCNGBB0 Servo Motor
 -
 Sigmatek PC 521 Process Controller
 -
 Sigmatek Geode LX800 12-780-012 Industrial PC
 -
 Sigmatek STO081 S-DIAS Safety Output Module
 -
 Sigmatek SCP111 S-DIAS Safety CPU Module
 -
 Sigmatek CDI161 Industrial I O Module
 -
Sigmatek Wiring Board V2 DIAS 05-250-023
-
Sigmatek CP102 20-004-102 S-DIAS CPU Module
-
SIGMATEK SLIDES CNC 115 Module
-
 SIGMATEK DCC080 05-700-080-2 Control Module
 -
SIGMATEK MDD 121 Drive Axis Module
-
 SIGMATEK CIO011 C-DIAS Multi I/O Module
 -
SIGMATEK CIV512 Servo Drive
-
 SIGMATEK CM5V020 12-250-021-K Wiring Module
 -
 SIGMATEK CIO011 12-013-011 Multi I/O Module
 -
SIGMATEK 01-450-031 C-IPC Industrial Computer
-
SIGMATEK AKM24D-ANBNGBB0 Servo Motor
-
 DEMAG NC4 LP0001289.03 Control Module
 -
 Sigmatek ETEK Industrial PC C-IPC with Option Module
 -
Sigmatek AO081 20-010-081 Analog Output Module
-
Sigmatek CNC 031 Positioning Module
-
Sigmatek CP731-K 20-004-731-K CPU Module
-
Sigmatek MDD 3320-JR-A Drive Module
-
Sigmatek PM Servo Motor AKM52K-ANC2GBB0
-
Sigmatek MDP 101 09-403-101 Power Module
-
Sigmatek S-SLIDES AO046 Analog Output Module
-
Sigmatek ICA111 20-102-111 Interface Module
-
 SIGMATEK DCP646 Module 05-004-646
 -
SIGMATEK SDI101 Digital Input Module 20-891-101
-
 SIGMATEK S3330-2 Directional Gyro Altitude Instrument
 -
SIGMATEK MDP102-1 Controller
-
SIGMATEK SMT 01-230-321 Touch Screen
-
SIGMATEK Krauss Maffei PC301-K 01-310-301-K Industrial PC with 8GB SSD
-
 SIGMATEK ETT731 01-230-731 Built-in Touch Terminal
 -
SIGMATEK CIV521 Control Module
-
 SIGMATEK DME 128 Module 05-005-128
 -
 SIGMATEK SCP111-S 20-890-111-S S-DIAS Safety CPU Module
 -
Sigmatek SCP111 S-DIAS Safety CPU
-
Sigmatek CRIF081 Interface Module
-
Sigmatek CP112-1 S-DIAS CPU Module
-
Sigmatek MDD121-L DIAS Drive Axis Module
-
 Sigmatek C-IPC 01-450-024 Industrial PC
 -
Sigmatek SDD215-23 SLIDES Drive
-
 Sigmatek DPS001 DIAS System Components
 -
Sigma-Tek 4000B-30 Directional Gyro
-
 Sigmatek SDD340-46 SDD Series Drive
 -
 Sigmatek CEZ221 Euromap67 I O Module
 -
 SIGMATEK VI021 Interface Module
 -
SIGMATEK CP731-K Control Module
-
SIGMATEK Krauss Maffei PC321-K Industrial PC
-
SIGMATEK ET322 Operator Terminal
-
SIGMATEK CP102 Control Module 24VDC
-
SIGMATEK SRO021 Relay Output Module
-
SIGMATEK DCP640 DIAS Central Unit
-
 SIGMATEK MDD 121 Drive Axis Module
 -
SIGMATEK AI043 Analog Input Module
-
 ENOTEC OXITEC 5000 SME-53310000 Oxygen Analyzer
 -
SIGMATEK Krauss Maffei PC301-K 01-310-301-K Industrial PC
-
 SIGMATEK SDD310-23 VARAN Servo Drive
 -
 SIGMATEK CDM 163 and CIC 011 C-DIAS Input Modules
 -
SIGMATEK MDP 101-1 Power Module
-
SIGMATEK CM5V020 Wiring Circuit with CTMS020
-
SIGMATEK CCP521 C-DIAS Processor Module
-
 SIGMATEK MDP 101-K Power Module
 -
SIGMATEK ETEK C-IPC 733MHz VIA Eden 7000
-
 SIGMATEK DCP 643 DIAS PLC CPU Module
 -
SIGMATEK TAE121 12-200-121 Operator Terminal
-
Sigmatek TMS012-T Injection Moulding Technology Module
-
Sigmatek MDD 121-1 Controller
-
Sigmatek CDM167 Module
-
Sigmatek DCP082 DIAS Central Unit
-
 Sigmatek ETT731 Built-In Terminal Touch
 -
Sigmatek CCP521 C-DIAS Processor Module
-
Sigmatek Krauss Maffei PC301-K Control Cabinet PC


