Watlow PM3 LEGACY ™ PID controller

Operation and Configuration
(1) Menu Structure and Navigation
Menu Type Entry Method Core Functions
Home: Power on default or press and hold the infinite key for 2 seconds to view/modify commonly used parameters such as settings, control modes, and self-tuning startup
Press and hold the up and down arrow keys for 3 seconds in the Operations menu to monitor process values, adjust PID parameters, alarm thresholds, and view operating status
Press and hold the up and down arrow keys for 6 seconds in the Setup menu to configure basic parameters such as input type, output function, communication parameters, alarm logic, etc
Program menu (Profiling): Long press the forward button for 3 seconds to edit the slope/constant temperature program, step parameters, and number of cycles
Factory Menu: Long press the forward button and infinite button for 6 seconds to calibrate, password lock, restore factory settings, and customize the homepage
(2) Core configuration steps
Input type configuration: Select the sensor type (such as thermocouple J type, 100 Ω RTD) from the "Analog Input" menu in the settings, and match the wiring method (such as RTD 2/3 wire system).
PID self-tuning start: Set "Autotune" to "YES" in the operation menu, and the controller will automatically enter the tuning mode. The homepage will display the prompt "tUN1", and the optimal PID parameters will be automatically saved after completion.
Slope/constant temperature program configuration: Create steps in the program menu (such as heating rate of 5 ℃/min, constant temperature of 30 minutes), support jump loop (up to 4 nested layers), and can be started/stopped through digital input or panel operation.
Alarm configuration: Select the alarm type (process/deviation), threshold, and hysteresis in the settings menu, configure the lockout/mute function, and display normal parameters and alarm information alternately on the homepage when the alarm is triggered (such as "AL. h1" indicating high alarm 1).
(3) Keys and Display
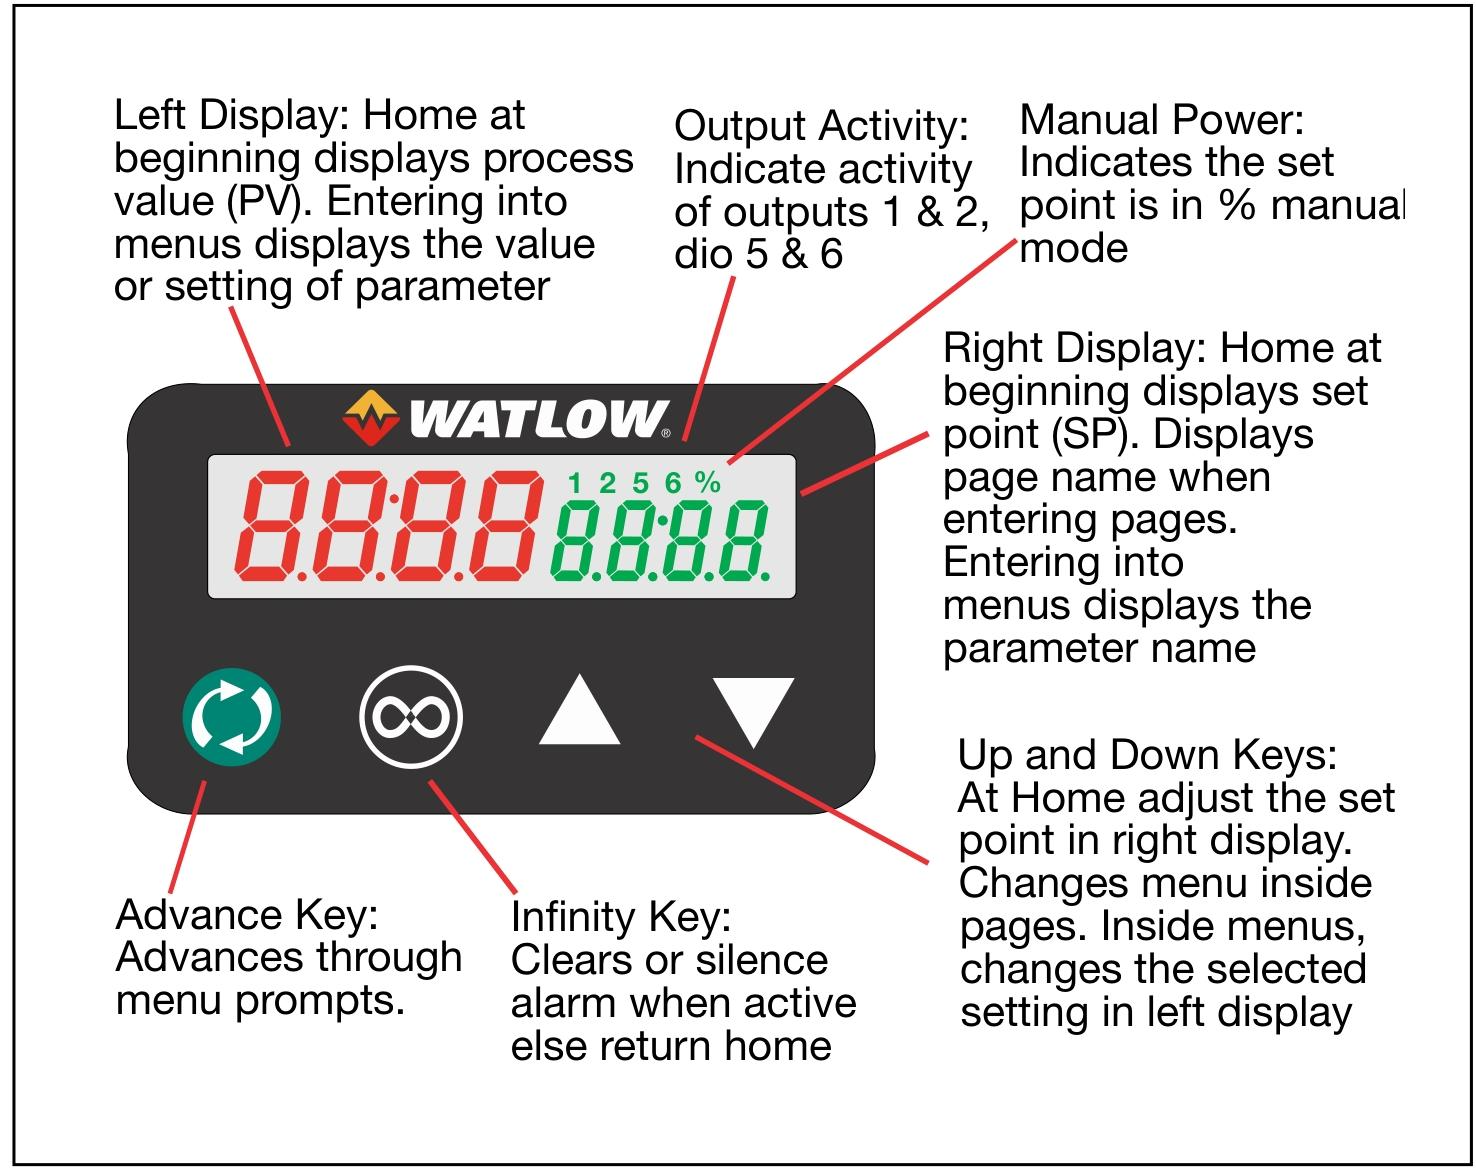
Key functions: forward key (switch parameters), infinite key (return to home page/clear alarm), up and down arrow keys (adjust values), support parameter self input (automatic confirmation after 3 seconds without operation).
Display screen: The upper screen displays the process value (PV), the lower screen displays the set value (SP)/parameter name, flashes the alarm code when an alarm is triggered, and displays "----" when a sensor fails.
Troubleshooting and Maintenance
(1) Common fault handling
Possible causes and steps for troubleshooting
No display power not connected, fuse blown, wiring error. Check the power voltage, replace the fuse, and verify the power wiring (terminals 98/99)
Sensor malfunction (Er. i1): Sensor open/short circuit, reverse polarity, type mismatch. Check the wiring and integrity of the sensor, and confirm that the sensor type in the settings menu is consistent with the actual one
No output action output function configuration error, load fault, control mode is "Off". Check the output function in the settings menu (such as heating/cooling), check the load and fuse, and switch the control mode to "Auto"
Temperature overshoot/large fluctuation. Improper PID parameters, incomplete self-tuning. Restart self-tuning, or manually adjust the proportional band (increase to reduce fluctuations) and derivative (increase to suppress overshoot)
Communication failure: baud rate/address mismatch, wiring error. Check the communication parameters (Modbus address, baud rate) in the settings menu and verify the EIA-485 wiring (T+/T -/common terminal)
(2) Maintenance points
Regular calibration: It is recommended to calibrate the input/output accuracy once a year using precision millivolt sources, resistance boxes, and other equipment. Offset and slope adjustments can be made through the "Calibration" menu in the factory.
Terminal maintenance: Check the tightness of the wiring (torque 0.56 Nm) to avoid poor contact caused by vibration; The lifespan of mechanical relays is about 100000 cycles, and it is recommended to use solid-state relays for high-frequency switching scenarios.
Software update: The EZ-ZONE Configurator software can be used to upgrade firmware, backup/restore configuration parameters, and avoid parameter loss caused by misoperation.

- ABB
- General Electric
- EMERSON
- Honeywell
- HIMA
- ALSTOM
- Rolls-Royce
- MOTOROLA
- Rockwell
- Siemens
- Woodward
- YOKOGAWA
- FOXBORO
- KOLLMORGEN
- MOOG
- KB
- YAMAHA
- BENDER
- TEKTRONIX
- Westinghouse
- AMAT
- AB
- XYCOM
- Yaskawa
- B&R
- Schneider
- Kongsberg
- NI
- WATLOW
- ProSoft
- SEW
- ADVANCED
- Reliance
- TRICONEX
- METSO
- MAN
- Advantest
- STUDER
- KONGSBERG
- DANAHER MOTION
- Bently
- Galil
- EATON
- MOLEX
- DEIF
- B&W
- ZYGO
- Aerotech
- DANFOSS
- Beijer
- Moxa
- Rexroth
- Johnson
- WAGO
- TOSHIBA
- BMCM
- SMC
- HITACHI
- HIRSCHMANN
- Application field
- XP POWER
- CTI
- TRICON
- STOBER
- Thinklogical
- Horner Automation
- Meggitt
- Fanuc
- Baldor
- SHINKAWA
- Other Brands


