
Rockwell Automation SmartGuard 600 Controller
Controller positioning: Programmable Electronic Safety System (PES), supporting 16 digital inputs, 8 digital outputs, 4 test pulse outputs, 1752-L24BBBE with additional support for EtherNet/IP communication;
Safety certification: meets high safety level requirements - IEC 61508 SIL 3, ISO 13849-1 PL (e), EN 954-1 CAT 4, suitable for hazardous environments (North American Class I Div 2 Groups A-D).
Rockwell Automation SmartGuard 600 Controller
Basic and Controller Core Positioning
1. Basic information
Document purpose: To guide the installation, parameter configuration, wiring, and status interpretation of safety controllers, suitable for deployment in industrial safety scenarios such as emergency stop and safety door monitoring;
Controller positioning: Programmable Electronic Safety System (PES), supporting 16 digital inputs, 8 digital outputs, 4 test pulse outputs, 1752-L24BBBE with additional support for EtherNet/IP communication;
Safety certification: meets high safety level requirements - IEC 61508 SIL 3, ISO 13849-1 PL (e), EN 954-1 CAT 4, suitable for hazardous environments (North American Class I Div 2 Groups A-D).
2. Comparison of Model Differences
Model Core Differences Communication Interface Applicable Scenarios
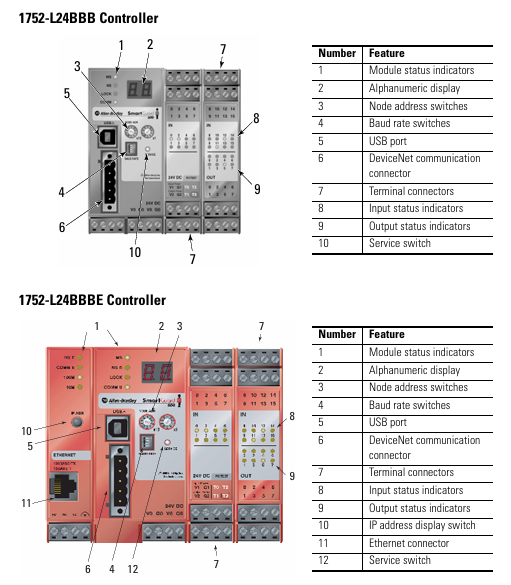
1752-L24BBB Basic Security Control USB+DeviceNet Security Scenarios without Ethernet Requirements (such as Single Device Security Monitoring)
1752-L24BBBE adds Ethernet functionality USB+DeviceNet+EtherNet/IP for distributed security systems that require remote Ethernet monitoring (such as production line level security linkage)
Key configurations before installation (mandatory steps)
1. Safety prerequisite requirements
Precautions for hazardous environments:
It is strictly prohibited to plug and unplug wires with electricity (which may cause arcing and explosion). Power must be cut off or the environment must be confirmed to be in a non hazardous area first;
Prohibition of replacing non original components (which may damage Class I Div 2 compatibility);
Battery replacement is only allowed in non hazardous areas.
Electrostatic protection: Before operation, touch a grounded object to discharge electricity, wear an anti-static wristband, prohibit touching circuit board pins, and store in anti-static packaging when idle.
2. Core parameter configuration (power-off operation)
(1) DeviceNet node address setting
Configuration method: Set through the two rotary switches (ten position+one position) on the front of the controller, with a range of 00~63 (default 63);
Software configuration compatibility: If setting the address through RSNetWorx for DeviceNet software, the rotary switch needs to be turned to 64~99;
Key reminder: Avoid duplicate node addresses, otherwise communication errors may be triggered.
(2) DeviceNet communication rate setting
Default speed: 125 kbps, supports three speeds of 125/250/500 kbps, configured through a 4-digit DIP switch:
DIP switch (1-4) communication rate description
OFF-OFF-OFF-OFF 125 kbps default value
ON-OFF-OFF-OFF 250 kbps medium range networking
OFF-ON-OFF-OFF 500 kbps short distance high throughput scenario
The software configuration of ON-ON-OFF-OFF needs to be set through RSNetWorx
Speed and distance matching: The higher the speed, the shorter the supported cable length (such as 75m for flat cables and 100m for thick cables at 500 kbps), which needs to be selected according to the network size.
(3) EtherNet/IP IP Address Setting (1752-L24BBBE only)
Default mode: BOOTP enabled, IP needs to be allocated through BOOTP server (recommended Rockwell free tool, download link: http://www.ab.com/networks/bootp.html );
Configuration steps:
Run the BOOTP tool and double-click on the device MAC address;
Enter the target IP in the pop-up window and click confirm;
The IP address of the controller can be viewed on the display screen through the front "IP Address Display Switch" (long press for more than 1 second), and error code "n4" indicates abnormal Ethernet configuration.
Controller installation and wiring specifications
1. Physical installation (DIN rail fixation)
Installation requirements:
Only supports EN 50022 standard DIN rails (35x7.5mm or 35x15mm), horizontal installation (vertical installation may affect heat dissipation);
Heat dissipation gap: at least 50mm (2.0in) up and down, and at least 5mm (0.20in) left and right, avoiding installation above heating equipment;
Installation steps:
Hang the top card slot of the controller on the DIN rail;
Press the bottom of the controller and tighten the bottom buckle (1752-L24BBB single buckle, 1752-L24BBBE double buckle);
Install end plates at both ends of the guide rail to ensure stability.
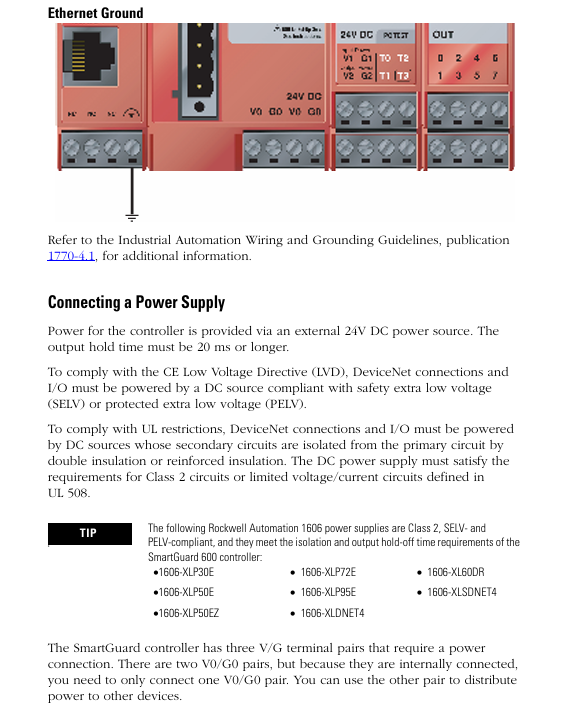
Grounding requirements: Chassis grounding is achieved through DIN rails, which require the use of galvanized yellow chromium steel rails (aluminum/plastic rails may cause poor grounding), and the rails should be fixed every 200mm (7.8in).
2. Power wiring (safety power supply is the core)
Power specifications:
External power supply: 24V DC (allowable range 20.4~26.4V DC), output holding time ≥ 20ms;
Safety compliance: Must meet SELV/PELV (CE LVD), Class 2 (UL 508), and recommend Rockwell 1606 series power supplies (such as 1606-XLP30E, 1606-XL60DR);
Terminal wiring:
The controller includes 3 sets of V/G terminals (V0/G0: internal logic power supply; V1/G1: Input and test output power supply; V2/G2: Safe output power supply);
The V0/G0 two sets of terminals are internally connected, only one set needs to be connected, and the other set can be used to distribute power to other devices.
3. I/O and communication wiring (according to scene specifications)
(1) Input wiring (compatible with two types of devices)
Mechanical contact equipment (such as emergency stop button): It is necessary to simultaneously connect the "safety input terminal (INx)" and the "test output terminal (Tx)" to achieve CAT 4 level, with a wiring length of ≤ 30m;
PNP semiconductor devices (such as safety light curtains): only connected to the safety input terminal (INx), no need to test the output, typical current is 4.5mA.
(2) Output wiring (distinguishing between safety and test outputs)
Safe output (OUT0~OUT7): Maximum load 0.5A, wiring beyond the rated value is strictly prohibited, and it is not allowed to be used as a test output;
Test output (T0~T3): Only used for input circuit testing, T3 additionally supports wire breakage/bulb burnout detection and cannot be connected to safety loads.
(3) Communication wiring
DeviceNet wiring: 5-wire connector, corresponding by color (red V+, white CAN H, blue CAN L, black V -, empty Drain), screw torque 0.25~0.3N · m;
USB wiring: only for temporary configuration (non permanent connection), cable length ≤ 3m, USB-A to USB-B male to male cable is required;
EtherNet/IP wiring (only 1752-L24BBBE): RJ45 interface, CAT5e/CAT5 cable, length ≤ 100m, pins 1 (TD+), 2 (TD -), 3 (RD+), 6 (RD -).
Interpretation of Status Indicators and Troubleshooting
1. Meaning of core indicator lights (sorted by classification)
(1) Module status (MS) indicator light
Suggestions for handling the meaning of indicator light status
Turn off the power supply and check the power wiring. Restart the power supply
Green constantly on, normal operation (Run mode), no operation required
Green flashing standby mode (Idle) to confirm if the configuration is complete
Red flashing can restore faults (such as configuration errors). Check the switch configuration and reset the configuration data
The red light is constantly on and cannot be restored due to a fault (such as hardware damage). Check the wiring, eliminate interference, and contact after-sales service
Red green alternating flashing self-test/configuration download waiting for completion. If it continues to flash, it needs to be reconfigured
(2) Network status indicator light
DeviceNet (NS D): Green constant light=online and connected, red constant light=MAC address conflict/bus disconnection, address and cable need to be checked;
EtherNet/IP (NS E, BE only): Green constant light indicates Ethernet connection, red constant light indicates IP address conflict, IP needs to be reassigned.
(3) I/O status indicator light
Yellow constant light=signal normal, red constant light/flashing=circuit fault (such as disconnection, short circuit, overcurrent), wiring and load need to be checked.
2. Interpretation of Display Screen Information
Normal state: Display node address (00~63), standalone mode displays "nd";
Fault status: alternately display error codes and node addresses (such as F0=MAC conflict, F1=bus disconnection);
Special function: Press the "Service Switch" to display the security configuration signature (verifying that the program has not been tampered with), press the "IP Display Switch" to display the Ethernet IP.
Key specifications and supporting resources
1. Core technical parameters
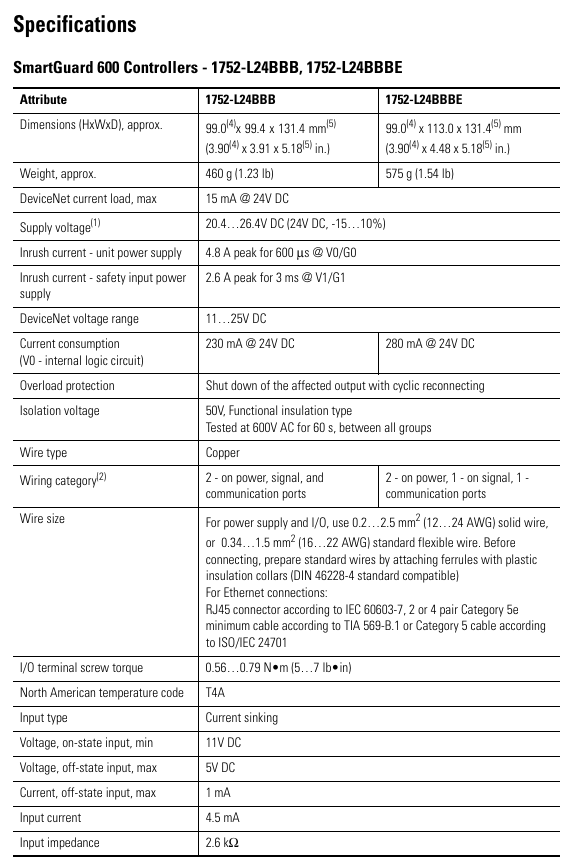
Specification item 1752-L24BBB 1752-L24BBBE
Size (HxWxD) 99x99.4x131.4mm 99x113x131.4mm
Weight 460g 575g
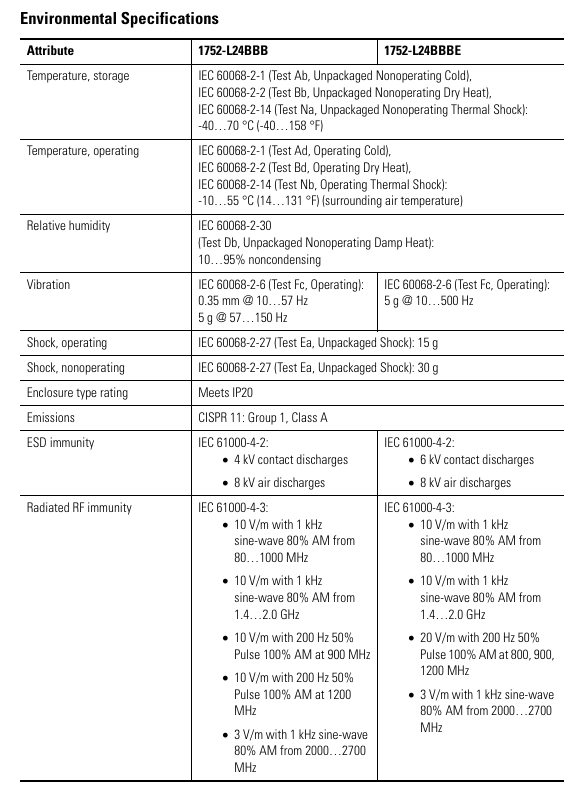
Working temperature -10~55 ℃ (14~131 ℉) same as left
Protection level IP20, same as left
Input current 4.5mA (per channel) same as left
Output current 0.5A (per channel, maximum) same as left
Ethernet speed -10/100Mbps (full/half duplex)
2. Supporting resources
Key manuals:
SmartGuard 600 User Manual (1752-UM001): Controller Configuration and Troubleshooting;
SmartGuard 600 Safety Reference Manual (1752-RM001): Safety Concepts and PFD/PFH Calculations;
tool
Configuration software: RSNetWorx for DeviceNet (DeviceNet configuration), BOOTP tool (IP configuration);
Core safety operation reminder
Prohibited behavior:
Test outputs cannot be used as safety outputs, and safety signals cannot be transmitted using DeviceNet standard I/O data;
It is prohibited to disassemble/modify the controller (which may damage safety functions);
Do not allow the 24V DC line to accidentally touch the output terminal to avoid starting the load.
Wiring specifications:
Input/output cables should be arranged separately from high-voltage/high current cables to avoid interference;
Stranded wires require the installation of DIN 46228-4 standard insulated Ferrules (non-standard Ferrules may not match the terminals).
- OMRON
- ABB
- General Electric
- EMERSON
- Honeywell
- HIMA
- ALSTOM
- Rolls-Royce
- MOTOROLA
- Rockwell
- Siemens
- Woodward
- YOKOGAWA
- FOXBORO
- KOLLMORGEN
- MOOG
- KB
- YAMAHA
- BENDER
- TEKTRONIX
- Westinghouse
- AMAT
- AB
- XYCOM
- Yaskawa
- B&R
- Schneider
- KONGSBERG
- NI
- WATLOW
- ProSoft
- SEW
- ADVANCED
- Reliance
- TRICONEX
- METSO
- MAN
- Advantest
- STUDER
- DANAHER MOTION
- Bently
- Galil
- EATON
- MOLEX
- DEIF
- B&W
- ZYGO
- Aerotech
- DANFOSS
- Beijer
- Moxa
- Rexroth
- Johnson
- WAGO
- TOSHIBA
- BMCM
- SMC
- HITACHI
- HIRSCHMANN
- Application field
- XP POWER
- CTI
- TRICON
- STOBER
- Thinklogical
- Horner Automation
- Meggitt
- Fanuc
- Baldor
- SHINKAWA
- Other Brands
- UniOP
- KUKA
- Iba
- Beckhoff
-
 OMRON CJ1W-MD261 Mixed I/O Module
 -
 Omron NJ301-1100 PLC CPU eCat EIP Specs
 -
 Omron F500-C15-ETN Vision System PLC Module
 -
 Modicon M241-24IO TM/T2UK PLC with Ethernet
 -
 SIXNET YS-800-001 RTU PLC Module
 -
 BEMAC UST-202-D Interface Board 1307D V08B2
 -
 Yaskawa JANCD-MMOIC-02 Drive Circuit Board
 -
 ABB 3BSE005028R1 SDCS-COM-1 Comm Board
 -
 Omron 3G3MX2-A4110 A4150 Inverter Drives Specs
 -
 KEYENCE CA-E100 PLC Module
 -
 GE IC693ALG223-GB Analog Input Module Specs
 -
 ABB BAILEY IMMFP01 Multi Function Processor System
 -
 SIEMENS 6FC5372 0AA00 0AA1 NCU 7202 Controller
 -
Modicon TM241CE4 40I O Transistor Programmable Controller
-
 SIEMENS 6ES7 315 2EH13 0AB0 CPU 3152 PN DP
 -
 NORIS A1 91 PCB Card Rack Module System
 -
 SIEMENS 6ES7 313 5BE01 0AB0 Compact CPU
 -
 SCHNEIDER ELECTRIC S144B MICROLOGIC 60A Trip Unit
 -
 CNI PLC269 v3 Control Module Board Rev H
 -
ABB BAILEY IIMCP02 Processor Module
-
 OMRON NT20S ST121 EV3 Operator Interface Terminal
 -
 OMRON NS-CA001 Video Input Unit
 -
 GE Fanuc IC695CHS012 RX3i Backplane
 -
 Allen Bradley 2711E-K14C6 PanelView 1400e Terminal
 -
 Siemens Sinamics CCB 10000432.71 Power Cell
 -
 Siemens 6SL3210-1SE21-8UA0 Power Module PM340
 -
 Yaskawa CIMR-F7A20P4 AC Drive
 -
 Beckhoff EP1918-0002 EtherCAT Box I/O Module
 -
 OMRON CQM1-TC001 Temperature Control Module
 -
 GE Fanuc SGHA36AT0400 Industrial Contactor
 -
 OMRON NJ501-1500 PLC Machine Automation Controller
 -
 Mitsubishi MAZAK QX084 Power Supply MELDAS 500 CNC
 -
 B&R 0AC808.9 PLC Automation Module
 -
 OMRON CP1H-XA40DT1-D PLC Module
 -
 G&W Electric PLC15 5111 011 15kV Capnut Assembly
 -
 GE DS200SLCCG3AGH PCB Circuit Board
 -
 Siemens SINUMERIK 6FC3981-4FD PLC Extension
 -
 OMRON F300-DC I/O Image Processing Unit
 -
 FANUC A06B-0314-B002 AC Servo Motor
 -
 GC-S84 Programmable Controller Logic Module
 -
 PASABAN MONTELEC MTC3001-DC Drive Control PLC
 -
 Allen Bradley 100E460EJ11 Auxiliary Contactor
 -
 Bosch Rexroth 1070075337-101 Card Parameters
 -
 HMS Anybus AB7646-F Gateway Specifications
 -
 Bosch 062633-303401 CNC Servo PLC Card
 -
 TI 500-5023 Series PLC Power Supply
 -
 Siemens C98043-A7002-L1-12 Circuit Board
 -
 Omron E5CC-RX3A5M-000 Controller
 -
 CN-8032-L Profinet Network Adapter Module
 -
 Siemens 3TK2804-0BB4 Safety Relay Details
 -
 Toledo TTLM-2-1M I/O Load Module
 -
 NORIS A1-91 PLC Rack Board Specifications
 -
 Mitsubishi A3ACPUR21 MELSEC PLC CPU Module
 -
 Beckhoff EP7041‑3002 EtherCAT Box Digital Input Module
 -
 REER EOS2E 1053 EOS2R 1053 Safety Light Curtain
 -
 Mitsubishi Q80BD-J71BR11 MELSECNET/H Interface Board
 -
 Omron 3G3IV-B4220-EV2 VFD 400V 22kW
 -
 Allen-Bradley 96844671 1785-LT3 PLC-5/12 Processor Module
 -
 Pasaban MTC3001-DC Drive Control PLC Module
 -
 Omron CJ1M-CPU11 V4.0 PLC CPU Module
 -
 ABB CM579-PNIO B3 Communication Module
 -
 B&R X20 AI 4221 Analog Module
 -
 Siemens 6SY7000-0AC80 PLC Module
 -
 GE 531X300CCHAFM5 Control Card
 -
 AB 810-A15C Inverse Time Relay
 -
 WITTENSTEIN LP120X-MF2-20 Planetary Gear
 -
 Mitsubishi Kakoki E-01B-4130 PLC I/O Modules
 -
 ABB DSQC643 Safety Control Board
 -
 Siemens G26004-A2105-P100-2 PCB
 -
 OMRON F350-C10E Image Processing Unit
 -
 FUJI UG430H-TS1 HMI Touch Panel
 -
 Westronics CB100188-01 Rev F Board
 -
 Siemens 7MH4900-3AA01 Weighing Module
 -
 Gilbert & Nash Tracker 2000 Control Cabinet
 -
 OMRON CJ1M-CPU22 CPU Unit
 -
 OMRON F3SJ-E0625P25 Light Curtain
 -
 Siemens 3VA2340-5HL32-0AA0 Breaker
 -
 Mitsubishi Melsec A61P A2NCPU PLC System
 -
 Aeco 158-02 DSP-02 PCB Card
 -
 FUJI NP1PS-32R CPU Module
 -
 Siemens 6SL3040-1MA01-0AA0 Control Unit CU320-2 PN
 -
 Fuji RYE.75D PLC Driver AC Drive
 -
 Electro Cam PS-6144-24-P16M09-L-MB Programmable Limit Switch
 -
 Siemens C98043-A7001-L2-4 CUD1 Control Board
 -
 Pilz 312070 PSSu H PLC1 FS SN SD Safety Module
 -
 Siemens Plc42q4200atsn Circuit Breaker Fuse Box
 -
 GE Fanuc IC695ALG708-AB Analog Output Module Rx3i
 -
 Siemens 6SE7036-5GK84-1JC2 IGD8 Gate Driver Board
 -
 Charmilles 813078 852029 PLC PCB Robocut 2 CNC EDM
 -
 Siemens 6SL3130-1TE24-0AA0 Smart Line Module
 -
 Pasaban MTC3001-DC Drive Control PLC Module
 -
 Modicon AS-P890-000 Remote I/O Processor Power Supply
 -
 Siemens PXC100-PE96.A PXC Modular Controller
 -
 TOYO KEIKI P:CARD5 AVH-R YH-212 Industrial Control Card
 -
 Omron NS5-SQ00B-V2 HMI Touch Screen 5.7 Inch
 -
 Sciemetric SigPOD 1202-0H00 Data Acquisition Module
 -
 GE Fanuc IC693CPU331W CPU Module Series 90-30
 -
 Square D 8903SVO11V02 Lighting Contactor 200A
 -
 Beckhoff C9900-P224 Power Supply Unit 24V 10A
 -
 HSD PE323 PLC I/O Module
 -
 Pillar AB6406-11A Power Control Board
 -
 GE Fanuc IC693CPU331W CPU Module
 -
 FANUC A61L-0001-0072 LCD Monitor
 -
 AB 20D-D-011-A-0-EYNANANE Drive
 -
 AB 1785-L20B PLC-5/20 Processor
 -
 Siemens SIREC P/PA Recorder 7ND3021
 -
 Siemens D2E160-AH01-17 Fan Blower
 -
 Eaton 101073735-001 LEG Module
 -
 AB 1404-M605B-ENT Powermonitor 3000
 -
 OMRON CJ1W-MAD42 Analog I/O
 -
 Omron CJ1M-CPU13 V3.0 PLC CPU Module
 -
 Pe323 HSD PLC Module Industrial Controller
 -
 Pasaban MTC3001-DC Drive Control PLC Module
 -
 Mitsubishi R02CPU PLC Module MELSEC iQ-R
 -
 B&R X20DC2395 Digital Output Module 32 Ch
 -
 Hoffman A30N24ALP Enclosure with PLC Addons
 -
 Rieter PLC with RMC 24/5V 10 RMC188-1 RMC RIO-1
 -
 Allen-Bradley 1790D-TN4V0 CompactBlock LDX Base Block 4 AI
 -
 National Instruments NI 9242 Analog Input Module 4-Channel
 -
 ABB AO820 3BSE008546R1 Analog Output Module
 -
 Moeller XVC-101-C192K-K82 PLC
 -
 AB 440F-C4000P MatGuard Controller
 -
 AB 1692-ZRCLSS Protection Module
 -
 Schneider S48896 PLC Module
 -
 FANUC A02B-0303-C205 I/O Module
 -
 AB 1785-LT4 PLC-5/10 Processor
 -
 AB 1746-NO8V SLC 500 Analog Output
 -
 OMRON CQM1-TC001 Temperature Unit


