How to install the Rockwell Automation 1756 series ControlNet communication module?
Model Core Features Applicable Scenarios
1756-CN2 standard media (non redundant), conventional industrial environment without anti-corrosion coating, single network link
1756-CN2K standard media (non redundant), with anti-corrosion coating (model ending with "K" mark), corrosive industrial environment (such as chemical and metallurgical)
1756-CN2R redundant media (dual link A/B), high reliability demand scenario without anti-corrosion coating (such as energy, transportation)
1756-CN2RK redundant media (dual link A/B) with anti-corrosion coating and high reliability requirements scenario
1756-CN2RXT redundant media, wide temperature design (-25~70 ℃), without anti-corrosion coating for extreme temperature environments (such as outdoor and refrigerated)
How to install the Rockwell Automation 1756 series ControlNet communication module?
Product Family and Core Positioning
1. Model classification and functional differences
The 1756 series ControlNet module is divided into "media type", "corrosion resistance", and "temperature adaptation range" to meet the needs of different industrial scenarios. The specific model functions are as follows:
Model Core Features Applicable Scenarios
1756-CN2 standard media (non redundant), conventional industrial environment without anti-corrosion coating, single network link
1756-CN2K standard media (non redundant), with anti-corrosion coating (model ending with "K" mark), corrosive industrial environment (such as chemical and metallurgical)
1756-CN2R redundant media (dual link A/B), high reliability demand scenario without anti-corrosion coating (such as energy, transportation)
1756-CN2RK redundant media (dual link A/B) with anti-corrosion coating and high reliability requirements scenario
1756-CN2RXT redundant media, wide temperature design (-25~70 ℃), without anti-corrosion coating for extreme temperature environments (such as outdoor and refrigerated)
2. Core advantages of ControlNet network
The ControlNet network connected to the module combines I/O network and Peer to Peer network functions, with the core features of:
Deterministic communication: ensuring repeatable and low latency transmission of critical control data;
Support redundancy: Redundant models (CN2R/CN2RK/CN2RXT) achieve network fault redundancy switching through dual links (A/B) to improve system stability.
Environmental requirements and safety certification
1. Basic environmental standards
Pollution level: only applicable to industrial environments with pollution level 2 (defined by IEC/EN 60664-1, which means the air contains only a small amount of non-conductive dust);
Overvoltage category: Class II application (IEC/EN 60664-1), suitable for downstream equipment in industrial distribution systems;
Altitude: up to 2000 meters (6562 feet), no need to downgrade for use;
Installation form: Open device, to be installed in an enclosure that meets the following requirements:
Protection level: at least IP54 (EN/IEC 60529);
Flame retardant rating: Non metallic shells must meet a 5VA flame spread rating;
Operation restriction: Tools are required to open the inside of the casing to prevent personnel from coming into contact with live parts.
2. Hazardous Area Certification
The module has been certified for hazardous areas in multiple regions, and the requirements for different regions are as follows:
Core requirements for certification areas
North America (Class I, Div 2) is suitable for A/B/C/D hazardous areas (such as environments containing flammable gases), with a temperature code of T4;
It is strictly prohibited to plug in or unplug modules/wiring in non power off or unknown non hazardous areas;
Components cannot be replaced, otherwise they may compromise their suitability for hazardous locations.
ATEX/UKEX equipment group II, category 3, protection type "Ex ec IIC T4 Gc" (increased safety type);
Only applicable to Zone 2 hazardous areas (where explosive gas environments rarely occur or occur in the short term);
It needs to be used with a UKEX/ATEX certified casing (IP54 or above).
IECEx certification protection type is the same as ATEX (Ex ec IIC T4 Gc), suitable for Zone 2 hazardous areas;
Transient protection must be met (peak voltage at the power supply end ≤ 140% of the rated value).
3. Requirements for electrostatic protection
The module is sensitive to static electricity, and the following should be followed during operation:
Contact with grounded objects to release static electricity, or wear a grounded wristband;
Do not touch module connectors, pins, and internal circuits;
When not in use, it should be stored in anti-static packaging;
Prioritize using anti-static workbenches.
Installation and wiring operations
1. Preparation before module installation
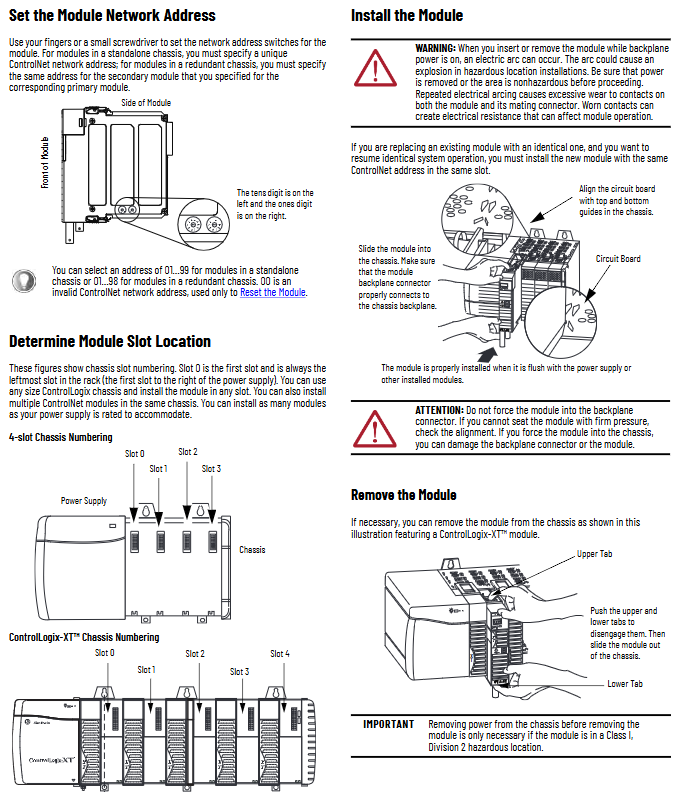
Slot position: Supports any size of ControlLogix chassis and can be installed in any slot (ensuring sufficient power capacity);
Redundant system requirements: The primary/backup modules need to be installed in the same slot of the corresponding chassis (such as the primary module in slot 3, and the backup module also needs to be in slot 3 of the backup chassis).
Network address setting:
Address range: Independent chassis modules range from 01 to 99, redundant chassis modules range from 01 to 98 (00 is an invalid address, only used for resetting);
Setting method: Adjust through the two digit dip switch on the side of the module (ten digits on the left and one digit on the right), ensuring that the address is unique within the same network.
2. Module installation and disassembly steps
(1) Installation steps
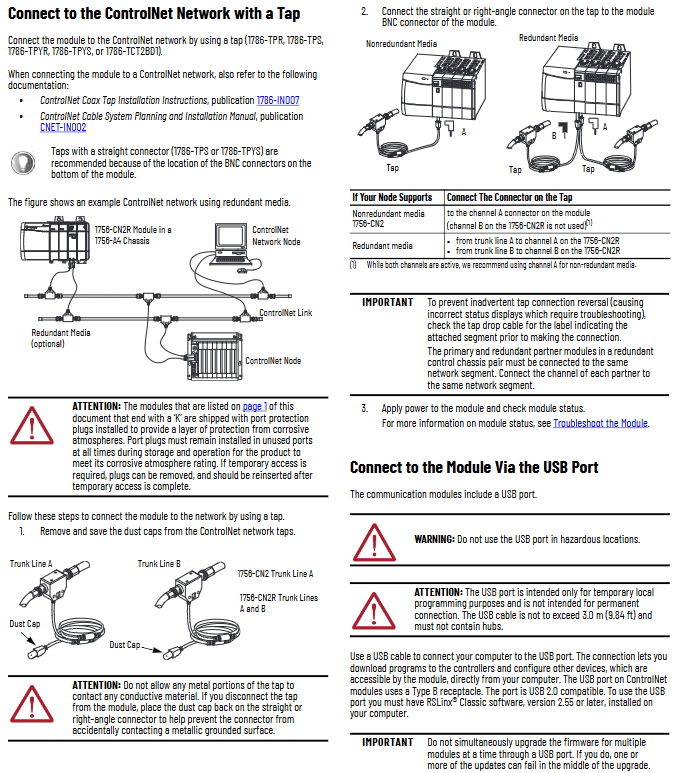
Confirm that the power supply of the chassis has been disconnected (power must be cut off in hazardous areas, and normal environments can support live plugging, but it is not recommended);
Align the module circuit board with the upper and lower rails of the chassis, and smoothly push it into the backplane connector;
Confirm that the module is flush with the power/other modules and not loose (do not forcefully press to avoid damaging the connector).
- ABB
- General Electric
- EMERSON
- Honeywell
- HIMA
- ALSTOM
- Rolls-Royce
- MOTOROLA
- Rockwell
- Siemens
- Woodward
- YOKOGAWA
- FOXBORO
- KOLLMORGEN
- MOOG
- KB
- YAMAHA
- BENDER
- TEKTRONIX
- Westinghouse
- AMAT
- AB
- XYCOM
- Yaskawa
- B&R
- Schneider
- Kongsberg
- NI
- WATLOW
- ProSoft
- SEW
- ADVANCED
- Reliance
- TRICONEX
- METSO
- MAN
- Advantest
- STUDER
- KONGSBERG
- DANAHER MOTION
- Bently
- Galil
- EATON
- MOLEX
- DEIF
- B&W
- ZYGO
- Aerotech
- DANFOSS
- Beijer
- Moxa
- Rexroth
- Johnson
- WAGO
- TOSHIBA
- BMCM
- SMC
- HITACHI
- HIRSCHMANN
- Application field
- XP POWER
- CTI
- TRICON
- STOBER
- Thinklogical
- Horner Automation
- Meggitt
- Fanuc
- Baldor
- SHINKAWA
- Other Brands


