TEKTRONIX CFG 253 Function Generator
TEKTRONIX CFG 253 Function Generator
Basic and Product Positioning
The official user manual for Tektronix CFG253 function generator (model 070-8362-04) states that the core purpose of the device is to generate various standard waveforms for audio equipment testing, ultrasound equipment calibration, servo system debugging, and other scenarios. It supports flexible adjustment of amplitude, frequency, waveform symmetry, as well as internal/external sweep functions to meet different testing needs.
Core parameters and functions
1. Key Electrical Characteristics
Parameter Category Specific Indicator Remarks
Normal frequency range (Freq/1): 0.3 Hz-3 MHz (7-speed RANGE: 1/10/100 Hz, 1/10/100 KHz, 1 MHz); 10 frequency division (Freq/10): 0.03 Hz -300 KHz Frequency accuracy: ± 5% Full scale (applicable to both normal and 10 frequency division)
Waveform types: sine wave, square wave, sawtooth wave, TTL synchronization signal. TTL signal is output from SYNC OUTPUT with fixed parameters
There are two selectable main output amplitudes (VOLTS OUT button switch):
1. Pop up mode: 0-20 V ₚₚ (open circuit), 0-10 V ₚₚ (50 Ω load)
2. Press the gear: 0-2 V ₚₚ (open circuit), 0-1 V ₚₚ (50 Ω load). The amplitude is continuously adjusted by the AMPLITUDE knob
DC offset ± 10 V (open circuit), ± 5 V (50 Ω load) Pull the DC OFFSET knob to activate, and when pressed, the offset is 0
Waveform quality sine wave distortion:<1% (10 Hz-100 KHz); Square wave rise/fall time: ≤ 100 ns (50 Ω load); Sawtooth wave linearity: ≥ 99% (20 Hz-200 KHz), ≥ 97% (200 KHz -3 MHz)-
Internal frequency scanning function: rate 0.5-50 Hz (SWEEP RATE adjustment), width 1:1-100:1 (SWEEP WIDTH adjustment); External sweep frequency: VCF INPUT input 0-+10 VDC, sweep frequency range 2 times (100:1). When performing external sweep frequency, the SWEEP button needs to pop up
2. Physical parameters
Specific indicators for parameter categories
Dimensions: Width 240 mm (9.46 in), Height 64 mm (2.53 in), Depth 230 mm (9.0 in)
Weight 2.0 kg (4.4 lb)
Safe operation and initialization
1. Safety regulations (must be followed)
Grounding requirements: The equipment should be grounded through the grounding conductor of the power cord. It is forbidden to remove the grounding pin of the power cord, otherwise it may cause electric shock; Before connecting the signal, it is necessary to confirm that the device is reliably grounded.
Line voltage and fuse:
The line voltage needs to be set to the appropriate value (supporting 4 levels: 90-110/108-132/198-242/216-250 VAC, 50-60 Hz). Setting it incorrectly can burn out the equipment;
Fuses need to be matched according to voltage: 0.3 A, 250 V, 3AG specifications (part number 159-0029-00) are used for 90-132 V operation, and 0.15 A, 250 V, 3AG specifications (part number 159-0054-00) are used for 198-250 V operation. Before replacement, the power must be turned off and the signal input disconnected.
Interface limitation: The VCF INPUT input voltage of the rear panel can reach a maximum of ± 10 V ₚₖ. Exceeding this range may damage the internal circuit.
Environmental taboos: Do not operate in damp or explosive environments; Do not operate with the cover open (as it may come into contact with high-voltage components, causing electric shock or fire).
2. Initialization operation steps
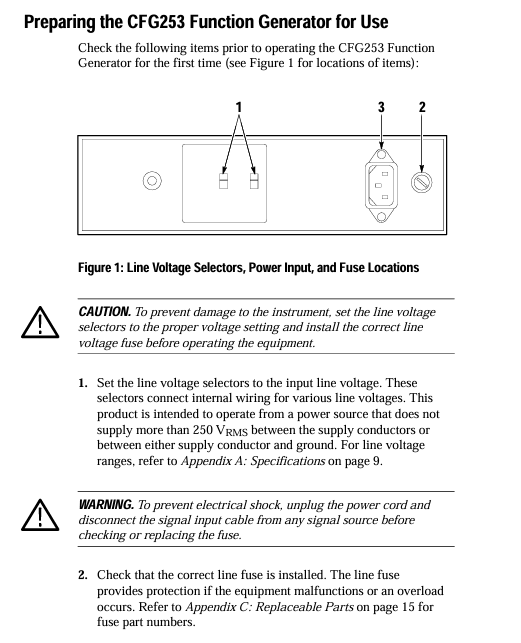
Set line voltage: Adjust the equipment line voltage selector (position shown in Figure 1) according to the local power supply voltage to ensure it matches the power supply voltage.
Check the fuse: Open the fuse cover and confirm that the installed fuse specifications are compatible with the line voltage. If the specifications are incorrect, replace it.
Connect power supply: Use the device's designated power cord (standard configuration is 115V North American model, other regions require corresponding accessories, refer to Table 7), and plug it into a grounded power outlet.
Power on check: Press the POWER button, confirm that the POWER On Light is on, and the device enters standby mode.
Panel controls and interface functions
1. Front panel controls (Figure 2)
Control Number Control Name/Function Operation Instructions
1 POWER ON Light indicator light on → Device powered on, off → Power off or malfunction (such as blown fuse)
2 AMPLITUDE knob adjusts the amplitude of the main output signal, with the range determined by the VOLTS OUT button (0-2 V ₚₚ or 0-20 V ₚₚ)
Press the 3 DC OFFSET knob → DC offset is 0; Pull on → Adjust the DC level of the main output signal (range ± 10 V open circuit)
The SYMMETRY knob only takes effect when the SYMMETRY button is pressed: adjust the square wave duty cycle, sawtooth wave/sine wave rise and fall time
5 RANGE (Hz) button (7 levels: 1/10/100 Hz, 1/10/100 KHz, 1 MHz) to select the frequency range, such as pressing "1 K" → frequency range 0.3 KHz -3.0 KHz
Press the corresponding button (sine wave/square wave/sawtooth wave) to select the desired waveform for the main output
Within the selected range of the RANGE button, continuously fine tune the output frequency with the 7 FREQUEncy knob
The 8 SWEEP WIDTH knob only takes effect when the SWEEP button is pressed internally: adjust the sweep amplitude (1:1-100:1)
- ABB
- General Electric
- EMERSON
- Honeywell
- HIMA
- ALSTOM
- Rolls-Royce
- MOTOROLA
- Rockwell
- Siemens
- Woodward
- YOKOGAWA
- FOXBORO
- KOLLMORGEN
- MOOG
- KB
- YAMAHA
- BENDER
- TEKTRONIX
- Westinghouse
- AMAT
- AB
- XYCOM
- Yaskawa
- B&R
- Schneider
- Kongsberg
- NI
- WATLOW
- ProSoft
- SEW
- ADVANCED
- Reliance
- TRICONEX
- METSO
- MAN
- Advantest
- STUDER
- KONGSBERG
- DANAHER MOTION
- Bently
- Galil
- EATON
- MOLEX
- Triconex
- DEIF
- B&W
- ZYGO
- Aerotech
- DANFOSS
- Beijer
- Moxa
- Rexroth
- Johnson
- WAGO
- TOSHIBA
- BMCM
- SMC
- HITACHI
- HIRSCHMANN
- Application field
- XP POWER
- CTI
- TRICON
- STOBER
- Thinklogical
- Horner Automation
- Meggitt
- Fanuc
- Baldor


