
YOKOGAWA SC210G Conductivity Detector
Corresponding manual number for supporting equipment type
FLXA202, FLXA21 2-wire liquid analyzer IM 12A01A02-01E
FLXA402 4-wire converter IM 12A01F01-02EN, IM 12A01F03-01EN, etc
FLXA402T turbidity and chlorine liquid analyzer IM 12A01G01-02EN, IM 12A01G03-01EN, etc
SC450G 4-wire conductivity converter IM 12D08N05-01E
YOKOGAWA SC210G Conductivity Detector
Equipment foundation and system composition
1. Core positioning and adaptation system
SC210G is a conductivity detection unit that needs to be used in conjunction with a specific analyzer/converter to form a complete detection system. The compatible equipment and corresponding manual information are as follows:
Corresponding manual number for supporting equipment type
FLXA202, FLXA21 2-wire liquid analyzer IM 12A01A02-01E
FLXA402 4-wire converter IM 12A01F01-02EN, IM 12A01F03-01EN, etc
FLXA402T turbidity and chlorine liquid analyzer IM 12A01G01-02EN, IM 12A01G03-01EN, etc
SC450G 4-wire conductivity converter IM 12D08N05-01E
2. Equipment core classification and parameters
SC210G can be divided into two categories based on measurement range, with the core difference in electrode structure and conductivity range, suitable for different solution detection scenarios:
Model Measurement Type Electrode Structure Battery Constant Measurement Range Applicable Scenarios
SC210G-C low range 316 stainless steel 2-electrode coaxial type 0.05 cm ⁻¹ 0-200 µ S/cm low conductivity solution (such as ultrapure water)
SC210G-D medium range glass tube with equidistant 3-ring platinum electrodes (short circuited on both sides and forming a counter electrode in the middle) 5 cm ⁻¹ 200 µ S/cm-20 mS/cm medium high conductivity solution
3. General technical specifications
Temperature and pressure: Normal temperature 0-105 ℃ (polypropylene material bracket is limited to 0-100 ℃); Conventional pressure 0-1 MPa (polypropylene material support limit 0-500 kPa)
Contact fluid material: SC210G-C (sensor: 316 stainless steel, fluororubber O-ring, polytetrafluoroethylene; Main body: 316 stainless steel, polypropylene); SC210G-D (sensor: platinum, glass, fluororubber O-ring; Subject is the same as Type C)
Temperature compensation: Built in Pt1000 temperature sensor, used to calibrate the effect of temperature on conductivity
Protection level: JIS C0920 waterproof (equivalent to NEMA 4), suitable for humid environments in industrial sites
Safety regulations and usage restrictions
1. Core security principles
Prohibited unauthorized operation: Only use according to the instructions in the manual, unauthorized modification of the device will result in loss of protective function; Repairs require Yokogawa certified spare parts, unauthorized modifications are prohibited
Static electricity and explosion prevention: Non metallic components may carry static electricity, and it is necessary to avoid static electricity generation operations such as wiping with dry cloth; The junction box shell is made of aluminum, which can avoid impact, friction, and sparks; Must comply with explosion-proof standards such as IEC 60079-11 (TIIS certified models cannot be connected)
Temperature limit: The maximum process temperature needs to be determined based on the supporting analyzer (FLXA202/FLXA21/SC202S) and temperature level (T1-T6). For example, under T5 level, FLXA202/FLXA21 with SC210G-C has a maximum process temperature of 54 ℃ at an ambient temperature of 40 ℃, and with SC210G-D it is 95 ℃ (note that the upper limit of T5 level is 100 ℃)
2. Manual usage guidelines
It needs to be handed over to the end user and properly stored, and unauthorized copying/dissemination is prohibited; Yokogawa reserves the right to improve manuals and equipment without prior notice
The manual only describes the device functions and does not guarantee adaptation to specific user scenarios; The equipment is provided as is, and Yokogawa is not responsible for unforeseeable direct/indirect losses
Installation and Wiring Guide
1. Installation type and preparation
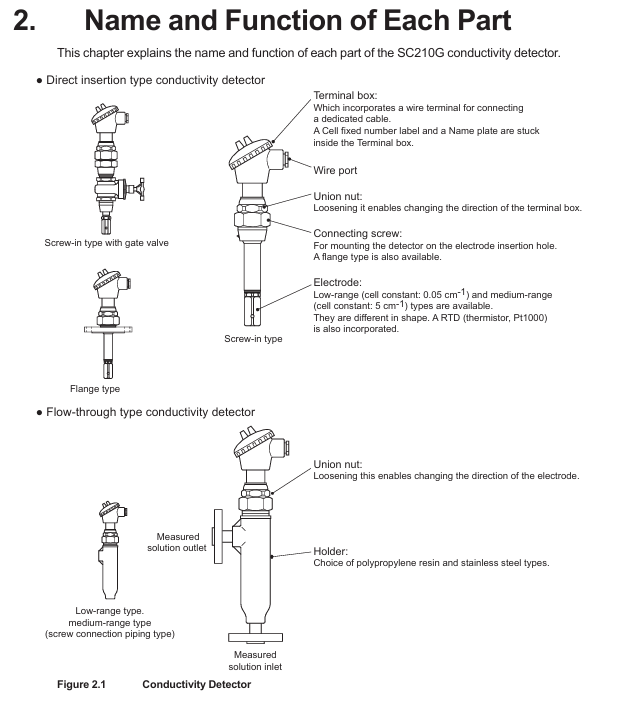
SC210G is divided into direct insertion type (installed in process pipelines) and flow type (sample introduced through sampling tubes). Before installation, it is necessary to:
Site selection requirements: easy maintenance, no bubbles in the solution (to avoid measurement deviation), stable liquid level, and away from high temperature (>50 ℃) pipelines
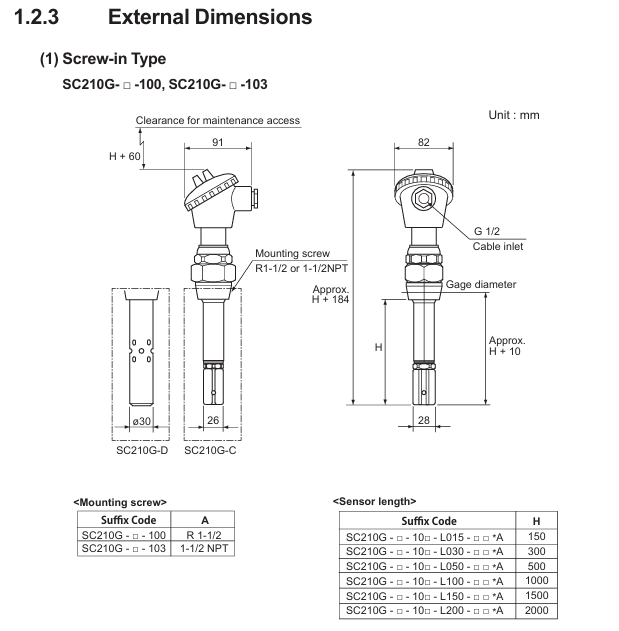
Preprocessing: For direct insertion type, corresponding thread holes (such as R1-1/2, 1-1/2 NPT) or flange holes (JIS 10K 50 RF, etc.) need to be reserved; The circulating polypropylene bracket needs to be equipped with a 50A pipe (outer diameter 60.5mm) and fixed with a bracket to prevent rupture
2. Installation steps
Direct insertion type: Threaded type requires sealing tape to be wrapped around the thread and screwed in; The flange type requires adding gaskets between the flange faces and evenly tightening 4 bolts
Flow type: fixed to the designated installation pipeline, adjustable solution inlet and outlet direction (stainless steel bracket can be adjusted horizontally, polypropylene bracket can be adjusted through the bracket direction)
Direction adjustment: Loosen the union nut of the junction box to rotate it for easy wiring (rotating without loosening the nut will damage the internal wiring)
3. Requirements for piping and wiring
Piping: Hard PVC pipes (JIS K9741, A16) for polypropylene supports, etc; 304/316 stainless steel pipes (JIS G3459, A15) are used for stainless steel brackets; Suggested flow rate<20 L/min (to prevent electrode wear caused by slurry solution), an overflow tank should be installed to remove bubbles, and a shut-off valve should be installed at the maintenance site to prevent leakage
Wiring: The cable length is provided according to the order (3/5/10/15/20m), and the terminals are divided into M4 ring type (compatible with FLXA202/FLXA21), M3 ring type (compatible with FLXA402/FLXA402T/SC450G), and pin type (compatible with multiple devices); The cable should avoid contact with high-temperature components, and the joint locking nut should be tightened for waterproofing after connection. The insulation resistance between the core wires should be ≥ 2 M Ω
Operation and maintenance process
1. Preparation before operation and steady-state operation
Inspection items: correctness of wiring, compatibility of piping materials, solution level (flow type needs to go to the outlet), no leakage; After startup, it is necessary to confirm that there is no bubble interference and no sudden temperature changes (to avoid affecting measurement accuracy)
Steady state maintenance: Conventional solutions (free of pollutants) can be maintained for 1 year without maintenance; Regular calibration with standard solution is required to ensure accuracy; If the analyzer outputs a FAIL signal, refer to the analyzer manual for troubleshooting
2. Core maintenance operations
(1) Electrode cleaning
Cleaning cycle: Low range (0.05 cm ⁻¹) electrodes require almost no cleaning due to minimal impurities in the solution; Medium range (5 cm ⁻¹) electrodes should be cleaned as needed (if the analyzer indicates abnormal electrode polarization)
Cleaning method: Type C (clean the inner and outer electrodes, only the inside of the hole needs to be cleaned externally); D-type (glass material requires a protective tube, gently wipe the platinum electrode on the inner wall of the glass tube with a thin rod wrapped in degreasing cotton)
(2) O-ring replacement
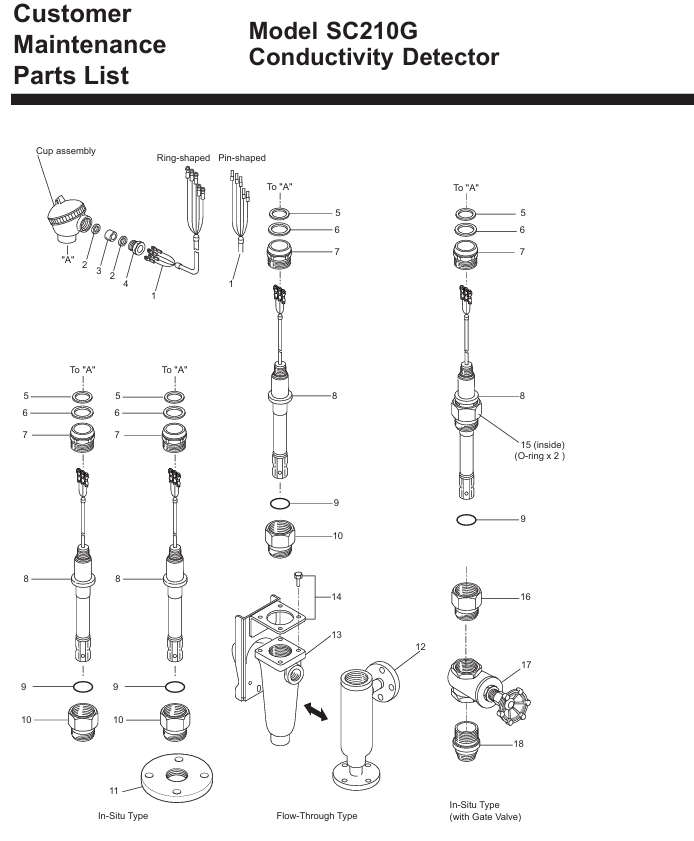
Replacement timing: O-ring damage can cause leakage, and regular inspections are required in high-temperature solution scenarios; Conventional O-ring (fluororubber, model K9050AT/K9050MR), with gate valve model requiring replacement with dedicated O-ring (K9050MS)
Replacement steps: For non gate valve types, simply loosen the union nut and remove the electrode to replace it; The gate valve type needs to first remove the external electrode and locking nut, remove the stop screw and replace the O-ring (recommended to replace in pairs), and calibrate the battery constant after reinstallation
(3) Electrode component replacement
Replacement condition: When the electrode is judged to be faulty (if there is still a large deviation after calibration)
Step: Power off → Remove the connection between the junction box and the electrode (use an Allen wrench to unscrew the electrode assembly) → Install a new component and wire it according to the color (green → C1, yellow → C2, red/black → T1/T2) → Update the battery constant label in the junction box → Enter the new battery constant in the analyzer
- OMRON
- ABB
- General Electric
- EMERSON
- Honeywell
- HIMA
- ALSTOM
- Rolls-Royce
- MOTOROLA
- Rockwell
- Siemens
- Woodward
- YOKOGAWA
- FOXBORO
- KOLLMORGEN
- MOOG
- KB
- YAMAHA
- BENDER
- TEKTRONIX
- Westinghouse
- AMAT
- AB
- XYCOM
- Yaskawa
- B&R
- Schneider
- KONGSBERG
- NI
- WATLOW
- ProSoft
- SEW
- ADVANCED
- Reliance
- TRICONEX
- METSO
- MAN
- Advantest
- STUDER
- DANAHER MOTION
- Bently
- Galil
- EATON
- MOLEX
- DEIF
- B&W
- ZYGO
- Aerotech
- DANFOSS
- Beijer
- Moxa
- Rexroth
- Johnson
- WAGO
- TOSHIBA
- BMCM
- SMC
- HITACHI
- HIRSCHMANN
- Application field
- XP POWER
- CTI
- TRICON
- STOBER
- Thinklogical
- Horner Automation
- Meggitt
- Fanuc
- Baldor
- SHINKAWA
- Other Brands
- UniOP
- KUKA
- Iba
- Beckhoff
- ADLINK
-
 Sigmatek MDD111-1 DIAS Drive Axis Module
 -
 Sigmatek DKL042 05-024-042 Terminal Module
 -
 Sigmatek DM822 Control Module
 -
 Sigmatek CDM167 12-008-167-O Module
 -
 Sigmatek TAE151 Touch Display Unit
 -
 Sigmatek DCC041 SLIDES Module 05-700-041-D
 -
 Sigmatek AKM65M-ANC2GBB0 PM Servo Motor
 -
 Sigmatek ETT221 01-230-221 Operator Terminal
 -
 Sigmatek SLIDES DAM 124 Analog Module
 -
Sigmatek AKM31C-ANCNGBB0 Servo Motor
-
 Mannesmann Demag Sigmatek CP626 Central Unit
 -
 SIGMATEK 0332.554.03 Board 371071000154
 -
 SIGMATEK 12-250-021 Base Plate Back Panel CM5V020
 -
 SIGMATEK DM162 S-DIAS Digital Mix Module
 -
 DEMAG ERGOTECH 061 381 66 Sigmatek 9842.243.02 Circuit Board
 -
 SIGMATEK CP313-1 PLC Module
 -
Sigmatek ETV0551-2 VARAN Touch Terminal
-
 Sigmatek SDM 081 FS S-Dias Safety Module
 -
 DEMAG 05-250-023 Ergotech Motherboard with Sigmatek TMS012
 -
Sigmatek CM5V020 12-250-023-K Wiring Base
-
 Sigma Tek 5000B-37 Attitude Gyro Indicator
 -
 Sigmatek SDD120-2 DIAS Drive
 -
 Sigmatek CME221 Memory Module
 -
 Sigmatek DCP640 DIAS Central Unit
 -
 Sigmatek STO040 Safety Output Module
 -
Sigmatek CET281 Control Panel
-
 Sigmatek CIPC LX800 Demag NC5 CPU
 -
 Sigmatek DKL093 05-024-093 Terminal Module
 -
 Sigmatek AI088 20-009-088 Analog Input Module
 -
Sigmatek CAI888 Analog Input Module
-
SIGMATEK CCA021 12-025-021 Analog Output Module
-
SIGMATEK 1104.579.05 Control Module
-
SIGMATEK SDI100 Digital Input Module
-
 SIGMATEK C-IPC 256MB LX800 Compact Dias
 -
 SIGMATEK 9423.090.02 Control Module
 -
SIGMATEK C-IPC 256 Power Supply 148498
-
 SIGMATEK CAI025 Analog Input Module
 -
 SIGMATEK CTO166 Digital Output Module
 -
 SIGMATEK CP112 20-004-112 Processor Module
 -
SIGMATEK CAI887 12-009-887 Safety Module
-
 Sigma-Tek 4000B-31 Directional Gyro 1U262-002-42
 -
Sigmatek C-IPC 256MB LX800 IPC Controller
-
Sigmatek C-IPC 01-450-031 Industrial PC LX800
-
Sigmatek C-IPC 256 Industrial PC Controller
-
Sigmatek CCP-531 PLC Processor Module
-
Sigmatek CDI163 Digital Input Module
-
 Sigmatek ETV0501 VARAN Terminal 12-230-0501
 -
 Sigmatek CTMS020 C-DIAS Technology Module
 -
 Sigmatek CIV512 VARAN Switch Module
 -
 Sigmatek HU011 20-080-011 Interface Module
 -
SIGMATEK SLIDES DAM 124 Module
-
 SIGMATEK C-IPC 161 01-450-161L Industrial PC
 -
SIGMATEK C-IPC 128MB VIA 733MHz 01-450-024-K
-
 SIGMATEK 12-780-012 R8-IPC Geode LX800 Module
 -
SIGMATEK CAM124 Analog Module
-
 SIGMATEK S1 032-8AF61-R4 EZ Servo Motor
 -
 SIGMATEK CTO163 Digital Output Module
 -
 SIGMATEK CCP082 12-004-082 Processor Module
 -
 SIGMATEK CRCH081 C-DIAS Temperature Module
 -
 SIGMATEK PC322-K 01-310-322-K Industrial PC
 -
SIGMATEK SDD310-2 Servo Drive
-
 SIGMATEK AI084 Analog Input Module
 -
SIGMATEK CRCH081 12-752-081 Temperature Module
-
Sigma-Tek 5000L-4 Attitude Gyro 1U284-001-3
-
 SIGMATEK CM5V020 12-250-023-K Wiring Module
 -
Sigma-Tek 4000H-6 Directional Gyro IU262-035-7
-
 SIGMATEK Dias DCP160 05-004-160 Processor Module
 -
SIGMATEK 0147.395.02 Control Module
-
SIGMATEK A1084 Control Module
-
SIGMATEK DI200 20-006-2000 Digital Input Module
-
Sigmatek DNC115 Encoder Module
-
 Sigmatek DAM122 05-017-122 Analog Module
 -
Sigmatek 9802.289.01 Control Board TA71 Display
-
Sigmatek TO127 20-007-127 Digital Output Module
-
Sigmatek DNC031 05-011-031 Digital Module
-
Sigmatek VI022 20-003-022 Interface Module
-
Sigmatek CAI085 Analog Input Module
-
 Sigmatek CP111 S-DIAS CPU Module
 -
Sigmatek CTMS030 Krauss Maffei Module
-
 Sigmatek CAM123 Control Module
 -
 Sigmatek TAE732-P 01-240-732-P Touch Display Unit
 -
Sigmatek MDM021 Digital Mixed Module
-
Sigmatek DCP642 DIAS Central Unit
-
 Sigmatek CST022 12-014-022 C-DIAS Module
 -
 Sigmatek SRO021 20-893-021 Safety Relay Output
 -
 Krauss Maffei MC5 Control System Sigmatek
 -
 Sigmatek DC061 Module 18-24VDC 300mA
 -
 Herrmann EVT0855 Ultrasonic Welder Touch Panel
 -
Sigmatek CIV521 Control Module 1.4A 2W
-
Sigmatek DDI61 05-006-161 Digital Input Module
-
SIGMATEK ETT312-E Touch Terminal 01-230-312
-
Cessna S3326-1 Sigma Tek 5000B-67 Gyro 1U149-015-9
-
SIGMATEK PS101 Power Supply Module
-
SIGMATEK 0332.554.03 Control Module 371071000154
-
 SIGMATEK ETT312-E Touch Terminal 01-230-312
 -
SIGMATEK CDM163 Control Module
-
 SIGMATEK VSV046 16-023-046 Module
 -
SIGMATEK AM221 20-017-221 Analog Module
-
SIGMATEK CTS051 12-053-051 Control Module
-
SIGMATEK AM221 20-017-221 Analog Module
-
Sigmatek CSDI161 12-891-161 Safety Input Module
-
Sigma Tek 4000C-1 Directional Gyro Indicator
-
Sigmatek ETV0501 12-230-0501 VARAN Terminal
-
Sigmatek DDM165 SLIDES Module
-
Sigmatek N100 20-011-100 Control Module
-
Sigmatek AKM54K-ANC2R-B0 PM Servo Motor
-
Sigmatek CTO166 Digital Output Module
-
Sigmatek CP212-K 20-004-212-K CPU Module
-
Sigmatek CDI161 Digital Input Module
-
Sigmatek DCC080 05-700-080-2 Control Module
-
 SIGMATEK SCP011 S-DIAS Safety CPU
 -
SIGMATEK SCP011 S-DIAS Safety CPU
-
SIGMATEK SRO022 Relay Output Module
-
SIGMATEK MDD 121 Drive Axis Module
-
SIGMATEK DSI021 SLIDES Siemens Interface
-
SIGMATEK DIAS DCP161 Module 05-004-161
-
 Sigmatek ETT312 Built-in Touch Terminal
 -
SIGMATEK DCP 643 DIAS Controller System
-
SIGMATEK CIO021 Multi I/O Module
-
SIGMATEK CTMS020 Control Module
-
 Sigmatek CME 221 Memory Module
 -
Sigmatek 0420.615.01 Control Board
-
Sigmatek CP111 20-004-111 CPU Module
-
Sigmatek 9405.065.03 Control Board
-
Sigmatek ETEK 01-450-032-K C-IPC 256MB Industrial PC
-
Sigmatek CTO163 12-007-163 Safety Output Module
-
Sigmatek TO081 20-007-081 Digital Output Module
-
 Sigmatek SI021 20-022-021 Safety Input Module


