How to install the Honeywell Sensepoint XRL fixed gas detector?
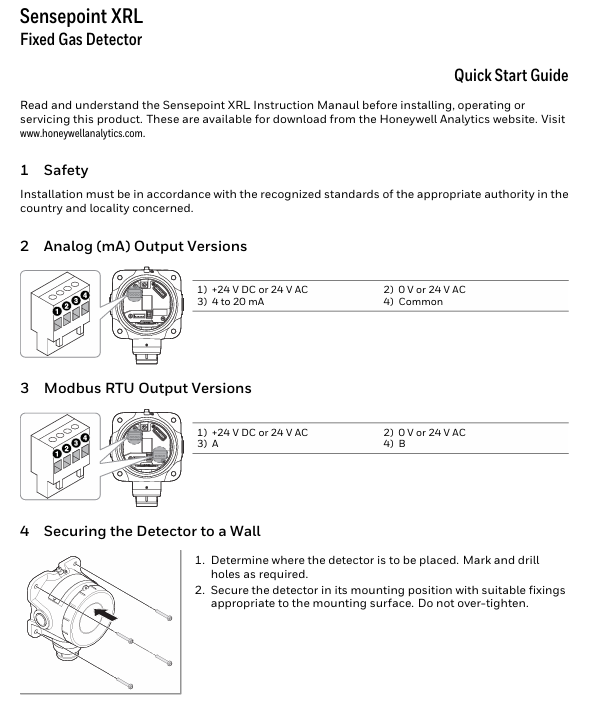
Modbus RTU output version: The terminal is defined as+24V DC/AC, 0V/24V AC, A (data+), B (data -).
How to install the Honeywell Sensepoint XRL fixed gas detector?
Safety and Installation Fundamentals
Safety requirements: Installation must comply with local and national authoritative standards, and the complete "Sensepoint XRL User Manual" (available for download from Honeywell's official website) must be read before operation.
Product version:
Analog (mA) output version: The terminals are defined as+24V DC/AC, 0V/24V AC, 4-20mA, and common terminal.
Modbus RTU output version: The terminal is defined as+24V DC/AC, 0V/24V AC, A (data+), B (data -).

Installation steps
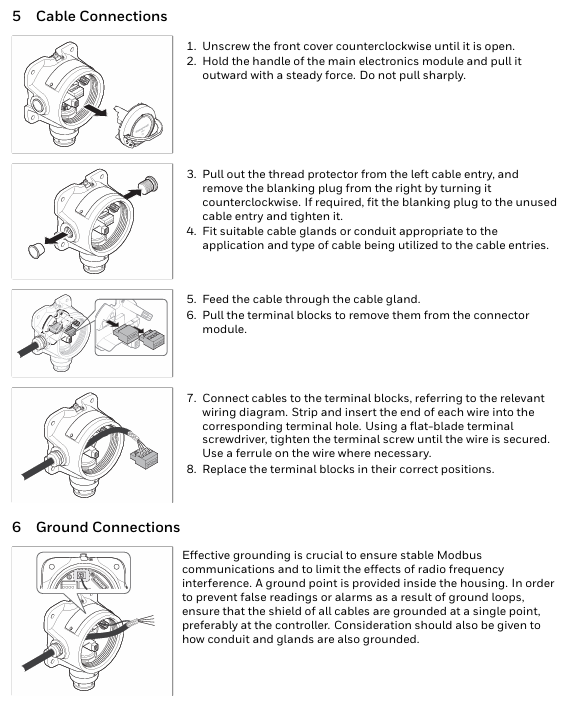
Fixed detector: After determining the installation position, drill holes and fix the detector to the wall with suitable fasteners to avoid excessive tightening.
Cable connection:
Unscrew the front cover counterclockwise and smoothly pull out the main electronic module.
Remove the threaded protective sleeve and sealing components from the cable entrance, and install cable glands or conduits for the entrance in use.
Thread the cable through the glass, remove the terminal block and connect the wires according to the wiring diagram (wire size is 0.2-2.5mm ², it is recommended to use cold pressed terminals), and then reinstall the terminal block.
Grounding connection:
The internal grounding terminal is used to stabilize Modbus communication and resist RF interference, and the cable shielding layer needs to be single ended grounded (preferably at the controller end).
The external safety grounding terminal should be connected to the electrical safety ground to avoid grounding loops.
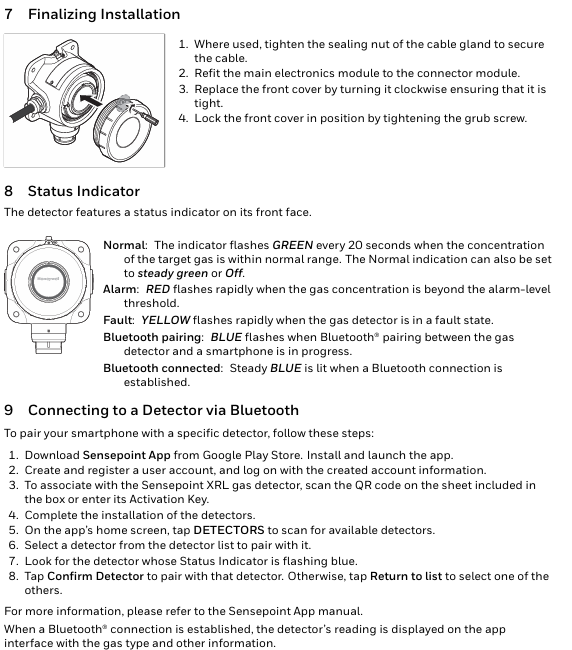
Complete installation: Tighten the sealing nut of the cable gland, reinstall the main electronic module and front cover, and tighten the grub screw to lock.

Status indication and Bluetooth connection
Meaning of status indicator light:
Normal: Blinks green every 20 seconds (can be set to stay on or off).
Alarm: Red flashing rapidly (gas concentration exceeds alarm threshold).
Fault: Yellow flashing rapidly (detector malfunction).
Bluetooth pairing: Blue flashing.
Bluetooth connected: Blue is constantly on.
Bluetooth connection steps:
Download and install the Sensepoint app from the Google Play Store, register an account, and log in.
Scan the QR code inside the detector packaging box or enter the activation code to associate with the device.
On the homepage of the application, click on "Detectors" to scan for available devices, select the detector with a flashing blue status light, and click on "Confirm Detector" to complete the pairing.
Technical specifications
Physical parameters: dimensions 118mm × 159mm × 93mm (4.4 × 6.2 × 3.6 inches), weight 1400g (3.1 pounds).
Power supply and power consumption:
Nominal voltage: 24V DC or 24V AC (50/60Hz), surge current<850mA.
Power consumption: mA version (toxic gas<1.5W, flammable gas<2.6W); Modbus version (toxic gas<1.0W, flammable gas<2.0W).
Output: Analog output is 0-22mA (configurable as sink or source mode); The digital output is Modbus RTU.
Environmental parameters:
Working temperature: -40 ° C to 65 ° C (-40 ° F to 140 ° F), storage temperature: 0 ° C to 30 ° C (32 ° F to 86 ° F).
Humidity: 0-99% RH (non condensing), flammable catalytic version needs to be within the range of 10-90% RH.
Protection level: IP66, NEMA 4X.
Cable entry: ATEX/IECEx version is M20, cULus version is three-quarters NPT.
Authentication information
ATEX (DEMKO 17 ATEX 1872X): II 2 GD, Ex db IIC T6 Gb, Ex tb IIIC T85 ° C Db, operating temperature -40 to+65 ° C.
IECEx (IECEx UL 17.0038X): Ex db IIC T6 Gb, Ex tb IIIC T85 ° C Db, operating temperature -40 to 65 ° C.

- ABB
- General Electric
- EMERSON
- Honeywell
- HIMA
- ALSTOM
- Rolls-Royce
- MOTOROLA
- Rockwell
- Siemens
- Woodward
- YOKOGAWA
- FOXBORO
- KOLLMORGEN
- MOOG
- KB
- YAMAHA
- BENDER
- TEKTRONIX
- Westinghouse
- AMAT
- AB
- XYCOM
- Yaskawa
- B&R
- Schneider
- Kongsberg
- NI
- WATLOW
- ProSoft
- SEW
- ADVANCED
- Reliance
- TRICONEX
- METSO
- MAN
- Advantest
- STUDER
- KONGSBERG
- DANAHER MOTION
- Bently
- Galil
- EATON
- MOLEX
- DEIF
- B&W
- ZYGO
- Aerotech
- DANFOSS
- Beijer
- Moxa
- Rexroth
- Johnson
- WAGO
- TOSHIBA
- BMCM
- SMC
- HITACHI
- HIRSCHMANN
- Application field
- XP POWER
- CTI
- TRICON
- STOBER
- Thinklogical
- Horner Automation
- Meggitt
- Fanuc
- Baldor
- SHINKAWA
- Other Brands


