
Hirschmann GUI Graphical User Interface Industrial ETHERNET (Gigabit-)Switch RS20/RS30/RS40, MS20/MS30
Core objective: To provide technical personnel with a complete operation guide for equipment configuration, monitoring, and diagnosis, ensuring network reliability, security, and compatibility in industrial scenarios.
Supporting resources: It needs to be used in conjunction with installation manuals, basic configuration manuals, redundant configuration manuals, etc., and supports the integration of HiVision network management software.
Hirschmann GUI Graphical User Interface Industrial ETHERNET (Gigabit-)Switch RS20/RS30/RS40, MS20/MS30
Document Overview
Document positioning: Official reference manual for Hirschmann Industrial Ethernet Switch graphical user interface (GUI) and command-line interface (CLI), applicable to RS20/RS30/RS40, MS20/MS30 and other series devices, version L2E Rel.9.0 (released in February 2015).
Core objective: To provide technical personnel with a complete operation guide for equipment configuration, monitoring, and diagnosis, ensuring network reliability, security, and compatibility in industrial scenarios.
Supporting resources: It needs to be used in conjunction with installation manuals, basic configuration manuals, redundant configuration manuals, etc., and supports the integration of HiVision network management software.
Basic configuration (IP/system information)
1. GUI operation steps
Key settings for functional operation path
Configure IP address basic settings ->select "Local" network mode, enter IP address, subnet mask, gateway; VLAN ID default 1 (0 means all VLANs are accessible)
Modify system information basic settings ->System input system name (PROFINET scene only includes letters/numbers/hyphens/dots), location, and contact person; Set temperature threshold (default upper and lower limits adapted to industrial environments)
Save Configuration Basic Settings → Load/Save Select "Save to Device" or "Save to PC (XML/financial format)", click "Set" to confirm
Restore factory settings to basic settings → Load/Save → Delete Select "Current Configuration", click "Delete Configuration", restart the device to take effect
2. CLI operation commands
Example of Function Command (Mode)
Configure IP address privilege execution mode: network parms <ip> <mask> [gw] network parms 192.168.1.100 255.255.255.0 192.168.1.1
View system information privilege execution mode: show sysinfo displays software version, MAC address, CPU utilization, port status, etc
Save configuration privilege execution mode: copy running config startup config Save current configuration to non-volatile memory, restart without loss
Restore factory settings privilege execution mode: clear config factory. After confirmation, delete all configurations (including IP addresses) and reconfigure them
VLAN configuration (IEEE 802.1Q)
1. GUI operation steps
Key settings for functional operation path
Create static VLAN switch → VLAN → Static VLAN Input VLAN ID (1-4042) and name (up to 32 characters); Port selection "T (tagged)" or "U (untagged)"
Configure port VLAN attribute exchange → VLAN → default port VLAN ID 1; Allow frame type selection of 'admitAll' (default); Disable inbound filtering (required for HIPER Ring scenarios)
View VLAN status exchange → VLAN → Current VLAN View port members, tag modes, and creation times for all VLANs
2. CLI operation commands
Example of Function Command (Mode)
Enter VLAN database mode privilege execution mode: VLAN database-
Create VLAN database mode: VLAN<id>VLAN 10 (Create VLAN 10)
Naming VLAN VLAN database schema: VLAN name<id><name>VLAN name 10 Production (naming VLAN 10 as "Production")
Configure port VLAN member interface configuration mode: VLAN participation include<id>interface 1/1 → VLAN participation include 10 (port 1/1 joins VLAN 10)
Configure port label mode interface configuration mode: VLAN tagging<id>interface 1/1 → VLAN tagging 10 (port 1/1 sends VLAN 10 frames with labels)
View VLAN configuration privilege execution mode: show VLAN brief displays the IDs, names, and types of all VLANs
Redundant configuration (HIPER Ring/MRP Ring)
1. HIPER Ring configuration
Operation method steps/command key parameters
GUI redundancy → ring network redundancy → select "HIPER Ring" ring port and choose 2 physical ports (such as 1/1, 1/2); Select "Standard" (480ms) or "Acceleration" (280ms) as the recovery mode; Enable Environmental Manager
CLI global configuration mode: hip ring → hip ring port primary<slot/port>→ hip ring port secondary<slot/port>→ hip ring recovery delay standard hip ring port primary 1/1 → hip ring port secondary 1/2 (set 1/1 and 1/2 as ring ports)
2. MRP Ring configuration
Operation method steps/command key parameters
GUI redundancy → ring network redundancy → select "MRP Ring" ring port and choose 2 physical ports; Set VLAN ID to>0 (bind specific VLAN); Select a recovery time of 200ms/500ms; Enable Environmental Manager
CLI global configuration mode: mrp new domain → mrp current domain<domain>→ mrp port<slot/port>ring port mrp new domain 1 → mrp current domain 1 → mrp port 1/1 ring port (port 1/1 is set as MRP ring port)
Port security configuration (MAC/IP binding)
1. GUI operation steps
Key settings for functional operation path
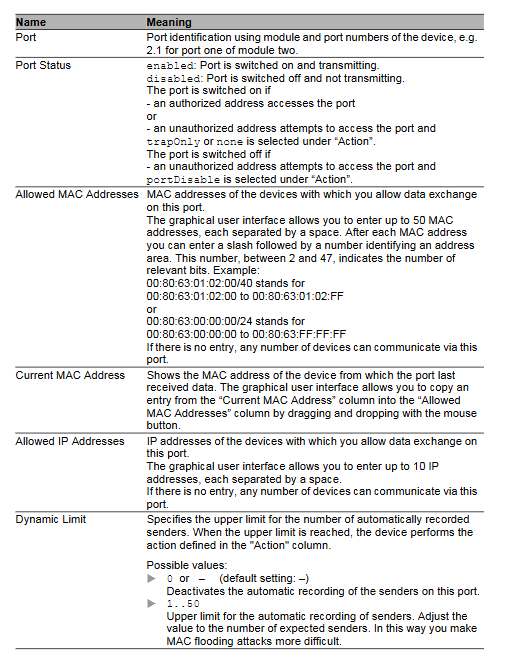
MAC based Port Security ->Port Security ->Configure and select "MAC Based" Port Allow MAC addresses: Enter up to 50 MAC addresses (supports address ranges, such as 00:80:63:00:00:00/24); Dynamically limit 1-50 automatic learning addresses
IP based port security → Port security → Configuration selection "IP based" port allows IP addresses: enter up to 10 IPs; relies on ARP to resolve MAC, ensuring that the terminal device is online
Violation action setting security ->Port security ->Select "trapOnly" (alert), "portDisable" (disable port), or "autoDisable" (reset according to diagnostic configuration) from the port table
2. CLI operation commands
Example of Function Command (Mode)
Enable MAC based port security global configuration mode: port sec mode MAC based-
Binding MAC address to port interface configuration mode: port sec allowed mac add<mac>interface 1/1 → port sec allowed mac add 00:11:22:33:44:55 (binding MAC to port 1/1)
Binding IP address to port interface configuration mode: port sec allowed ip add<ip>interface 1/1 → port sec allowed ip add 192.168.1.200 (binding IP to port 1/1)
Set violation action interface configuration mode: port sec action<action>interface 1/1 → port sec action portDisable (disable port 1/1 when violating)
View port security status privilege execution mode: show port sec port<slot/port>show port sec port 1/1 (view the security configuration of port 1/1)
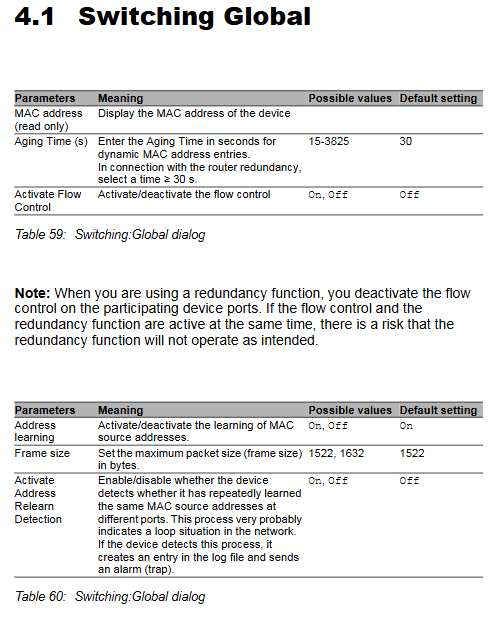
QoS/Priority Configuration
1. GUI operation steps
Key settings for functional operation path
Global Trust Mode QoS/Priority → Select "trustDot1p" (Trust VLAN Priority) or "trustIpDscp" (Trust IP DSCP) globally; Set the priority of management messages to 6-7 (to ensure the management channel)
Port priority QoS/priority → Port configuration Port priority is set to 0-7 (with 7 being the highest), automatically mapped to 4 traffic classes
802.1D/p mapping QoS/priority → 802.1D/p mapping VLAN priority 0-7 to traffic class 0-3 (e.g. priority 6 → traffic class 3, adapted to voice services)
2. CLI operation commands
Example of Function Command (Mode)
Set global trust mode Global configuration mode: classofservice trust<mode>classofservice trust trustDot1p (trust VLAN priority)
Configure port priority interface configuration mode: VLAN priority<priority>interface 1/1 → VLAN priority 7 (port 1/1 priority is set to 7)
Configure DSCP mapping global configuration mode: classofservice ip-dscp-mapping <<dscp> <trafficclass> classofservice ip-dscp-mapping 46 3(DSCP 46 → Traffic category 3, adapted to EF business)
View QoS configuration privilege execution mode: show classofservice trust displays the current trust mode and mapping rules
Time synchronization configuration (SNTP/PTP)
1. SNTP configuration
Operation method steps/command key parameters
GUI time → SNTP configuration enables SNTP client; Enter the NTP server address for the main server IP; Request interval of 30 seconds (default); Set the broadcast to 'On'
CLI global configuration mode: sntp operation on → sntp client server primary<ip>sntp operation on → sntp client server primary 210.72.145.44 (configure national time service center server)
2. PTP configuration (IEEE 1588)
Operation method steps/command key parameters
GUI time → PTP → global mode selection "v2 binary lock"; Synchronization threshold of 30ns (default); Enable PTP transmission and reception on the port
CLI global configuration mode: ptp mode v2 binary lock → ptp port<slot/port>enable ptp mode v2 binary lock → ptp port 1/1 enable (port 1/1 enables PTP)
Diagnostic tool (port mirroring/logging)
1. Port mirroring configuration
Operation method steps/command key parameters
GUI diagnosis ->Port image source port selection - Select the ports to be monitored (up to 8); Select the monitoring port (idle port) as the destination port; Set the operation to 'On'
CLI global configuration mode: monitor session 1 source interface<slot/port>→ monitor session 1 destination interface<slot/port>→ monitor session 1 mode enable monitor session 1 source interface 1/1-1/8 → monitor session 1 destination interface 1/9 → monitor session 1 mode enable (monitor port traffic from 1/1-1/8 to 1/9)
2. Log viewing
Operation method steps/command instructions
GUI diagnosis → Syslog/diagnosis → Trap log to view system event and alarm logs; Support exporting to PC
CLI privileged execution mode: show logging traplogs displays all Trap logs (including timestamps and event descriptions)
- OMRON
- ABB
- General Electric
- EMERSON
- Honeywell
- HIMA
- ALSTOM
- Rolls-Royce
- MOTOROLA
- Rockwell
- Siemens
- Woodward
- YOKOGAWA
- FOXBORO
- KOLLMORGEN
- MOOG
- KB
- YAMAHA
- BENDER
- TEKTRONIX
- Westinghouse
- AMAT
- AB
- XYCOM
- Yaskawa
- B&R
- Schneider
- KONGSBERG
- NI
- WATLOW
- ProSoft
- SEW
- ADVANCED
- Reliance
- TRICONEX
- METSO
- MAN
- Advantest
- STUDER
- DANAHER MOTION
- Bently
- Galil
- EATON
- MOLEX
- DEIF
- B&W
- ZYGO
- Aerotech
- DANFOSS
- Beijer
- Moxa
- Rexroth
- Johnson
- WAGO
- TOSHIBA
- BMCM
- SMC
- HITACHI
- HIRSCHMANN
- Application field
- XP POWER
- CTI
- TRICON
- STOBER
- Thinklogical
- Horner Automation
- Meggitt
- Fanuc
- Baldor
- SHINKAWA
- Other Brands
- UniOP
- KUKA
- Iba
- Beckhoff
-
 Basler DECS-200-2L Digital Excitation Control
 -
 Basler BE1-47N Voltage Phase Sequence Relay
 -
 Basler AEC63-7 Analog Excitation Controller 220-277V
 -
 Basler BE1-50/51B-107 Overcurrent Relay
 -
 Basler Electric BE1‑32R BE1‑E1P‑BON0F Protective Relay
 -
 Basler BE1-25 Solid State Time Overcurrent Relay M1EA6PA5S1F
 -
 Basler MVC 232 Manual Voltage Control Module 90 37000 103 60VAC 55VDC
 -
 Basler RAL6144-16GM Racer GigE Line Scan Camera
 -
 Basler SSR 63-12 Static Voltage Regulator
 -
 Basler BE1-51A Overcurrent Relay
 -
 Basler BE1-87T Solid State Protective Relay
 -
 Basler SR4A2B01B3A Static Voltage Regulator
 -
 Basler SSR 32-12 Static Voltage Regulator
 -
 Basler TRR00696 Transformer 1KVA 115V
 -
 Basler DECS-100-B15 AVR Replacement
 -
Basler BE1-27 Under-Voltage Relay
-
 Basler ACA2000-50GM Interface Module
 -
 Basler AEC63-7 Analog Excitation Controller
 -
 Basler PRS 250 Veri-Sync Relay
 -
 Basler SR4A-2B15B3A Static Voltage Regulator
 -
Basler BE1-32R Power Relay
-
Basler SR8A-2B06B3E Static Voltage Regulator
-
Basler BE1-81 O/U Frequency Relay
-
 Basler BE1-51A-K2E-W6M-B1N0F Overcurrent Relay
 -
Basler BE1-851 Overcurrent Relay G3A1S1 – 48-125V AC/DC
-
 Basler BEI-51 Overcurrent Relay – NSN 5945-01-293-2363
 -
Basler Electric L301KC Protective Relay – L301KC
-
 Basler DECS-100-B15 Automatic Voltage Regulator – Generator AVR
 -
 Basler SR4A-2B15B3A Static Voltage Regulator – SR4A2B15B3A
 -
 Basler UF 312 Under Frequency Protective Module – 9094700100
 -
Basler Electric MVC 232 Manual Control Module – 60VAC 55VDC 20A
-
Basler PRS 250 Veri-Sync Relay – Generator Synchronizing Relay
-
 Basler DECS-100-A05 Digital Regulator Review
 -
 Basler AEM-2020 Analog Expansion Module Specs
 -
 Basler DECS-100-B15 Digital Excitation Specs
 -
Basler Electric 9125600106 Regulator Component
-
Basler BE1-51A-K1E-W6M-B1N0F Overcurrent Relay
-
 Basler MVC-301 MVC 300 Excitation Controller
 -
 Basler SSR 32-12 Static Voltage Regulator
 -
 Basler 9-2849-00-101 Control Module
 -
Basler BE1-51A Overcurrent Relay
-
 Basler BE1-51/27R Overcurrent Relay
 -
 Basler BE1-51 Overcurrent Relay
 -
 Basler SR8A-2B15B3A Static Voltage Regulator
 -
 Basler BE32965001 Transformer and Timer Board
 -
 Basler 9174700100 EL200-7 Excitation Limiter
 -
 Basler BE2000E AVR Voltage Regulator
 -
Basler BE1-87G Differential Relay
-
 Basler BE21834001 Generator Control Module
 -
Basler DECS-100-B15 AVR
-
 Basler D90 96801 100 PCB Card
 -
 Basler XR2002F Voltage Regulator (110 VAC, 48-480 Hz)
 -
 Basler SR8A-2B14B3A Regulator
 -
 Basler 9561500100 Module
 -
 Basler DECS-400 BE1-11 System
 -
 Basler DECS-100-B15 Excitation Control
 -
 Basler SCP 210 Frequency Controller
 -
Basler SR4A-2B15B3A Static Voltage Regulator
-
Basler BE1-32R Power Relay
-
 Basler PIA2400-17GM Power Interface Adapter
 -
 Basler MVC 232 Manual Voltage Control Module
 -
 Basler SSR 32-12 Static Voltage Regulator
 -
Basler 5MW AVR Generator Voltage Regulator
-
 Basler VR63-4B Voltage Regulator
 -
Basler DECS-100-A05 AVR for Engine Generator
-
Basler DECS-100-B15 Automatic Voltage Regulator
-
Basler BE1-32R Directional Power Relay
-
Basler BE1-87B Differential Relay
-
 Basler UFOV 260A Protective Module
 -
 Basler 9-2614-02-100 PCB Rev M
 -
Basler DECS-100-B15 Digital AVR
-
 Basler 9284900103 PS DECS-400N
 -
 Basler D4N3H1U Intertie Protection
 -
 Basler DECS-100-B15 A15 AVR
 -
 Basler KR4F Voltage Regulator
 -
 Basler BE26434 T14 Transformer
 -
 Basler SR8A-2B15B3A Regulator
 -
 Westinghouse 774B472A12 AR Relay
 -
Basler DECS-100-B15 AVR
-
Basler XR2002F Regulator 110V
-
Basler SR125-E Static Regulator
-
Basler SSR 125-12 Regulator
-
Basler MOC2599 Motor Pot
-
 Basler BE1-DFPR Feeder Relay
 -
 Basler CBS 305 Current Boost
 -
Basler BE1-25 AutoSync
-
Basler MVC 300 Voltage Control
-
 Basler BE3-25A AutoSync
 -
 Basler KR7FF Static Regulator
 -
Basler 90-49000-100 Regulator
-
 Basler 880 kVA Dry Type Transformer Specs
 -
Basler Electric BE1-25 Sync-Check Relay Specs
-
 Basler SSR 125-12 Voltage Regulator Specs
 -
 Basler Electric BE1-851 Overcurrent Relay Review
 -
Basler Electric 149D930G02 Control Sub-Assembly
-
 Basler Electric BE1-81O/UT Frequency Relay Specs
 -
 Basler Electric BE1-51/27C Overcurrent Relay
 -
 Basler Electric 149D956G02 Industrial Component
 -
Basler Electric BE1-51A Overcurrent Relay Specs
-
 Basler Electric BE1-40Q Loss of Excitation Relay
 -
Basler DECS-200 Excitation Control System
-
 Basler DECS-200 Voltage Regulator 56-277V AC / 125V DC
 -
Basler BE1-87T Transformer Differential Relay
-
 Basler RDP-110-S1 Protection Relay
 -
 Basler BE1-700V Digital Protective Relay
 -
 Basler BE1-951 Overcurrent Protection System
 -
 Basler DECS-300 Digital Excitation Control
 -
 Basler DECS-200 Digital Excitation Control
 -
 Basler DECS-200-1C Excitation Control System
 -
Basler DECS-200-1L Digital Excitation Control
-
 Basler Electric BE1-GPS Generator Protection System
 -
Basler Electric DECS-200-1C Digital Excitation Controller
-
 Basler Electric DECS125-15 Excitation Control with Power Module
 -
Basler Electric BE1-87G Differential Relay
-
 Basler Electric BE1-11 Protection System I5A3M2P2N0EA00
 -
Basler Electric DECS-200-1C Excitation Control System
-
Basler Electric BE1-11g Generator Protection Relay
-
Basler Electric DECS 125-15-B2C1 V2.0.9 Excitation Control
-
Basler Electric BE1-81O/UT3ED1JA7N2F Frequency Relay
-
Basler Electric BE1-81O/UT3EE1YB7N1F Frequency Relay
-
 Basler Electric DECS-200-1L Digital Excitation Control System
 -
Basler DECS125-15-B2C1 Excitation Control
-
 Basler 9507900205 SSR Retrofit Voltage Regulator
 -
 Basler BE2000E Digital Voltage Regulator
 -
 Basler BE1-GPS Generator Protection System
 -
Basler DECS-250-CN1CN1N Digital Excitation Control
-
 Basler DGC-2020 Genset Controller
 -
Basler BE1-81O UT3ED1LA7N0F Frequency Relay (Variant)


