ZYGO Laser Interferometer Accessory Guide OMP-0463AM
Clarify the accessory requirements for different measurement scenarios (such as transmission through the plane for planar measurement and transmission through the sphere for spherical measurement);
Correct selection (such as matching accessory specifications based on interferometer model and measuring aperture), installation and debugging (such as optical alignment, mechanical fixation);
Maximizing accessory functionality (such as improving measurement accuracy through isolation tables and achieving automated measurement through programmable stages).
ZYGO Laser Interferometer Accessory Guide OMP-0463AM
Core positioning and scope of application
1. Positioning and Value
This manual should be an authoritative guide for the accessories of Zygo laser interferometers, with the core goal of helping users:
Clarify the accessory requirements for different measurement scenarios (such as transmission through the plane for planar measurement and transmission through the sphere for spherical measurement);
Correct selection (such as matching accessory specifications based on interferometer model and measuring aperture), installation and debugging (such as optical alignment, mechanical fixation);
Maximizing accessory functionality (such as improving measurement accuracy through isolation tables and achieving automated measurement through programmable stages).
2. Applicable product scope
Based on the Zygo laser interferometer product line, the core host models covered in the manual are speculated as follows:
Key accessories for core application scenarios of interferometer series
GPI series (such as GPI XP, GPI Pro) for measuring large aperture optical components (4-18 inches), such as flat mirrors, spherical lenses, large transmission planes/spheres, heavy-duty stages, and vibration isolation systems
The VeriFire series (such as VeriFire MST, VeriFire Sphere) provides high-precision wavefront analysis and non spherical measurement for optical lenses, high-resolution laser resonant cavity cameras, non spherical dedicated transmission components, and dynamic measurement modules
NewView series (such as NewView 5000, NewView 7000) micro morphology measurement (MEMS, microstructure surface), roughness/step height detection high magnification microscope objective (2.5X-100X), white light scanning module, precision Z-axis drive
Speculative core content framework
1. Detailed explanation of accessory classification and functions
The manual is likely classified according to the "function and purpose of accessories", clarifying the core functions, technical parameters, and applicable scenarios of various accessories. It is speculated that the classification and representative accessories are as follows:
(1) Optical core accessories
Used to generate reference wavefronts and optimize laser optical paths, it is the "optical foundation" of interferometric measurement, and its core includes:
Transmission Flat (TF):
Function: Generate a planar reference wavefront for detecting the flatness of planar components such as glass plates and mirrors;
Key parameters: caliber (4 inches/6 inches/12 inches), flatness accuracy (such as ≤ 0.02 λ RMS, λ=632.8nm), material (such as ULE ultra-low expansion glass, reducing temperature deformation);
Applicable scenarios: GPI series for measuring large-diameter planar components and calibrating semiconductor wafer flatness.
Transmission Sphere (TS):
Function: Generate spherical reference wavefront for detecting the curvature radius and surface shape error of spherical components (such as lenses and mirrors);
Key parameters: curvature radius range (e.g. 10mm-10m), adaptive aperture (e.g. 2-8 inches), numerical aperture (NA, e.g. 0.1-0.5);
Selection criteria: Match the "curvature radius+aperture" of the tested sphere, for example, convex lenses need to choose "concave transmissive sphere", and concave lenses need to choose "convex transmissive sphere".
Objective lens and optical accessories:
Microscopic objectives (NewView series specific): such as 2.5X (large field of view), 50X (high resolution), 100X (ultra-high precision), with parameters including numerical aperture (NA) and working distance (such as 100X objective working distance of 0.3mm);
Polarization components: polarizers and waveplates, used to adjust the polarization state of lasers and adapt to the measurement of polarization sensitive elements (such as polarizers and waveplates);
Filter: such as narrowband filter (632.8nm ± 1nm), reduces environmental noise interference and improves signal-to-noise ratio.
(2) Mechanical auxiliary accessories
Used to fix the measured object, reduce environmental interference, achieve automated movement, and ensure measurement stability and efficiency:
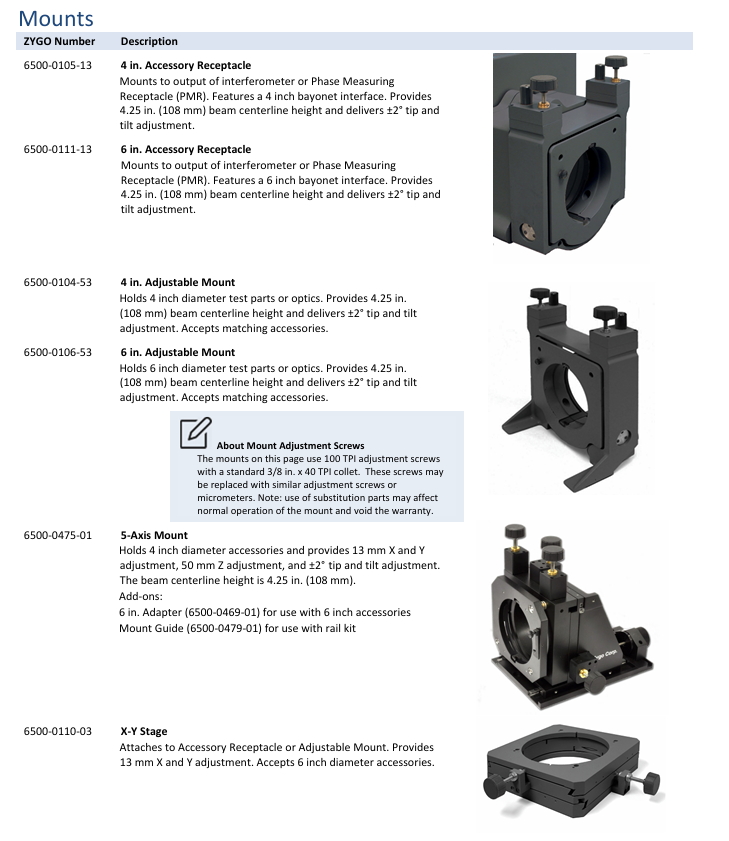
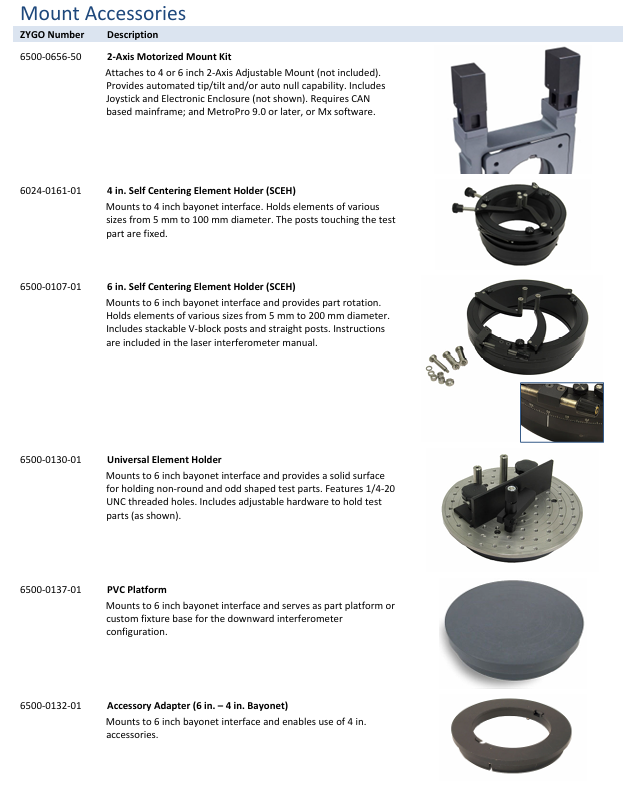
Stage and fixture:
Manual stage: used for small-sized components (such as 1-2 inch lenses), supporting X/Y axis fine adjustment (accuracy ± 1 μ m) and θ rotation (± 0.1 °);
Programmable stage (such as Zygo Motorized Stage): supports automatic movement of X/Y/Z axes (with a repeat positioning accuracy of ± 0.5 μ m), and is compatible with multi position automatic measurement (such as wafer multi chip detection);
Special fixtures: such as vacuum suction cups (fixing transparent components), magnetic fixtures (fixing metal base components), and centering fixtures (ensuring that the center of the spherical component is coaxial with the interferometer optical axis).
Vibration isolation system:
Passive isolation table: such as Zygo Standard Isolation Table, which isolates low-frequency vibrations (1-10 Hz) through spring/damping structures and is suitable for laboratory environments;
Active isolation table: such as Zygo Active Isolation System, which detects vibration in real-time through sensors (response time<1ms) and actively cancels it out, suitable for complex vibration environments (such as production lines and multi device laboratories);
Selection criteria: interferometer accuracy level (such as active isolation for nanoscale measurements), environmental vibration spectrum (such as workshop vibration isolation of 10-50Hz).
Adjustment frame and bracket:
Optical adjustment bracket: used to fix the transmission plane/sphere, supporting pitch and roll fine adjustment (accuracy ± 0.001 °), ensuring that the reference wavefront is perpendicular to the interferometer optical axis;
Host bracket: Heavy duty bracket (suitable for GPI series large-sized hosts) with horizontal adjustment feet, used to fix the host and calibrate its levelness.
(3) Electronic and software accessories
Used to enhance data collection capabilities, achieve automated control, and expand analysis functions:
Camera and image acquisition card:
High resolution camera: such as 1600 × 1200 pixel, 12 bit grayscale camera, compatible with VeriFire series high-resolution wavefront measurement;
High speed image acquisition card: such as USB 3.0/PCIe interface, supports real-time acquisition (frame rate ≥ 30fps), and is compatible with dynamic measurement (such as MEMS vibration detection).
Control and Communication Module:
Motion controller: such as Zygo Motion Controller, used to control programmable stage and objective switching motors, supporting linkage with MetroPro software;
Remote control module: such as wireless remote control, supporting remote adjustment of laser switch and light intensity, suitable for operation of large interferometers (such as 18 inch GPI).
Software plugins and authorization:
Special analysis plugins: such as "roughness analysis module" (calculating Ra, RMS, Rz), "non spherical analysis module" (fitting non spherical coefficients);
Automated script authorization: such as MetroScript programming authorization, supporting custom measurement processes (such as automatic mask loading, batch data export).
(4) Calibration and maintenance accessories
Used to ensure the long-term measurement accuracy of interferometers and extend the lifespan of accessories:
Standard calibration parts:
Flat calibration components: such as Zygo Reference Flat (flatness ≤ 0.01 λ RMS), used for calibrating transmission plane accuracy and system error correction;
Spherical calibration component: such as a standard spherical mirror with a known curvature radius (accuracy ± 0.1 μ m), used to calibrate the curvature radius deviation of the transmitted spherical surface;
Step height standard components: such as 10 μ m/100 μ m standard steps, used to calibrate the step height measurement accuracy of the NewView series.
Maintenance tools:
Optical cleaning kit: such as lint free cloth and isopropanol cleaning solution, used to clean the optical surface of the transmission plane/sphere (to avoid dust affecting the reference wavefront);
Calibration tools: such as laser collimators, used to calibrate the parallelism between the interferometer optical axis and the stage motion axis.
2. Accessories selection and matching guide
The core chapters of the manual are likely to include the "selection process", which helps users match according to "measurement requirements → host model → accessory specifications". It is speculated that the key selection logic is as follows:
(1) Four step selection process
Clear measurement requirements: Determine the parameters of the tested object (such as size, type: plane/sphere/microstructure), accuracy indicators (such as flatness ≤ 0.1 λ, roughness ≤ 1nm Ra), and measurement efficiency (such as single piece measurement time ≤ 30s);
Match host model: Determine accessory compatibility based on host series (such as GPI → large caliber, NewView → microscope) and model (such as GPI XP → 8-inch caliber) (such as GPI XP only compatible with transmission planes of 8 inches and below);
Selection of accessory specifications: Taking "selection of transmission sphere" as an example, it is necessary to match the "curvature radius of the tested sphere" (such as selecting TS-100mm model for 100mm curvature radius) and "interferometer aperture" (such as selecting 8-inch transmission sphere for 8-inch host);
Verify environmental adaptability: For example, if the production line environment requires the selection of a "dust-proof stage", and if the high temperature environment (such as 40 ℃) requires the selection of a "high temperature resistant fixture" (temperature resistance -20 ℃~80 ℃).
(2) Common selection misconceptions and avoidance
Misconception 1: Neglecting the compatibility between accessories and the host (such as using NewView's microscope lens for GPI host);
Avoidance: The manual should clearly indicate the "Accessories Host Compatibility Table", such as "Only NewView 5000/7000 supports 200X lenses".
Misconception 2: Excessive pursuit of high-precision accessories (such as choosing an active isolation table for laboratory measurements, which can actually be satisfied by passive isolation);
Avoidance: Provide a "scene accessory matching recommendation table", such as "passive isolation for laboratory accuracy ≤ 1nm, active isolation for production line accuracy ≤ 0.5nm".
3. Installation, Debugging, and Application Cases
(1) Installation and debugging process
The manual may provide a "step-by-step installation guide" for key accessories, taking "installation on a transmissive sphere" as an example:
Mechanical fixation: Fix the transmitted spherical surface on the interferometer output port through a dedicated bracket, ensuring that the bracket is level (calibrated with a level, deviation ≤ 0.1 °);
Optical alignment: Fine tune the pitch/roll of the transmission sphere by adjusting the frame, so that the center of the reference wavefront coincides with the interferometer optical axis (observe the "center spot symmetry" through MetroPro software, deviation ≤ 5%);
Accuracy verification: Measure the standard spherical mirror and compare the "measured curvature radius" with the "standard value". The deviation should be ≤ 0.1% (for example, if the standard value is 100mm, the measured value should be between 99.9-100.1mm).
(2) Typical application cases
The manual may help users understand the value of accessories through case studies of "scene+accessory configuration+effect". The following case studies are speculated:
Case 1: Measurement of semiconductor wafer flatness
Host: GPI Pro (12 inches);
Accessories: 12 inch transmission plane, programmable vacuum stage, active isolation stage;
Effect: Achieve full aperture measurement of 8-inch wafers, with flatness repeatability ≤ 0.05nm RMS and measurement efficiency of 1 wafer per 2 minutes.
Case 2: Measurement of Step Height in MEMS Devices
Host: NewView 7000;
Accessories: 50X Mirau objective lens, 10 μ m step height standard component, high-speed image acquisition card;
Effect: The measurement accuracy of step height is ± 0.01 μ m, and it supports MEMS dynamic step change monitoring (sampling rate 10Hz).
4. Maintenance and warranty of accessories
Maintenance cycle and method: For example, the transmission plane needs to be cleaned every 3 months (gently wiped with a lint free cloth dipped in isopropanol), and the vibration isolation table needs to be calibrated for levelness every 6 months;
Warranty information: Zygo original parts warranty period (such as 1 year for optical parts and 2 years for mechanical parts), warranty scope (free replacement for non-human damage), repair process (such as applying for repair through Zygo customer support).
Model may be required
ZMI-2002 8020-0211-1-J
8010-0105-01
PC200 CS1115-801-346
ZMI-4004
7702 8070-0102-01X
7702 8070-0102-35
ZMI-2002 8020-0211
4104C
HSSDC TO HSSDC2 CABLE 1115-800-056
HSSDC2 TO HSSDC2 CABLE 1115-800-055
1115-801-346
8010-0105-02 ZMI-501
- ABB
- General Electric
- EMERSON
- Honeywell
- HIMA
- ALSTOM
- Rolls-Royce
- MOTOROLA
- Rockwell
- Siemens
- Woodward
- YOKOGAWA
- FOXBORO
- KOLLMORGEN
- MOOG
- KB
- YAMAHA
- BENDER
- TEKTRONIX
- Westinghouse
- AMAT
- AB
- XYCOM
- Yaskawa
- B&R
- Schneider
- KONGSBERG
- NI
- WATLOW
- ProSoft
- SEW
- ADVANCED
- Reliance
- TRICONEX
- METSO
- MAN
- Advantest
- STUDER
- DANAHER MOTION
- Bently
- Galil
- EATON
- MOLEX
- DEIF
- B&W
- ZYGO
- Aerotech
- DANFOSS
- Beijer
- Moxa
- Rexroth
- Johnson
- WAGO
- TOSHIBA
- BMCM
- SMC
- HITACHI
- HIRSCHMANN
- Application field
- XP POWER
- CTI
- TRICON
- STOBER
- Thinklogical
- Horner Automation
- Meggitt
- Fanuc
- Baldor
- SHINKAWA
- Other Brands
- UniOP
- KUKA
- Iba


