
Westinghouse WGen9500c portable generator
Power specification: 120/240V single-phase AC, frequency 60Hz, speed 3600rpm, voltage stability range 230-250V, frequency stability range 58-62Hz, suitable for most household and industrial equipment
4. Personnel safety protection
Operation protection: goggles must be worn (to prevent fuel splashing and debris from entering the eyes), gloves must be worn (to prevent oil contamination and burns); Long hair should be curled up to avoid getting caught up in moving parts.
Personnel management: Children and pets should stay away from the running generator (at least 5 feet away); Do not operate the generator when fatigued, under the influence of alcohol, or after taking medication (which affects judgment).
Emergency response:
If you experience symptoms such as dizziness, nausea, and fatigue after inhaling carbon monoxide, immediately move to fresh air and seek medical attention in severe cases (carbon monoxide is colorless and odorless, so be alert).
If burns occur (due to contact with high-temperature components such as exhaust pipes), immediately rinse the burned area with cold water, and seek medical attention in severe cases.
If a fire occurs, use ABE or BE type fire extinguishers to extinguish it (it is prohibited to directly extinguish electrical or fuel fires with water).
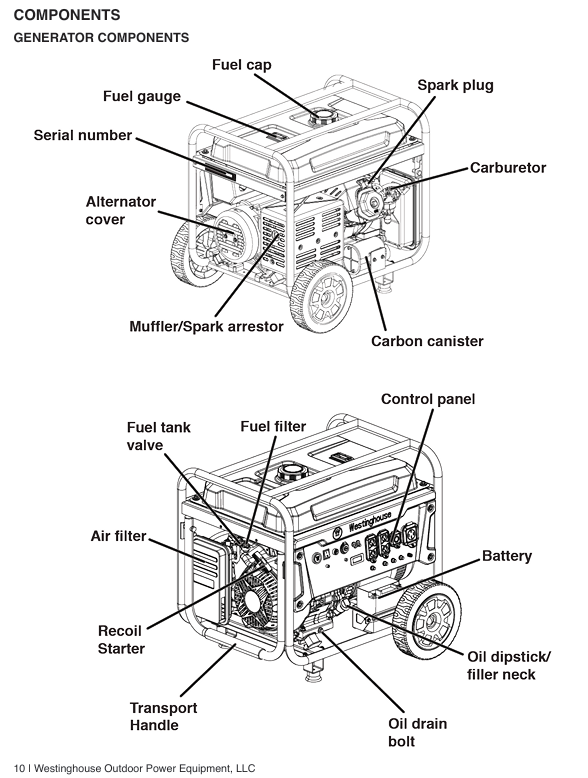
Complete operation process (assembly → start → run → stop)
1. First use assembly and preparation
Open box inspection:
Remove the generator and its accessories (tripod, roller, tool kit, engine oil, battery, remote control, manual).
Check that the appearance of the generator is undamaged, the components are not loose, the sockets and switches are functioning properly, and the battery is fully charged.
Install the tripod and roller:
Tilt the generator (ensuring that the fuel valve is closed to avoid fuel leakage), and use the accompanying bolts and wrenches to secure the tripod on both sides of the bottom of the body.
Install the roller into the slot below the tripod, tighten the fixing bolts to ensure that the roller rotates flexibly and is securely installed (which can drive the generator to test stability).
Add engine oil:
Place the generator on a level surface, open the oil filler cap on the left side of the body, and remove the dipstick.
Slowly add the recommended model of engine oil (SAE 10W-30) and check the dipstick while adding until the oil level is between the "L" (lowest) and "H" (highest) marks (not exceeding the "H" mark to avoid excessive oil accumulation and oil leakage).
Tighten the oil filler cap and dipstick, and wipe off any remaining oil with a dry cloth.
Add fuel:
Unscrew the fuel tank cap (counterclockwise) and clean the impurities around the fuel inlet.
Add unleaded gasoline with a fuel level not exceeding the red limit ring inside the fuel tank, and tighten the fuel tank cap (clockwise).
Check for leaks at the connection between the fuel tank and oil pipe. If there is any overflow, wipe it clean immediately.
Battery connection:
Find the battery quick connector on the side of the body (red positive pole, black negative pole), align the battery connector with the body connector and insert it. When you hear a "click" sound, it will lock (the connector is pre installed at the factory and does not require additional wiring).
Turn on the battery switch (to the "ON" position) and check if the control panel data center is lit up (confirm that the battery power supply is normal).
2. Startup process (detailed explanation of three startup methods)
(1) Remote start (recommended, convenient and efficient)
Preprocessing: Confirm that the fuel valve is "ON", the battery switch is "ON", all loads are disconnected, and the generator is placed for horizontal ventilation.
Start operation: Press the "START" button on the remote control for 1 second, and release it immediately after the generator starts (do not long press to avoid damaging the starter motor).
Check after startup: After the generator is started, the remote control indicator light will flash, and the data center will display voltage and frequency. Observe that the engine runs smoothly without any abnormal noise.
Cold machine regulation: If the cold machine is started, the generator may run at high speed and wait for 3-5 minutes for the speed to stabilize (automatic regulation).
(2) Electric start (used when there is no remote control or when the remote control fails)
Preprocessing: Same as remote control startup, ensure that all switch positions are correct and the load is disconnected.
Start operation: Press the "START/STOP" button on the control panel for 2 seconds, and release it after the engine starts; If it fails to start once, try again after a 30 second interval (to avoid overheating of the starting motor).
Fault handling: If the startup fails 3 times, check the battery level (possibly low), whether the fuel is sufficient, and whether the spark plug is normal.
(3) Hand pulled start (emergency backup, used when the battery is low)
Preprocessing: Close the air door (push in the air door knob), turn on the fuel valve, turn off the battery switch (no power supply required), and disconnect the load.
Start operation:
Press and hold the generator body with one hand (to prevent vibration displacement), and hold the starting rope handle with the other hand. Slowly pull until you feel an increase in resistance (piston compression stroke), then quickly and forcefully pull the handle.
- OMRON
- ABB
- General Electric
- EMERSON
- Honeywell
- HIMA
- ALSTOM
- Rolls-Royce
- MOTOROLA
- Rockwell
- Siemens
- Woodward
- YOKOGAWA
- FOXBORO
- KOLLMORGEN
- MOOG
- KB
- YAMAHA
- BENDER
- TEKTRONIX
- Westinghouse
- AMAT
- AB
- XYCOM
- Yaskawa
- B&R
- Schneider
- KONGSBERG
- NI
- WATLOW
- ProSoft
- SEW
- ADVANCED
- Reliance
- TRICONEX
- METSO
- MAN
- Advantest
- STUDER
- DANAHER MOTION
- Bently
- Galil
- EATON
- MOLEX
- DEIF
- B&W
- ZYGO
- Aerotech
- DANFOSS
- Beijer
- Moxa
- Rexroth
- Johnson
- WAGO
- TOSHIBA
- BMCM
- SMC
- HITACHI
- HIRSCHMANN
- Application field
- XP POWER
- CTI
- TRICON
- STOBER
- Thinklogical
- Horner Automation
- Meggitt
- Fanuc
- Baldor
- SHINKAWA
- Other Brands
- UniOP
- KUKA
- Iba
- Beckhoff
-
 Basler D90 96801 100 PCB Card
 -
 Basler XR2002F Voltage Regulator (110 VAC, 48-480 Hz)
 -
 Basler SR8A-2B14B3A Regulator
 -
 Basler 9561500100 Module
 -
 Basler DECS-400 BE1-11 System
 -
 Basler DECS-100-B15 Excitation Control
 -
 Basler SCP 210 Frequency Controller
 -
 Basler SR4A-2B15B3A Static Voltage Regulator
 -
 Basler BE1-32R Power Relay
 -
 Basler PIA2400-17GM Power Interface Adapter
 -
 Basler MVC 232 Manual Voltage Control Module
 -
 Basler SSR 32-12 Static Voltage Regulator
 -
 Basler 5MW AVR Generator Voltage Regulator
 -
 Basler VR63-4B Voltage Regulator
 -
 Basler DECS-100-A05 AVR for Engine Generator
 -
 Basler DECS-100-B15 Automatic Voltage Regulator
 -
 Basler BE1-32R Directional Power Relay
 -
 Basler BE1-87B Differential Relay
 -
 Basler UFOV 260A Protective Module
 -
 Basler 9-2614-02-100 PCB Rev M
 -
Basler DECS-100-B15 Digital AVR
-
 Basler 9284900103 PS DECS-400N
 -
 Basler D4N3H1U Intertie Protection
 -
 Basler DECS-100-B15 A15 AVR
 -
 Basler KR4F Voltage Regulator
 -
 Basler BE26434 T14 Transformer
 -
 Basler SR8A-2B15B3A Regulator
 -
 Westinghouse 774B472A12 AR Relay
 -
Basler DECS-100-B15 AVR
-
Basler XR2002F Regulator 110V
-
Basler SR125-E Static Regulator
-
 Basler SSR 125-12 Regulator
 -
 Basler MOC2599 Motor Pot
 -
 Basler BE1-DFPR Feeder Relay
 -
 Basler CBS 305 Current Boost
 -
 Basler BE1-25 AutoSync
 -
 Basler MVC 300 Voltage Control
 -
 Basler BE3-25A AutoSync
 -
 Basler KR7FF Static Regulator
 -
 Basler 90-49000-100 Regulator
 -
 Basler 880 kVA Dry Type Transformer Specs
 -
 Basler Electric BE1-25 Sync-Check Relay Specs
 -
 Basler SSR 125-12 Voltage Regulator Specs
 -
 Basler Electric BE1-851 Overcurrent Relay Review
 -
Basler Electric 149D930G02 Control Sub-Assembly
-
 Basler Electric BE1-81O/UT Frequency Relay Specs
 -
 Basler Electric BE1-51/27C Overcurrent Relay
 -
 Basler Electric 149D956G02 Industrial Component
 -
Basler Electric BE1-51A Overcurrent Relay Specs
-
 Basler Electric BE1-40Q Loss of Excitation Relay
 -
 Basler DECS-200 Excitation Control System
 -
 Basler DECS-200 Voltage Regulator 56-277V AC / 125V DC
 -
Basler BE1-87T Transformer Differential Relay
-
 Basler RDP-110-S1 Protection Relay
 -
 Basler BE1-700V Digital Protective Relay
 -
 Basler BE1-951 Overcurrent Protection System
 -
 Basler DECS-300 Digital Excitation Control
 -
 Basler DECS-200 Digital Excitation Control
 -
 Basler DECS-200-1C Excitation Control System
 -
Basler DECS-200-1L Digital Excitation Control
-
 Basler Electric BE1-GPS Generator Protection System
 -
Basler Electric DECS-200-1C Digital Excitation Controller
-
 Basler Electric DECS125-15 Excitation Control with Power Module
 -
 Basler Electric BE1-87G Differential Relay
 -
 Basler Electric BE1-11 Protection System I5A3M2P2N0EA00
 -
Basler Electric DECS-200-1C Excitation Control System
-
Basler Electric BE1-11g Generator Protection Relay
-
Basler Electric DECS 125-15-B2C1 V2.0.9 Excitation Control
-
 Basler Electric BE1-81O/UT3ED1JA7N2F Frequency Relay
 -
Basler Electric BE1-81O/UT3EE1YB7N1F Frequency Relay
-
 Basler Electric DECS-200-1L Digital Excitation Control System
 -
Basler DECS125-15-B2C1 Excitation Control
-
 Basler 9507900205 SSR Retrofit Voltage Regulator
 -
 Basler BE2000E Digital Voltage Regulator
 -
 Basler BE1-GPS Generator Protection System
 -
Basler DECS-250-CN1CN1N Digital Excitation Control
-
 Basler DGC-2020 Genset Controller
 -
 Basler BE1-81O UT3ED1LA7N0F Frequency Relay (Variant)
 -
 Basler BE1-81O UT3EE1YA9S0F Frequency Relay (Variant)
 -
Basler BE1-81O Over/Under Frequency Relay
-
Basler DECS125-15 Digital Excitation Control
-
Basler Electric BE1-951 Overcurrent Protection System
-
 Basler Electric BE1-700V Digital Protective Relay
 -
 Basler Electric APR63-5 Automatic Voltage Regulator
 -
Basler Electric BE1-851 Overcurrent Protection System
-
Basler Electric DECS-250-LN1SN1N Excitation Control
-
 Basler Electric BE1-87T Transformer Differential Relay
 -
Basler Electric DECS-200-1L Excitation Control System
-
 Basler Electric 9310300100 DECS-300 Excitation Control
 -
 Basler Electric SSE-N 125-4.5KW Shunt Exciter Regulator
 -
 Basler Electric DGC-2020HD-5NS1DNSBA Genset Controller
 -
Basler Electric BE1-81-O/UT3EE1JB7N1F Frequency Relay
-
Basler Electric BE1-81T1EE1WA0N1F Frequency Relay
-
 Basler Electric BE1-25M1EA6PN5R1F Sync-Check Relay
 -
 Basler Electric BE1-GPS Generator Protection System
 -
Basler Electric DECS-250-LN1SN1N Excitation Control Rev V
-
 Basler Electric DECS-250-CN2CN1N Excitation Control
 -
Basler Electric BE1-50/51B-207 Overcurrent Relay
-
Basler Electric DECS-300-C0N0 Excitation Control System
-
Basler Electric DECS-200 Digital Excitation Control System
-
Basler Electric DECS-250-LN1CN1N Excitation Unit
-
Basler Electric DECS-250 LN2SA1D Excitation Unit Specs
-
Basler Electric BE1-87T Transformer Relay Review
-
Basler Electric BE1-11 Protection System
-
Basler Electric BE1-GPS100-E4N1H1N Protection System
-
 Allen-Bradley 442G-MABH-R Safety Module
 -
 Beckhoff CX1030-0111 PLC Assembly Profile
 -
 FANUC IC693CPU364 PLC Module
 -
 Orange Denmark Type 200816 220 PLC Specs
 -
 OMRON C200H-SNT31 Sysmac PLC Module
 -
 Allen Bradley 20AB022A3AYNANC0 PowerFlex 70
 -
 OMRON C200HW-PCU01 Position Control Unit
 -
 ABB AO845A-eA Analog Output Module
 -
 OMRON CJ1M-CPU22 CPU Unit
 -
 Allen Bradley 100-E265ED11 Contactor
 -
 Honeywell 51304511-100 Interface Module
 -
 SOLEXY BXF3S0101N0018 Gateway Module
 -
 OMRON CJ2H-CPU65 CPU Unit
 -
 Automation Direct GS2-45P0 AC Drive
 -
 M68-2000 2-Axis Motion CNC Controller
 -
 OMRON CJ1M-CPU11 V3.0 PLC CPU Unit
 -
 OMRON CJ1W-NC413 4-Axis Positioning Controller
 -
 OMRON 3G2A3-PRO16 Programming Console HMI
 -
 Siemens 3VT8440-2AA04-2GA2 Molded Case Circuit Breaker
 -
 Siemens 3RT5045 Contactor Series
 -
 OMRON C200HS-CPU01-E SYSMAC PLC Controller
 -
 OMRON C500-NC103-E Positioning Control Unit
 -
 OMRON CJ1W-TC001 Temperature Control Unit


