
TEKTRONIX P6022 Current Probe
TEKTRONIX P6022 Current Probe
Basic Information and Product Positioning
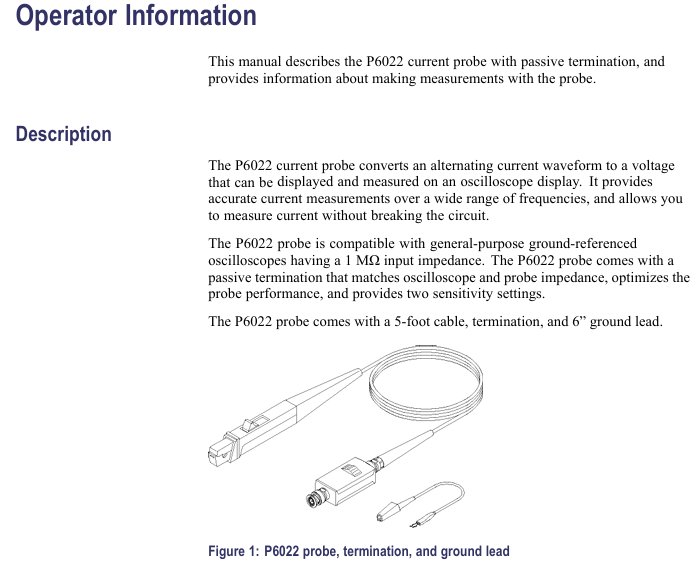
This document is the official manual for the Tektronix P6022 current probe (document number 070-0948-05). Its core function is to convert the AC current waveform into a voltage signal that can be measured by an oscilloscope, enabling current measurement without disconnecting the tested circuit. It is suitable for grounded general-purpose oscilloscopes with an input impedance of 1 M Ω and is mainly used in scenarios that require high-precision and wide frequency range current detection.
Core parameters of the product
1. Key electrical parameters (including guaranteed and typical characteristics)
Parameter Category Specific Indicator Remarks
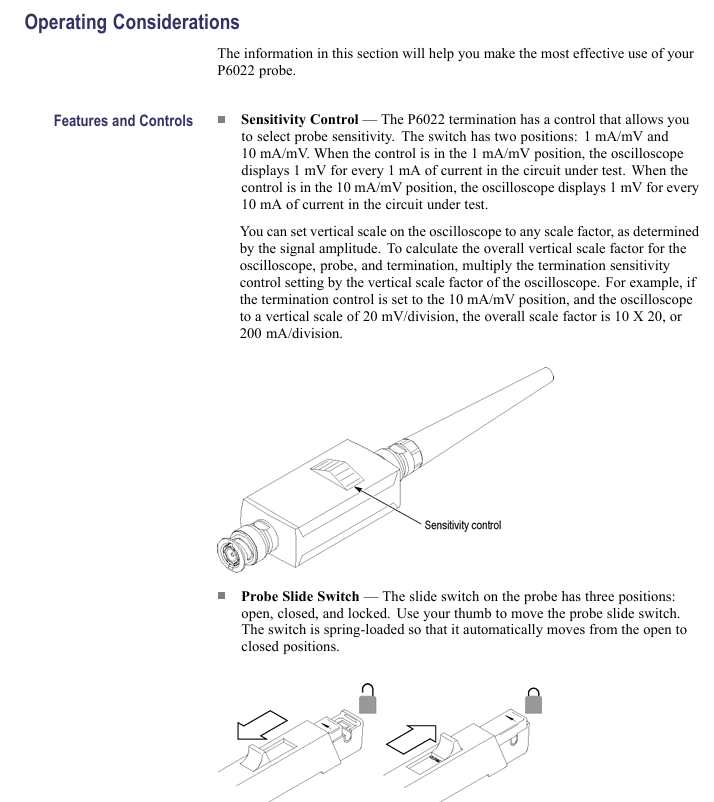
Sensitivity options are available in two levels: 1 mA/mV and 10 mA/mV, controlled by the terminal sensitivity switch
Bandwidth (-3 dB) 1 mA/mV range: 8.5 kHz -100 MHz; 10 mA/mV range: 935 Hz-120 MHz requires an oscilloscope with a bandwidth ≥ 300 MHz
Intermediate frequency accuracy ± 3% calibration environment: 20 ° C-30 ° C (68 ° F-86 ° F)
Maximum current pulse current: 100 A peak (≤ 9 A · ms, if exceeded, the magnetic core will saturate); Continuous current: The reference frequency derating curve is 6 A p-p in the range of 3 kHz to 10 MHz at 10 mA/mV
Insertion impedance ≤ 0.03 Ω at 1 MHz and ≤ 0.2 Ω at 120 MHz affects high-frequency signal measurement, and attention should be paid to load effects
Rise time 1 mA/mV ≤ 3.2 ns; 10 mA/mV ≤ 2.9 ns reflects high-frequency response speed
Signal delay of about 9 ns with 5-foot probe cable and terminal
2. Environmental and mechanical parameters
Specific indicators for parameter categories
Working temperature: 0 ° C-50 ° C (32 ° F-122 ° F); Non working temperature: -40 ° C -65 ° C (-40 ° F -149 ° F)
Working altitude 2000 m (6561 ft); Non working altitude: 15240 m (50000 ft)
Cable length 5 feet (1.5 meters)
Weight probe+cable: 2.5 oz (≈ 71 g); Terminal: 1.7 oz (≈ 48 g)
The maximum wire diameter of 0.11 inches (2.79 mm) exceeding the specification will damage the probe clamp
Safety operation standards
1. General safety warning
Maintenance restrictions: Only qualified personnel are allowed to carry out repairs, avoiding separate operations. Before repairing, the power must be disconnected and refer to the safety summary.
Connection taboos: Do not plug or unplug probes/test wires with power on; The connection sequence is "connect the terminal to the oscilloscope first, then connect the probe to the circuit", and the disconnection sequence is reversed; The common terminal of the probe can only be grounded, and it is prohibited to connect to voltages higher than the ground potential.
Usage environment: Do not open the lid or use in damp/explosive environments; When measuring with bare wires, the voltage should not exceed 30 Vrms, 42 Vpk, or 60 VDC. Insulated wires are required above this voltage.
2. Probe operation safety
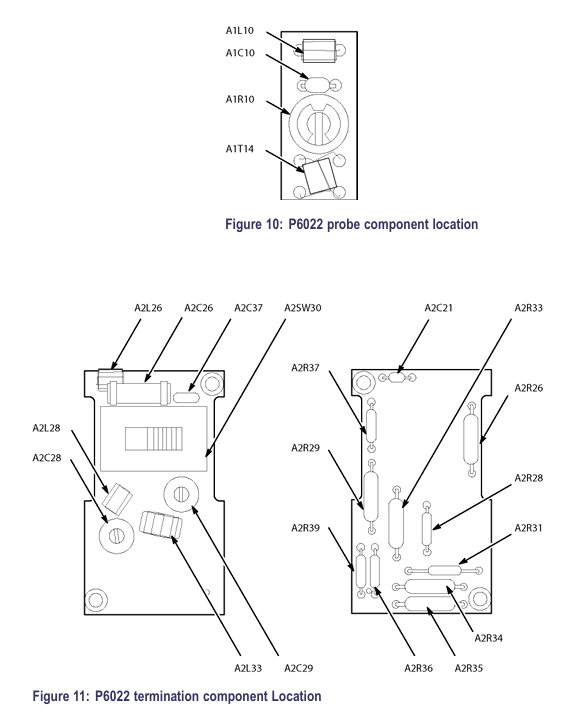
Sliding operation: When opening the sliding block, it should be held, and after placing the wire, it should be closed and locked (pushed to the transformer end about 1/8 inch) to ensure good contact between the two halves of the transformer.
Terminal protection: When measuring high currents, it is forbidden to disconnect the probe from the terminal (otherwise the secondary of the transformer will generate high voltage, causing electric shock or equipment damage).
Installation and usage guide
1. Installation steps
Terminal connection: Connect the BNC female head of the terminal to the probe output cable, and connect the BNC male head to the BNC input interface of the oscilloscope.
High frequency grounding: When measuring signals of ≥ 2 MHz, attach a 6-inch grounding wire to the probe transformer column and clamp it to RF ground to reduce interference and ringing.
Probe clamping: Open the slider → Place the measured wire into the transformer core (arrow direction is consistent with current direction, ensure correct waveform direction) → Close and lock the slider.
2. Usage skills
Reduce load effect: Prioritize clamping the probe at the low potential or ground terminal of the component to reduce its impact on the tested circuit.
Improve sensitivity: Increase the number of turns of the wire around the probe (e.g. 2 turns), doubling the sensitivity (e.g. 10 mA/division → 5 mA/division), but note that impedance increases with the square of the turns, which may affect high-frequency signals.
Anti magnetic field interference: In a strong magnetic field environment, use two probes to connect the positive and negative inputs of the oscilloscope, one clip the tested wire and one empty clip, and set the oscilloscope to "subtraction mode" to cancel out interference.
Performance validation and calibration
1. Required equipment
Equipment name, specification requirements, recommended model
Oscilloscope bandwidth ≥ 300 MHz, vertical sensitivity ≥ 1 mV/div, supports average amplitude TDS 303X, TDS 305X
Calibration generator fast edge (≤ 1 ns), sine wave (5 V) p-p@50 Ω, 935 Hz-120 MHz) Wavetek 9100, Tektronix PG 506A
Digital multimeter (DMM) AC voltage range, with an accuracy of 5.5 digits or higher, and an error of ≤ 0.5% at 50 kHz. Keithley 2000, HP 3458A
Auxiliary accessories BNC "T" type adapter, 50 Ω precision coaxial cable (36 inches), BNC to double banana head adapter, calibration fixture Tektronix corresponding models (see Table 6)
2. Core validation projects (including calculation methods)
(1) Mid frequency accuracy test (50 kHz)
Qualification criteria for step calculation method
1. Set the terminal to 1 mA/mV, calibrate the generator output to 50 kHz, 5 V p-p, connect BNC "T" → DMM, record the reading M1 I test=M1/50 Ω (test current). 2. Disconnect the DMM from "T", connect the probe+terminal, calibrate the probe clamp fixture, record the DMM reading M2% Error=[(M2 − I test)/I test] × 100 ± 3%
3. Set the terminal to 10 mA/mV, repeat step 2, and record the DMM reading M3% Error=[(10 × M3 − I test)/I test] × 100 ± 3%
(2) Low frequency bandwidth test
Qualification criteria for sensitivity gear step calculation method
1 mA/mV 1. Measure the output M1 at 50 kHz; 2. Set the generator to 8.5 kHz and measure the output M2 low-frequency ratio=M2/M1 ≥ 0.707
10 mA/mV 1. Measure the output of M3 at 50 kHz; 2. Set the generator to 935 Hz and measure the low frequency ratio of M4 output=M4/M3 ≥ 0.707
(3) High frequency bandwidth testing
Qualification criteria for sensitivity gear step calculation method
1 mA/mV. Set the oscilloscope to 20 mV/div and measure the amplitude M1 at 50 kHz. 2. Set the generator to 100 MHz and measure the amplitude M2. High frequency ratio=M2/M1 ≥ 0.707
10 mA/mV. 1. Set the oscilloscope to 2 mV/div and measure the amplitude M3 at 50 kHz. 2. Set the generator to 120 MHz and measure the amplitude M4. High frequency ratio=M4/M3 ≥ 0.707
3. Calibration adjustment (if verification fails)
Remove terminal cover: Use a small screwdriver to gently pry open the top snap cover of the terminal (keep the bottom cover).
Oscilloscope settings: CH1, DC coupling, 2 mV/div, 4-5 ns/div, average 5-10 times, trigger set AC, positive slope.
Adjust parameters: calibrate the generator to output a 1 V p-p fast edge signal and connect it to the calibration fixture; Adjust the C28 and C29 capacitors of the terminal and the R10 resistance of the probe to minimize waveform distortion and ensure optimal flat top response.
Maintenance and Repair
1. Daily maintenance
Cleaning: Wipe the probe body with a damp cloth; Clean the magnetic core with cotton swabs soaked in isopropanol (solvents such as benzene, toluene, acetone, etc. are prohibited); Do not soak or use abrasives.
Lubrication: The slider component can only be coated with a small amount of silicon-based grease, and petroleum based grease is prohibited; Lubrication is prohibited on the contact surface of the magnetic core.
Inspection: Regularly check the wear of the slider and the cleanliness of the magnetic core contact surface (dirt can reduce low-frequency response).
2. Disassembly and maintenance
(1) Probe disassembly (requires soldering iron)
Pull back the strain relief boot, gently pry on the probe body and remove it forward.
Take out the ball bearing and spring retainer, and remove the upper half of the slider, spring, and transformer.
Remove the grounding terminal of the circuit board and gently remove the circuit board, transformer, and cable components (to avoid damaging the cable solder joints).
(2) Terminal maintenance
Replace connector: remove cover → protect circuit with heat sink → solder off old connector → replace with new connector → solder reset.
Replace the circuit board: Remove the front and rear covers → solder off the connector wires → remove the circuit board screws → assemble in reverse after replacement.
3. List of replaceable parts (core)
Electrical components (excerpt from Table 10)
Component Number Tektronix Part Number Name and Description
A1 670-1112-00 Probe Circuit Board Component
A2 011-0106-00 P6022 Coaxial Terminal
A1T1 120-0603-00 Current Transformer
A2C28/A2C29 281-0123-00 Variable capacitor (5-25 PF, 100 V)
Mechanical components (excerpt from Table 11)
Drawing number/index Tektronix part number name and description quantity
12-1 204-0360-01 Probe Upper Shell 1
12-3 351-0174-00 Probe Slide (Acetal Material) 1
12-9 175-1027-00 RF Cable Assembly (62.5 Ω, 60 inches) 1
12-18 196-3120-01 Probe Grounding Wire (23 AWG, 6 inches) 1
- OMRON
- ABB
- General Electric
- EMERSON
- Honeywell
- HIMA
- ALSTOM
- Rolls-Royce
- MOTOROLA
- Rockwell
- Siemens
- Woodward
- YOKOGAWA
- FOXBORO
- KOLLMORGEN
- MOOG
- KB
- YAMAHA
- BENDER
- TEKTRONIX
- Westinghouse
- AMAT
- AB
- XYCOM
- Yaskawa
- B&R
- Schneider
- KONGSBERG
- NI
- WATLOW
- ProSoft
- SEW
- ADVANCED
- Reliance
- TRICONEX
- METSO
- MAN
- Advantest
- STUDER
- DANAHER MOTION
- Bently
- Galil
- EATON
- MOLEX
- DEIF
- B&W
- ZYGO
- Aerotech
- DANFOSS
- Beijer
- Moxa
- Rexroth
- Johnson
- WAGO
- TOSHIBA
- BMCM
- SMC
- HITACHI
- HIRSCHMANN
- Application field
- XP POWER
- CTI
- TRICON
- STOBER
- Thinklogical
- Horner Automation
- Meggitt
- Fanuc
- Baldor
- SHINKAWA
- Other Brands
- UniOP
- KUKA
- Iba
- Beckhoff
- ADLINK
-
 SIGMATEK TAE732-P Touch Screen Operator Panel
 -
 SIGMATEK 01-018-100 Control Module
 -
 SIGMATEK DDI-164 Digital Input Module
 -
 Sigma-Tek 5000B-36 Artificial Horizon
 -
 SIGMATEK 12-780-012 R8-IPC Geode LX800 Computer
 -
 SIGMATEK CTMS 020 Servo Drive
 -
 Sigmatek MDD121-1 Controller
 -
 Sigmatek ETV1021-L VARAN Terminal
 -
 Sigmatek DST022 DIAS Module
 -
 Sigmatek CCP512-K C-Dias Processor Module
 -
 Sigmatek SRO 021 Relay Output Module
 -
 Sigmatek SDI 101 Digital Input Module
 -
 Sigmatek IPC 221 Industrial PC
 -
Sigmatek DNC-305 Digital Input Module
-
 Sigmatek SDD335 DIAS Drive
 -
 Sigmatek C-IPC Industrial Controller
 -
 SIGMATEK 01-450-031 C-IPC 256MB LX800 Computer
 -
 SIGMATEK SDD310-3 DIAS Drive 310
 -
 SIGMATEK DSV011 SLIDES Hub Module 05-023-011
 -
SIGMATEK CNC031 CD Analog Module 12-011-031
-
 SIGMATEK 01-450-031 C-IPC 256MB LX800
 -
 SIGMATEK 01-450-026 C-IPC VIA 733MHz Controller
 -
 SIGMATEK DCP-643 DIAS CPU Module with DKL-003
 -
 SIGMATEK MDD111-L DIAS Drive Axis Module
 -
SIGMATEK SDD310-23-L DIAS Drive 310
-
 SIGMATEK Viscotec ETV0551 Touch Panel
 -
 SIGMATEK PC321K Industrial Computer
 -
 SIGMATEK MDP 102-1 SLIDES Power Module
 -
 SIGMATEK TAE-151 12-200-151 Light Terminal
 -
 SIGMATEK CP102 20-004-102P6995B HMI Panel
 -
 SIGMATEK CAM-123 12-017-123-C Analog Mixing Module
 -
SIGMATEK DCC041 DIAS Compact Controller
-
SIGMATEK DVI021 and DKL015 DIAS Power Module
-
 SIGMATEK SDD340-46 SDD Series Servo Drive
 -
 SIGMATEK Robotdrive L6 02220-7997 Engel Drive
 -
 SIGMATEK AKM63M-ANCNGBB0 4.38kW PM Servomotor
 -
 Sigmatek SDD 310 SLIDES-Drive SDD310-4O
 -
 Sigmatek SDD335-23K Drive VARAN Interface 14kVA
 -
 Sigmatek TAE1922-K Touch Display Unit
 -
 Sigmatek DIAS DCP 643 CPU Module DKL003
 -
 Sumitomo CNH-4105Y-43 NSNP Gear Reducer
 -
 Sumitomo CHHP-4160Y-35-213T Inline Gear Reducer
 -
 Sumitomo CNHM02-6090YA-87 NSNP Gear Motor
 -
 Sumitomo CNVXS-6100Y-43 NSNP Gear Reducer
 -
 Sumitomo CNHM2609511 Gear Motor
 -
 Sumitomo CHVM3-6130-B-35 Gear Motor
 -
 Sumitomo HW0389042-A Industrial Component
 -
 Sumitomo F2CF-W55-ZG05-64 Gear Reducer
 -
 Sumitomo CHH-6165Y-13 Inline Gear Reducer
 -
 Sumitomo CNVM3-6125C-EP-6 Cyclo Gear Motor
 -
 Sumitomo RNYX-1320Y-20 Gear Reducer
 -
Sumitomo XFCG111-43/24/165 Control Component
-
 Sumitomo LHYJ-3A105K-Y3-102 Gear Reducer
 -
 Sumitomo CNFM02-6095DA-B-121 TC-FX/FB-02A Motor
 -
 Sumitomo CNHJ-4105DAY-289 NSNP Gear Reducer
 -
 Sumitomo LHYJS-4C145Y-Y1-112 NSNB Gear Reducer
 -
 Radiator 2060351111 Komatsu Sumitomo Linkbelt
 -
 Sumitomo BL3-09B-35MEHDK6 Gearbox ANFJ-L30
 -
 Sumitomo Truninger 8H1-150 Internal Gear Pump
 -
Sumitomo RNFMS01-25R-B-150 200V NSNP Gearmotor
-
Sumitomo CHHBJN1HA-6135Y-29 Inline Reducer
-
Sumitomo EHYMS5-B6125YA-Y3-74 NSNB Reducer
-
 Sumitomo Eaton H-050AA2F-J Orbit Motor
 -
Sumitomo TC-FXVP Motor 0.75kW 4P 400V N-80M
-
 Sumitomo XFCG111-87/24130 Industrial Control Component
 -
 Sumitomo AF3122-030 Inverter 30kW 3Ph 200V
 -
 Sumitomo QT42-25FS-B Internal Gear Pump
 -
 Sumitomo F2CS-A35-ZG09-59 Speed Reducer
 -
 Sumitomo CNHM05-6090-B-29 Gear Motor
 -
 Sumitomo CHHJ-6145Y-29-210T Gear Reducer
 -
 Sumitomo E3P-20-2.2-S1450-E Hydraulic Pump
 -
 Sumitomo RNYMS1-1420C-AV-20 Right Angle Gear Motor
 -
 Sumitomo SR101 SRKG101-76-40-060 Reamer Head
 -
Sumitomo RNYM05-1220-25/UBAABB Gear Motor
-
 Optidrive E3 Sumitomo GHB-36 Vector Inverter Motor
 -
Sumitomo CNH-614HY-35 UNMP Gear Reducer
-
 Sumitomo CNH-612HY-6 SM-Cyclo Gearmotor
 -
 Sumitomo HF3214-A75 Electric Motor
 -
 Sumitomo CNVM02-6100-B-59 NSMP Gear Reducer
 -
 Sumitomo CNHJ4105Y35 NSNP Gear Reducer
 -
 Sumitomo CHH6165Y-29 NSNB Gear Reducer
 -
Sumitomo RNYM1-1420-25 Hyponic Gear Motor
-
 Sumitomo T600C Industrial Control Unit
 -
 Sumitomo LHH-4A115-K2-28 NSNB Gear Reducer
 -
 Sumitomo RNYM02-1220-AV-20 Speed Reducer
 -
 Sumitomo CHHS-6140Y-SB-17 Gear Motor
 -
 Sumitomo Heavy Industries SSE-100A-RM Drive Unit
 -
Sumitomo PA228771 CNHM2-6100YB-EP-8 Gear Motor
-
 Sumitomo RNYM02-1231-B-50 Speed Reducer
 -
Sumitomo CNFM1H-6090-6 Induction Motor
-
 Sumitomo CHH-614HY-11 Gear Reducer
 -
Sumitomo F4C-D25-ZG01-41 Speed Reducer
-
Sumitomo PA224280 CNHM1-6095YC-EP-21 Gear Motor
-
Sumitomo KHYJB4115K185145TC Gear Motor
-
 Sumitomo LHYJS-3A105Y-Y1-179 NSNB Gearmotor
 -
 Sumitomo AF3102-022 BN AC Driver
 -
 Sumitomo SG75M-H Operator Panel
 -
 Sumitomo NT2014-2A2 NSNP Control Unit
 -
Sumitomo RNYMS03-1320-B-60 Gear with Motor
-
Sumitomo F90L/4 F90L4 Drive Motor
-
Sumitomo TC-FX NSMP Motor Unit
-
Sumitomo RNYM05-1210-7 NSMP Gearmotor
-
Sumitomo Fine Cyclo F2CFS-C45-59 Gearbox
-
Sumitomo Heavy Industries SSE-50A Industrial Unit
-
 Sumitomo CHH-6130Y-17 NSNB Gear Reducer
 -
 Sumitomo UMC556000-02 Control Unit
 -
 Sumitomo CHHJ-4155Y-87 Inline Gear Box
 -
 Sumitomo ANFXS-P120F-M30GLD-5 NSNP Reducer
 -
Sumitomo CNHJ-6095Y-17 NSNP Gear Reducer
-
Sumitomo H-3115 17:1 USNT Gear Reducer
-
Sumitomo CHH 6135Y USNTC02 Gear Reducer
-
 Sumitomo JA450918A2 45JA918A Cylinder Head
 -
 Sumitomo SD4SGS-ACB-02C-110-54 Solenoid Valve
 -
Sumitomo CNVMS02-6100DAYA-231 NSMD Gear Reducer
-
Sumitomo CHH4135Y8 NSMD Inline Gear Reducer
-
Sumitomo PA020201 CNH-6125Y-87 Worm Gear Reducer
-
 Sumitomo Connectivity 8100-2730 Connector
 -
Sumitomo CNHJ-6120Y-87 PA021857 NSNB Gear Reducer
-
Sumitomo RNYM02-1330-B-100 Induction Gear Motor
-
 Sumitomo JA762913AC Operator Interface Keypad
 -
 Sumitomo CQT51-100FV-S1262J-A Coolant Pump
 -
Sumitomo PA225389 CNHM1-6095YC-EP-6 Gear Motor
-
Sumitomo CHHJ-4130Y-43 NSNB Gear Reducer
-
Sumitomo RNYJ-1520Y-12 NSNB Gear Reducer
-
Sumitomo HC1480-29.00 NSMD Inline Gear Reducer
-
 Sumitomo MC-550 MCU UMC550000AEG01
 -
 Sumitomo CNVM1H-6125YA-B-87 Gear Reducer
 -
Sumitomo SD4GS-ACB-02B-110-54 Solenoid Valve


