

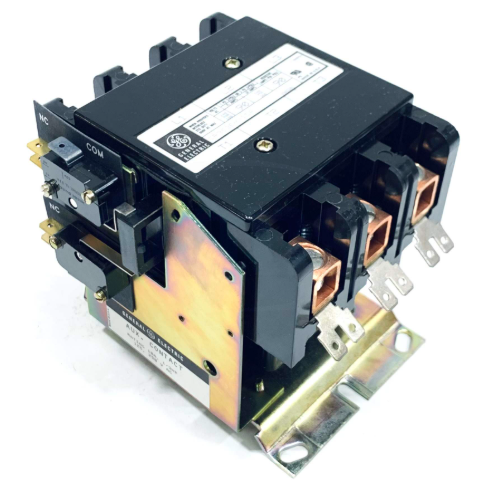
The GE CK11CE300 contactor is an electrical component designed by General Electric (GE) specifically for low-voltage distribution and control scenarios. With stable performance, reliable on-off capability, and good adaptability, it is widely used in industrial automation, building electrical, mechanical equipment control, and other fields. Its core function is to achieve the connection or disconnection of the main circuit under the action of control signals, thereby achieving the purpose of controlling the start and stop of loads such as motors and heating equipment. It is an indispensable key component in electrical control systems
GE CK11CE300 contactor
Core technical parameters
Technical parameters are the core basis for the selection and application of contactors. The key parameters of GE CK11CE300 are as follows. Actual application should be based on the product manual and physical identification:
-Rated voltage: The rated voltage of the control coil usually supports conventional low voltage levels such as AC220V and AC380V (specific to the model suffix or parameter table), and the rated voltage of the main contact is AC690V, suitable for most low voltage distribution systems.
-Rated current: The rated working current of the main contact is 30A, which can stably carry the load current under rated conditions and meet the control requirements of small and medium power equipment.
-Contact form: Adopting a combination of "normally open main contact+auxiliary contact", generally configured with 3 sets of normally open main contacts for connecting the main circuit; Auxiliary contacts are usually 1 open 1 close or 2 open 2 close (depending on the actual model), used for signal feedback or interlocking control of control circuits.
-Operating frequency: Supports high-frequency operations, with a rated operating frequency of up to 1200 times per hour, suitable for scenarios where motors frequently start and stop, such as conveying equipment, compressors, etc.
-Work schedule: Suitable for continuous work schedule (S1), short-term work schedule (S2), and intermittent cycle work schedule (S3), where the load duration rate under intermittent cycle work schedule is usually 40%, which can be flexibly matched according to load characteristics.
-Coil power consumption: The suction power consumption is about tens of VA, and the power consumption is kept low (usually a few VA), effectively reducing the energy loss of the control circuit.
-Mechanical and electrical lifespan: The mechanical lifespan can reach over 10 million cycles, and the electrical lifespan (under rated load) can reach over 1 million cycles, providing a long-lasting service life.
Structural Design and Core Features
1. Reasonable structural composition
The GE CK11CE300 contactor adopts a modular structure design, mainly composed of four parts: electromagnetic system, contact system, arc extinguishing device, and housing:
-Electromagnetic system: including coil, iron core, and armature, it is the driving core of the contactor. When the coil is energized, the iron core generates electromagnetic attraction to attract the armature, driving the contact to move; After the coil is powered off, the armature resets under the action of the reset spring, and the contacts return to their initial state. The iron core is made of stacked silicon steel sheets, which can effectively reduce eddy current losses and minimize coil heating.
-Contact system: The main contact is made of silver alloy material, which has excellent conductivity, wear resistance, and resistance to welding, and can effectively cope with arc erosion during connection and disconnection; The auxiliary contacts are made of silver nickel alloy to ensure the reliability of control signal transmission. Stable contact pressure and low contact resistance can effectively reduce contact heating.
-Arc extinguishing device: For the arc generated when the main contact is disconnected, this contactor is equipped with a closed arc extinguishing cover. Through the action of a magnetic field or the principle of grid arc extinguishing, the arc is quickly extinguished to prevent the arc from burning the contact and affecting surrounding components, thus improving operational safety.
-Shell: Made of high-strength flame-retardant plastic material, it has good insulation performance, heat resistance, and impact resistance, which can effectively protect internal components from dust, oil stains, and external mechanical damage, while complying with relevant safety standards.
2. Outstanding performance characteristics
-High reliability: By optimizing the design of the electromagnetic system and selecting high-quality materials, the contactor can still operate stably under complex working conditions such as voltage fluctuations (usually allowing ± 10% of the rated voltage) and temperature changes (applicable ambient temperatures are generally -20 ℃~+60 ℃), reducing the probability of faults.
-Good safety: equipped with a complete insulation protection structure, the creepage distance and electrical clearance meet international standards, effectively preventing leakage and short circuit accidents; The reasonable design of the arc extinguishing device avoids safety hazards caused by arc exposure.
-Easy installation: using standard guide rail installation or bolt fixing method, the installation process is simple and efficient, and can be quickly integrated into the distribution box or control cabinet; The wiring terminal design is clear, with clear identification, making it easy to operate and maintain the wiring.
-Strong compatibility: It can be used in conjunction with GE series thermal relays, circuit breakers, and other protective components to form a complete motor starting and protection circuit. It can also adapt to other brands of low-voltage electrical components and has good system compatibility.
Applicable scenarios
Based on its rated current of 30A and stable performance, the GE CK11CE300 contactor is mainly suitable for controlling small and medium power loads. Typical application scenarios include:
-In the field of industrial automation, it is used to control the start and stop of motors for equipment such as conveyor belts, fans, water pumps, and small compressors, such as auxiliary equipment control for factory production lines and workshop ventilation system control.
-In the field of building electrical, it is suitable for controlling central air conditioning end fans, water supply and drainage pumps, lighting systems (high-power lighting circuits), etc., to meet the electrical control needs of commercial buildings and residential communities.
-In the field of mechanical equipment, as the control core component of small machine tools, packaging machinery, printing machinery and other equipment, it realizes the automation operation control of the equipment.
-Other low-voltage control scenarios: motor control for agricultural irrigation equipment, small refrigeration equipment, and on/off control for electric heating loads such as resistance furnaces and electric heaters.
Installation and maintenance precautions
1. Installation specifications
-Before installation, it is necessary to confirm that the model, rated voltage, rated current, and other parameters of the contactor are consistent with the actual requirements. Check the appearance of the product for any damage and ensure that the contacts are not oxidized or deformed.
-The installation location should be chosen in a well ventilated, dry, dust-free, non corrosive gas, and flammable and explosive environment, avoiding direct sunlight and severe vibration.
-When using guide rail installation, it is necessary to ensure that the guide rail specifications match and the installation is firm; When fixing with bolts, the tightening torque should be moderate to prevent damage to the shell caused by over tightening or poor contact caused by over loosening.
-When wiring, it is necessary to distinguish between the main contact and the auxiliary contact. The cross-sectional area of the main circuit wire should be selected according to the rated current (usually 30A current compatible with 6-10mm ² copper wire). The wiring terminals should be tightened to prevent loosening and heating; The cross-sectional area of the control circuit wires is generally 1.5-2.5mm ² to ensure stable coil power supply.
-After installation, a certain amount of heat dissipation space should be reserved, and the distance between the contactor and surrounding components should not be too close (recommended not less than 50mm).
2. Daily maintenance
-Regularly check the surface cleanliness of the contactor. If there is dust or oil stains, they should be cleaned with a dry brush or compressed air to avoid affecting heat dissipation and insulation performance.
-Check the status of the contacts. If severe erosion, depression, or excessive oxide layer is found on the main contacts, the contacts or contactors should be replaced in a timely manner; The auxiliary contacts must ensure reliable contact and no jamming phenomenon.
-Check the appearance of the coil for any damage or odor, measure the resistance value of the coil. If there is a significant deviation from the rated value (such as too high or too low resistance), it indicates that the coil may have a fault and needs to be replaced in a timely manner.
-Check whether the arc extinguishing cover is intact, whether there is any burning or deformation, and replace it in a timely manner if it is damaged to ensure the arc extinguishing effect.
-Regularly conduct action tests, manually or through control signals to trigger the contactor action, to check whether the action is flexible, without jamming, and whether the contact is reliably engaged and disconnected.
-In humid or dusty environments, it is necessary to shorten the maintenance cycle, strengthen the inspection of insulation performance, and prevent leakage accidents.
- User name Member Level Quantity Specification Purchase Date
- Satisfaction :
-


-
 SUMITOMO T2100Z steel turning selection and troubleshooting
 -
 SUMITOMO PSZ Turn Quick Change System Selection and Troubleshooting
 -
 SUMITOMO EGU chip breaker selection and troubleshooting
 -
 SUMITOMO GND slotting tool holder selection and troubleshooting
 -
 SUMITOMO AC8000P steel turning selection and troubleshooting
 -
 SUMITOMO AC6000M Stainless Steel Turning Guide
 -
 SUMITOMO ELECTRIC AC5000S Heat Resistant Alloy Turning Guide
 -
 SUMITOMO ELECTRIC AC4000K Cast Iron Turning Selection Guide
 -
 SUMITOMO ELECTRIC AC1135U Small Parts Turning Application Guide
 -
 SUMITOMO ELECTRIC AC1030U Precision Machining Selection and Practice for Small Parts
 -
 CCS 6900G/P pressure switch
 -
 BENDER WR Transformer Selection
 -
 BENDER RCMA475LY Residual Current Monitoring
 -
 BENDER IRDH575 Insulation Monitoring
 -
 BENDER IRDH265 Insulation Monitoring and Debugging
 -
 Bender RCMA475LY residual current monitor debugging
 -
 Beckwith Electric M-3425A Generator Protection Relay Debugging Guide
 -
 Automated MEX816U Expander Troubleshooting Guide
 -
 ASEM HT2150 Industrial Tablet Selection and Troubleshooting
 -
 Troubleshooting and practical application of Advantest U3771/3772 microwave spectrum analyzer
 -
 Advantest R6144 Programmable DC Voltage/Current Source (Calibration Source) Calibration and Maintenance
 -
 Aerotech UNIDEX 100/U100i single axis motion controller
 -
 Aerotech Ndrive MP Ultra Compact PWM Digital Servo Driver
 -
 Aerotech Ndrive HPe 10/20/30 High Performance PWM Digital Servo Drive
 -
 Aerotech Ndrive HLe maintenance replacement
 -
 Aerotech Ndrive CP maintenance replacement
 -
 Aerotech Ndrive Linear Drive Selection
 -
 Aerotech NDrive HL linear drive maintenance replacement
 -
 Aerotech NDrive HP 10/20/30 Maintenance and Replacement
 -
 Aerotech NDrive CP10 Servo Drive Guide
 -
 SIGMATEK TAE1941 Display Unit Replacement and Troubleshooting
 -
 SIGMATEK TAE151 Replacement and Troubleshooting
 -
 SIGMATEK AKM Servo Motor Replacement and Troubleshooting Guide
 -
 SIGMATEK S-DIAS Control System Replacement and Upgrade Guide
 -
 SIGMATEK ETT Series HMI Replacement and Selection Guide
 -
 SIGMATEK DIAS Drive 310-23 servo amplifier
 -
 SIGMATEK CCP 521 C-DIAS processor module
 -
 Megmeet L6 electric drive troubleshooting
 -
 Sysmex XN-1000/2000 Technical Guide
 -
 Sysmex XN-L blood analyzer maintenance and troubleshooting
 -
 Troubleshooting and Maintenance of Sysmex XN-9000
 -
 LTI Motion ServoOne PROFIBUS/PROFINET Troubleshooting and Replacement
 -
 Micro Innovation MICRO GF1 Touch Screen Troubleshooting and Replacement
 -
 Troubleshooting and Replacement of Micro Innovation WINbloc Distributed I/O System
 -
 MICRO PANEL GS-2 Troubleshooting and Debugging
 -
 LTi Synchronous Motor LST/LSH Replacement Selection Guide
 -
 Fault diagnosis of LTi CDE/CDB3000
 -
 Maintenance and troubleshooting of ENOTEC SILOTEC 8000 silo analyzer
 -
 ENOTEC ENSITU 7000 Oxygen Analyzer
 -
 ENOTEC COMTEC 6000 ATEX GasEx Analyzer Maintenance, Calibration, and Troubleshooting Guide
 -
 ENOTEC Analyzer Family Selection Guide
 -
 ENOTEC OXITEC 500E Oxygen Analyzer
 -
 KUKA KR CS Box-2 Compact Controller for Four Axis SCARA Robot
 -
 KUKA KR C5 slim-2 Robot Controller
 -
 KUKA KR C5 micro KSS troubleshooting
 -
 KUKA KR C5 micro debugging and troubleshooting
 -
 KUKA KR C5 Controller Assembly and Troubleshooting
 -
 KUKA KR C5 Cabinet Assembly and Troubleshooting
 -
 KUKA KR C4 Smallsize-2 Debugging Guide
 -
 KUKA KR C4 Midsize Assembly Guide
 -
 ENOTEC OXITEC 5000 Oxygen Analyzer Maintenance Guide
 -
 KUKA KR C4 extended assembly and debugging
 -
 KUKA KR C4 compact assembly and debugging
 -
 KUKA Sunrise Cabinet Med Medical Collaborative Robot Special Control Cabinet
 -
 KUKA Sunrise Cabinet Next Generation Small Control Cabinet
 -
 KUKA KR C4 Smallsize-2 family's smallest control cabinet
 -
 KUKA KR C4 Midsize Fault Diagnosis
 -
 KUKA KR C4 extended is a high-power multi axis control cabinet
 -
 Troubleshooting and Maintenance of KUKA KR C4 Control Cabinet
 -
 Troubleshooting and Maintenance of KUKA KR C4 Compact Control Cabinet
 -
 KUKA KR15 DELTA-2 V2 Robot Installation and Debugging
 -
 KUKA TITAN-2 Ultra Assembly and Maintenance Guide
 -
 KUKA KR SCARA-2 CS Assembly, Debugging, and Operation Guide
 -
 Troubleshooting KUKA SCARA X
 -
 Troubleshooting of KUKA KR FORTEC-2 ultra
 -
 Troubleshooting of KUKA KR FORTEC-2
 -
 Troubleshooting KUKA KR 1000 Titan
 -
 Troubleshooting of KUKA KR 600 FORTEC
 -
 KUKA KR 500 MT FORTEC Maintenance and Inspection
 -
 KUKA KR 360 FORTEC Inspection and Maintenance Guide
 -
 Troubleshooting KUKA Sunrise Cabinet Med
 -
 KUKA KR SCARA HO Assembly and Maintenance
 -
 KUKA QUANTEC-2 PA maintenance troubleshooting
 -
 KUKA QUANTEC-2 K/P Maintenance Troubleshooting Guide
 -
 KUKA QUANTEC-2 HO Maintenance Guide
 -
 KUKA KR QUANTEC-2 HC Maintenance and Rescue Guide
 -
 KUKA KR QUANTEC-2 Maintenance Troubleshooting Guide
 -
 KUKA KR QUANTEC PA series heavy-duty palletizing robot
 -
 KUKA KR IONTEC-2 Debugging and Maintenance Guide
 -
 KUKA KR IONTEC ultra series six axis heavy-duty industrial robot
 -
 KUKA KR IONTEC HO Maintenance Troubleshooting Guide
 -
 KUKA KR CYBERTECH-3 HW maintenance troubleshooting
 -
 KUKA KR CYBERTECH-3 maintenance troubleshooting
 -
 KUKA KR8 R2100-2 arc HW maintenance troubleshooting
 -
 KUKA KR CYBERTECH nano-2 maintenance troubleshooting
 -
 KUKA KR 20 R1810 HO maintenance troubleshooting
 -
 KUKA CYBERTECH maintenance troubleshooting
 -
 KUKA KR CYBERTECH CR maintenance troubleshooting
 -
 KUKA KR AGILUS-3 ultra maintenance troubleshooting
 -
 KUKA KR 300 R2700-2 C-F maintenance troubleshooting
 -
 KUKA KR 20 R1820-2 E Maintenance Troubleshooting and Replacement Practice
 -
 KUKA AGILUS-3 troubleshooting
 -
 KUKA KR AGILUS-2 maintenance troubleshooting
 -
 KUKA KR 1000 titan PA troubleshooting
 -
 KUKA KR 700 PA maintenance troubleshooting
 -
 KUKA KR18 R1450-3 PP Operation and Maintenance Essentials
 -
KUKA KR12 SCARA Operations Essentials
-
 KUKA KR4 R600 Operation and Maintenance Essentials
 -
 KUKA KR 3 AGILUS Operation and Maintenance Safety Essentials
 -
 KUKA LBR iiwa CR Cleanroom Troubleshooting and Maintenance
 -
 Troubleshooting and Maintenance of KUKA KR AGILUS sixx
 -
 KUKA KR60 SCARA CS Maintenance Guide
 -
 KUKA KR 23 SCARA-2 Robot Installation and Maintenance Detailed Explanation
 -
 KUKA KR 20 SCARA CS Robot Selection and Maintenance Guide
 -
 KUKA KR 15 DELTA-2 Robot Installation and Maintenance
 -
 KUKA KR 13 SCARA-2 CS Detailed Explanation
 -
 KUKA KR 3 D1200 Robot Operation and Maintenance
 -
 KUKA KR 3 D1200 HM Robot Operation and Maintenance Guide
 -
 KUKA LBR Med Medical Robot Integration Guide
 -
 KUKA iiwa Robot Safety Operation and Maintenance
 -
 KUKA LBR iiwa CR Operations and Troubleshooting
 -
 Lauer PCS Series Operation Console Configuration Guide
 -
 Installation and Maintenance Guide for KUKA LBR iisy Series Collaborative Robots
 -
 KUKA LBR iisy 3 R760 Collaborative Robot Debugging Guide
 -
 KUKA LBR iico Robot Installation and Debugging Technical Guide
 -
 Lauer Starline LCA 300/320/325 Text Display Application Guide
 -
 Lauer PCS 950 Operation Console Application Guide
 -
 Lauer EPC series industrial computer configuration


