

Type: Siemens SIMATIC ET200SP Server Module Operation Manual, version March 2015 (A5E0357537-AB), is a supplementary document to the ET200SP Distributed I/O System Manual, focusing on module specific functions. System level general functions should refer to the ET200SP System Manual (available through specified links).
Siemens ET200SP 6ES7193-6PA00-0AA0 server module
Overview and Basic Product Information
(1) Overview
Type: Siemens SIMATIC ET200SP Server Module Operation Manual, version March 2015 (A5E0357537-AB), is a supplementary document to the ET200SP Distributed I/O System Manual, focusing on module specific functions. System level general functions should refer to the ET200SP System Manual (available through specified links).
Document Structure: Includes 8 core chapters: Preface, Document Guide, Product Overview, Parameter/Address Space, Diagnostic Alarm, Technical Specifications, Parameter Data Recording, Dimensional Drawings, along with supporting safety warning system and compliance instructions.
(2) Product Fundamentals
Model and positioning: Model 6ES7193-6PA00-0AA0 is a server module for the ET200SP distributed I/O system. Its core function is to enclose the backplane bus and provide three backup fuses (5 × 20mm) for storage support. It needs to be used in conjunction with specific CPU/interface modules.
Compatibility: Only supports IM 155-6 PN BA interface module (product version ≥ 1, firmware version ≥ V1.1.1), can be configured through STEP 7 (TIA Portal) or GSD file.
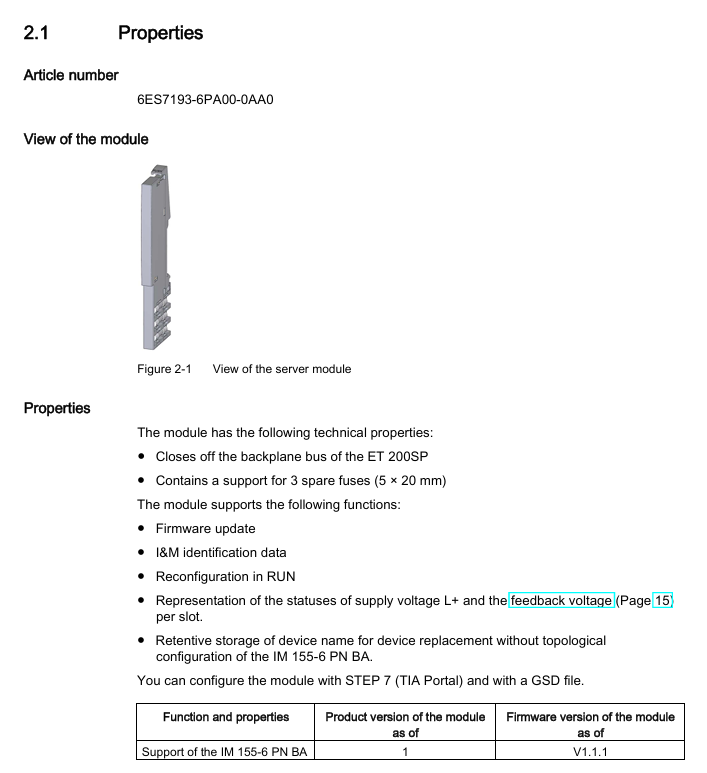
Core functions and features
(1) Basic functions
Hardware Assistance: Integrated backup fuse storage location, convenient for quick access to fuses during on-site maintenance, without the need to carry additional spare parts boxes.
System support: Closed ET200SP backplane bus to ensure stable bus signals and avoid external interference; Support firmware updates, I&M identification data storage, and reconfiguration in RUN mode to enhance system flexibility and maintainability.
Status monitoring: It can monitor the power supply voltage (L+) and feedback voltage status of each slot I/O module in real time, and output the monitoring results through the address space, which is convenient for user programs to read and locate faults.
Device replacement optimization: When there is no topology configuration for IM 155-6 PN BA, the device name can be retained, and there is no need to reconfigure the name parameter after replacing the module, simplifying the replacement process.
(2) Key characteristics
Characteristic Details
Parameter configuration supports the "L+Power Loss Group Diagnosis" parameter (can be enabled/disabled, disabled by default). When enabled, 1 diagnostic message will be generated based on the potential group for L+power loss, regardless of the "L+Power Loss Diagnosis" parameter of the I/O module itself
The address space function outputs input data of different lengths based on the maximum number of I/O modules supported by the CPU/interface module (12/32/64 slots). It can choose to monitor only the power supply voltage or monitor both the power supply voltage and feedback voltage simultaneously
Diagnostic alarm is only a type 1 diagnostic alarm (error code 1BH), corresponding to "server module firmware version invalid (
Parameters and Address Space
(1) Parameter configuration
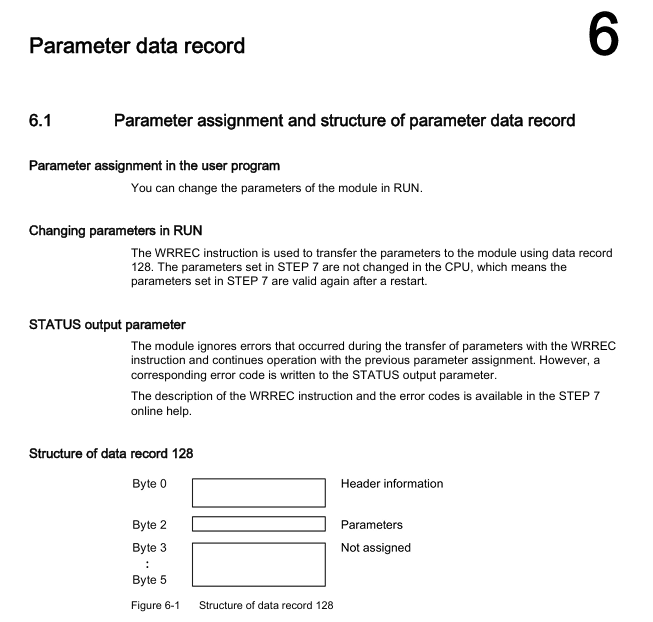
Configurable parameters: Only one parameter, "L+power loss group diagnosis", with a range of "enable/disable", disabled by default, supports reconfiguration in RUN mode (data recording needs to be transmitted through the "WRREC" command).
Parameter validation logic: After activation, the system generates a diagnosis based on the power supply status of the installed I/O modules in the potential group, requiring no empty slots in the potential group; When the light colored BaseUnit (BU.. D) has no I/O module, the potential group will be merged into the previous potential group. After inserting the I/O module, the potential group will be re identified and the diagnosis will be updated.
(2) Address space rules
1. Data length division
According to the maximum number of I/O modules supported by the CPU/interface module, the input data length is divided into three categories, as follows:
The maximum number of I/O modules supported is to monitor only the power supply voltage (in bytes) while monitoring both the power supply voltage and feedback voltage (in bytes). Only the diagnostic address (with no data) is supported
12 slots 2 4 0
32 slots 4 8 0
64 slots 8 16 0
2. Data interpretation rules
Power supply voltage monitoring: Each I/O module corresponds to one bit, bit=1 indicates "L+power supply is normal and the module exists", bit=0 indicates "L+power supply is missing or the module is not installed"; The server module's own slot outputs bit=0 regardless of whether it is installed or not.
Feedback voltage monitoring: Extra bytes of the same length as the supply voltage are occupied, with 1 bit corresponding to each I/O module. Bit=1 indicates "feedback voltage exists", and bit=0 indicates "feedback voltage is missing"; The I/O module without feedback voltage monitoring function has a bit status that is consistent with the "L+power loss" status (i.e. bit=0).
Data validity: When the server module is missing, all input data is invalid, and the module installation status needs to be checked first.
3. Feedback voltage evaluation
Voltage range definition: When L+supply voltage is greater than 6V, the feedback voltage status is included in the input data; When 6V
Evaluation scenario: Only when the L+power supply is safely disconnected (as indicated by the safety relay status), the feedback voltage bit=1 (6-12V or>12V) can be used as a fault diagnosis basis to locate system circuit abnormalities.

Technical specifications and installation
(1) Mechanical specifications
Parameter Value
Dimensions (width x height x depth) 7mm x 117mm x 36mm
Weight (approximately) 19g
The fuse supports three 5 × 20mm backup fuses
(2) Installation and Connection
Installation method: Suitable for ET200SP standard installation rails, no additional fasteners required, quick installation through rail buckles, compatible with other ET200SP modules in terms of layout.
Connection requirements: No independent I/O terminals, only connected to the system through the backplane bus, no additional wiring required, automatically connected to the system after installation.
Diagnosis and maintenance
(1) Diagnostic alarm processing
Diagnosis alarm type error code reason solution
Invalid firmware version 1BH server module firmware version
2. Firmware update of existing modules (requires specialized tools and processes)
(2) Parameter data recording
Parameter transmission: To modify parameters in RUN mode, the "WRREC" command is used to write the parameters into data record 128 (bytes 0-5, where byte 2 is the "L+power loss group diagnosis" enable bit, bit=1 enabled).
Error handling: When an error occurs during parameter transmission, the module ignores the error and maintains the original parameter configuration. At the same time, the error code is written into the "STATUS" output parameter. The meaning of the error code can be queried through STEP 7 online help.
- User name Member Level Quantity Specification Purchase Date
- Satisfaction :
-


-
 SUMITOMO T2100Z steel turning selection and troubleshooting
 -
 SUMITOMO PSZ Turn Quick Change System Selection and Troubleshooting
 -
 SUMITOMO EGU chip breaker selection and troubleshooting
 -
 SUMITOMO GND slotting tool holder selection and troubleshooting
 -
 SUMITOMO AC8000P steel turning selection and troubleshooting
 -
 SUMITOMO AC6000M Stainless Steel Turning Guide
 -
 SUMITOMO ELECTRIC AC5000S Heat Resistant Alloy Turning Guide
 -
 SUMITOMO ELECTRIC AC4000K Cast Iron Turning Selection Guide
 -
 SUMITOMO ELECTRIC AC1135U Small Parts Turning Application Guide
 -
 SUMITOMO ELECTRIC AC1030U Precision Machining Selection and Practice for Small Parts
 -
 CCS 6900G/P pressure switch
 -
 BENDER WR Transformer Selection
 -
 BENDER RCMA475LY Residual Current Monitoring
 -
 BENDER IRDH575 Insulation Monitoring
 -
 BENDER IRDH265 Insulation Monitoring and Debugging
 -
 Bender RCMA475LY residual current monitor debugging
 -
 Beckwith Electric M-3425A Generator Protection Relay Debugging Guide
 -
 Automated MEX816U Expander Troubleshooting Guide
 -
 ASEM HT2150 Industrial Tablet Selection and Troubleshooting
 -
 Troubleshooting and practical application of Advantest U3771/3772 microwave spectrum analyzer
 -
 Advantest R6144 Programmable DC Voltage/Current Source (Calibration Source) Calibration and Maintenance
 -
 Aerotech UNIDEX 100/U100i single axis motion controller
 -
 Aerotech Ndrive MP Ultra Compact PWM Digital Servo Driver
 -
 Aerotech Ndrive HPe 10/20/30 High Performance PWM Digital Servo Drive
 -
 Aerotech Ndrive HLe maintenance replacement
 -
 Aerotech Ndrive CP maintenance replacement
 -
 Aerotech Ndrive Linear Drive Selection
 -
 Aerotech NDrive HL linear drive maintenance replacement
 -
 Aerotech NDrive HP 10/20/30 Maintenance and Replacement
 -
 Aerotech NDrive CP10 Servo Drive Guide
 -
 SIGMATEK TAE1941 Display Unit Replacement and Troubleshooting
 -
 SIGMATEK TAE151 Replacement and Troubleshooting
 -
 SIGMATEK AKM Servo Motor Replacement and Troubleshooting Guide
 -
 SIGMATEK S-DIAS Control System Replacement and Upgrade Guide
 -
 SIGMATEK ETT Series HMI Replacement and Selection Guide
 -
 SIGMATEK DIAS Drive 310-23 servo amplifier
 -
 SIGMATEK CCP 521 C-DIAS processor module
 -
 Megmeet L6 electric drive troubleshooting
 -
 Sysmex XN-1000/2000 Technical Guide
 -
 Sysmex XN-L blood analyzer maintenance and troubleshooting
 -
 Troubleshooting and Maintenance of Sysmex XN-9000
 -
 LTI Motion ServoOne PROFIBUS/PROFINET Troubleshooting and Replacement
 -
 Micro Innovation MICRO GF1 Touch Screen Troubleshooting and Replacement
 -
 Troubleshooting and Replacement of Micro Innovation WINbloc Distributed I/O System
 -
 MICRO PANEL GS-2 Troubleshooting and Debugging
 -
 LTi Synchronous Motor LST/LSH Replacement Selection Guide
 -
 Fault diagnosis of LTi CDE/CDB3000
 -
 Maintenance and troubleshooting of ENOTEC SILOTEC 8000 silo analyzer
 -
 ENOTEC ENSITU 7000 Oxygen Analyzer
 -
 ENOTEC COMTEC 6000 ATEX GasEx Analyzer Maintenance, Calibration, and Troubleshooting Guide
 -
 ENOTEC Analyzer Family Selection Guide
 -
 ENOTEC OXITEC 500E Oxygen Analyzer
 -
 KUKA KR CS Box-2 Compact Controller for Four Axis SCARA Robot
 -
 KUKA KR C5 slim-2 Robot Controller
 -
 KUKA KR C5 micro KSS troubleshooting
 -
 KUKA KR C5 micro debugging and troubleshooting
 -
 KUKA KR C5 Controller Assembly and Troubleshooting
 -
 KUKA KR C5 Cabinet Assembly and Troubleshooting
 -
 KUKA KR C4 Smallsize-2 Debugging Guide
 -
 KUKA KR C4 Midsize Assembly Guide
 -
 ENOTEC OXITEC 5000 Oxygen Analyzer Maintenance Guide
 -
 KUKA KR C4 extended assembly and debugging
 -
 KUKA KR C4 compact assembly and debugging
 -
 KUKA Sunrise Cabinet Med Medical Collaborative Robot Special Control Cabinet
 -
 KUKA Sunrise Cabinet Next Generation Small Control Cabinet
 -
 KUKA KR C4 Smallsize-2 family's smallest control cabinet
 -
 KUKA KR C4 Midsize Fault Diagnosis
 -
 KUKA KR C4 extended is a high-power multi axis control cabinet
 -
 Troubleshooting and Maintenance of KUKA KR C4 Control Cabinet
 -
 Troubleshooting and Maintenance of KUKA KR C4 Compact Control Cabinet
 -
 KUKA KR15 DELTA-2 V2 Robot Installation and Debugging
 -
 KUKA TITAN-2 Ultra Assembly and Maintenance Guide
 -
 KUKA KR SCARA-2 CS Assembly, Debugging, and Operation Guide
 -
 Troubleshooting KUKA SCARA X
 -
 Troubleshooting of KUKA KR FORTEC-2 ultra
 -
 Troubleshooting of KUKA KR FORTEC-2
 -
 Troubleshooting KUKA KR 1000 Titan
 -
 Troubleshooting of KUKA KR 600 FORTEC
 -
 KUKA KR 500 MT FORTEC Maintenance and Inspection
 -
 KUKA KR 360 FORTEC Inspection and Maintenance Guide
 -
 Troubleshooting KUKA Sunrise Cabinet Med
 -
 KUKA KR SCARA HO Assembly and Maintenance
 -
 KUKA QUANTEC-2 PA maintenance troubleshooting
 -
 KUKA QUANTEC-2 K/P Maintenance Troubleshooting Guide
 -
 KUKA QUANTEC-2 HO Maintenance Guide
 -
 KUKA KR QUANTEC-2 HC Maintenance and Rescue Guide
 -
 KUKA KR QUANTEC-2 Maintenance Troubleshooting Guide
 -
 KUKA KR QUANTEC PA series heavy-duty palletizing robot
 -
 KUKA KR IONTEC-2 Debugging and Maintenance Guide
 -
 KUKA KR IONTEC ultra series six axis heavy-duty industrial robot
 -
 KUKA KR IONTEC HO Maintenance Troubleshooting Guide
 -
 KUKA KR CYBERTECH-3 HW maintenance troubleshooting
 -
 KUKA KR CYBERTECH-3 maintenance troubleshooting
 -
 KUKA KR8 R2100-2 arc HW maintenance troubleshooting
 -
 KUKA KR CYBERTECH nano-2 maintenance troubleshooting
 -
 KUKA KR 20 R1810 HO maintenance troubleshooting
 -
 KUKA CYBERTECH maintenance troubleshooting
 -
 KUKA KR CYBERTECH CR maintenance troubleshooting
 -
 KUKA KR AGILUS-3 ultra maintenance troubleshooting
 -
 KUKA KR 300 R2700-2 C-F maintenance troubleshooting
 -
 KUKA KR 20 R1820-2 E Maintenance Troubleshooting and Replacement Practice
 -
 KUKA AGILUS-3 troubleshooting
 -
 KUKA KR AGILUS-2 maintenance troubleshooting
 -
 KUKA KR 1000 titan PA troubleshooting
 -
 KUKA KR 700 PA maintenance troubleshooting
 -
 KUKA KR18 R1450-3 PP Operation and Maintenance Essentials
 -
KUKA KR12 SCARA Operations Essentials
-
 KUKA KR4 R600 Operation and Maintenance Essentials
 -
 KUKA KR 3 AGILUS Operation and Maintenance Safety Essentials
 -
 KUKA LBR iiwa CR Cleanroom Troubleshooting and Maintenance
 -
 Troubleshooting and Maintenance of KUKA KR AGILUS sixx
 -
 KUKA KR60 SCARA CS Maintenance Guide
 -
 KUKA KR 23 SCARA-2 Robot Installation and Maintenance Detailed Explanation
 -
 KUKA KR 20 SCARA CS Robot Selection and Maintenance Guide
 -
 KUKA KR 15 DELTA-2 Robot Installation and Maintenance
 -
 KUKA KR 13 SCARA-2 CS Detailed Explanation
 -
 KUKA KR 3 D1200 Robot Operation and Maintenance
 -
 KUKA KR 3 D1200 HM Robot Operation and Maintenance Guide
 -
 KUKA LBR Med Medical Robot Integration Guide
 -
 KUKA iiwa Robot Safety Operation and Maintenance
 -
 KUKA LBR iiwa CR Operations and Troubleshooting
 -
 Lauer PCS Series Operation Console Configuration Guide
 -
 Installation and Maintenance Guide for KUKA LBR iisy Series Collaborative Robots
 -
 KUKA LBR iisy 3 R760 Collaborative Robot Debugging Guide
 -
 KUKA LBR iico Robot Installation and Debugging Technical Guide
 -
 Lauer Starline LCA 300/320/325 Text Display Application Guide
 -
 Lauer PCS 950 Operation Console Application Guide
 -
 Lauer EPC series industrial computer configuration


