
How to troubleshoot Yokogawa OR8EFG KCl filled ORP sensor (IM12C07J01-01E)?
How to troubleshoot Yokogawa OR8EFG KCl filled ORP sensor (IM12C07J01-01E)?
Product positioning and core features
1. Core positioning
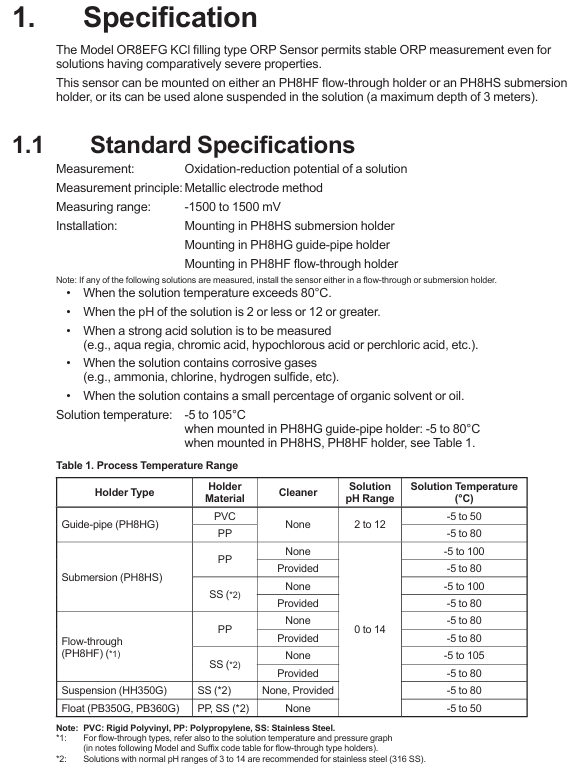
OR8EFG is a KCl filled ORP sensor based on metal electrode method, which achieves stable oxidation-reduction potential measurement (-1500~+1500 mV) by integrating platinum/gold indicator electrode and Ag/AgCl reference electrode, combined with KCl solution filling system. Its core advantage lies in its adaptability to multiple installation methods (immersion, flow, conduit suspension), and through pressure compensation design (medium pressure storage tank), it can be used under pressure conditions. It is also compatible with transmitters such as Yokogawa FLXA202/FLXA21, meeting the requirements of industrial measurement accuracy and reliability.
2. Core advantages
Wide working condition adaptation: supports a temperature range of -5~105 ℃ (slightly different depending on the material of the installation bracket), a pressure range of atmospheric pressure to 500 kPa (medium pressure storage tank), a medium flow rate of ≤ 2 m/s, and is suitable for various harsh processes;
Durable materials: PPS resin (main body), platinum/gold (indicator electrode), PTFE/ceramic (liquid interface), fluororubber/perfluoroelastomer (seal) are used for the contact medium components, which are acid and alkali resistant and corrosion-resistant;
Flexible installation: can be paired with PH8HS immersion bracket, PH8HF flow-through bracket, PH8HG catheter bracket, etc., or can be hung separately (maximum immersion depth of 3m) to adapt to different process layouts;
Compliance and Safety: Compliant with explosion-proof standards such as ANSI/ISA-60079 and IEC 60079, it can be used as a "simple device" in conjunction with isolated transmitters (such as FLXA202) for use in hazardous areas to avoid the risk of electrostatic ignition;
Low maintenance design: equipped with a KCl storage tank (universal type 250mL/medium pressure type), with low consumption of KCl solution (universal type ≤ 3 mL/day, PTFE liquid interface ≤ 20 mL/day), reducing the need for frequent fluid replenishment.
Detailed explanation of technical specifications
1. Basic measurement parameters
Parameter category specification details
ORP measurement range -1500~+1500 mV, measurement principle is metal electrode method, indicating electrode material can be platinum (- PT) or gold (- AU);
Environmental adaptability temperature: -5~105 ℃ (flow type bracket, stainless steel material), -5~80 ℃ (immersion bracket, PP material);
Pressure: normal pressure~500 kPa (medium pressure storage tank), normal pressure (universal storage tank);
Medium requirements: Conductivity is not mandatory, flow rate ≤ 2 m/s, maximum immersion depth 3m;
Contact material body: PPS resin (Ryton);
Indicator electrode: platinum glass/gold epoxy resin;
Liquid interface: ceramic/PTFE/fluororesin;
Sealing components: FKM/FFKM, suitable for organic solvents/high-temperature media;
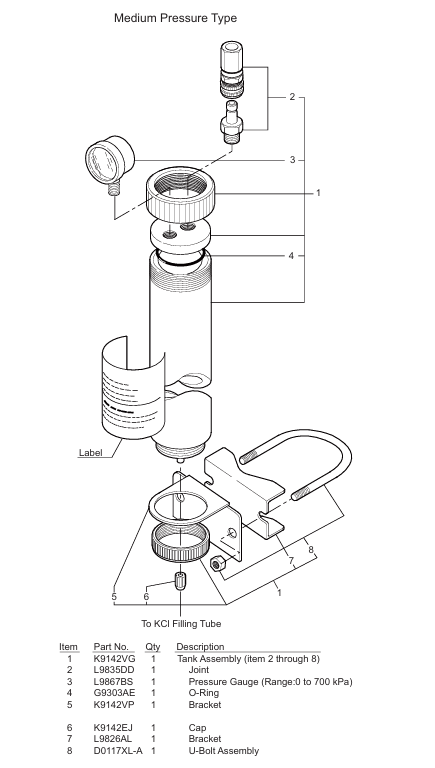
KCl system storage tank: universal type (250mL, equipped with 2-inch pipe support), medium pressure type (requiring external pressure regulator);
Solution consumption: Under a pressure difference of 10 kPa, the universal liquid interface is ≤ 3 mL/day, and the PTFE liquid interface is ≤ 20 mL/day;
Cable: Chlorinated polyethylene rubber sheath, available in lengths of 3/5/7/10/15/20m;
The weight and protection of the sensor body are about 0.4kg, the general storage tank is about 0.3kg, and the medium pressure storage tank is about 1kg. There is no clear IP rating, but it can prevent liquid splashing through a sealed design (which needs to be used in conjunction with a bracket waterproof cap);
2. Model classification and suffix code
OR8EFG distinguishes core configurations through suffix codes, and the selection needs to specify electrode materials, cable lengths, storage tank types, and compatible transmitters. The specific meanings are as follows:
Core characteristics of suffix code classification
-PT/- AU indicator electrode PT: platinum electrode (universal scenario, oxidation resistant); -AU: Gold electrode (suitable for pollution prone scenarios such as sulfide);
-The numerical representation of the length of cables and KCl pipes, such as 03/-05/-10, is in meters. For example, -03 is 3m and supports a maximum length of 20m (100m can be customized);
-TT1/- TT2 storage tank type - TT1: universal type (250mL, normal pressure, equipped with pipeline support); -TT2: Medium pressure type (requires external air pressure, suitable for pressurized working conditions);
-TN1/- TN2 maintenance storage pipes only contain KCl supply pipes and do not include storage tanks (for pipeline replacement of existing storage tanks);
-E/- F/- G compatible transmitters - E: compatible with FLXA202/FLXA21/PH202 (pin terminals); -F: Compatible with FLXA202/FLXA21 (M3 ring terminal); -G: Compatible with FLXA402/PH450G (M4 ring terminal);
/TF//PF/FEP special options/TF: PTFE liquid interface (anti pollution); /PF: Perfluoroelastomer seal (resistant to organic solvents); /FEP: FEP material KCl tube (UV resistant);
3. Compliance and Explosion Protection Requirements
As a 'simple device', OR8EFG must meet the following compliance conditions before it can be used in hazardous areas:
Supporting equipment: It must be used in conjunction with transmitters with built-in isolation functions (such as FLXA202-D - □ - D-CB -...) or systems with isolation safety barriers to avoid risks introduced by non isolated circuits;
Temperature limit: Depending on the ambient temperature (Ta) and temperature level, the upper limit of the process temperature varies (for example, when T6 level Ta=40 ℃, FLXA202 can be used with an upper limit of 16 ℃); T3 level Ta=upper limit of 105 ℃ at 40 ℃);
Electrostatic protection: Avoid wiping the sensor with a dry cloth to prevent the accumulation of static electricity from causing explosions; The titanium material solution grounding terminal (- TN suffix) can eliminate the risk of impact friction sparks;
Installation and wiring process
1. Preparation before installation
(1) Unpacking and Inspection
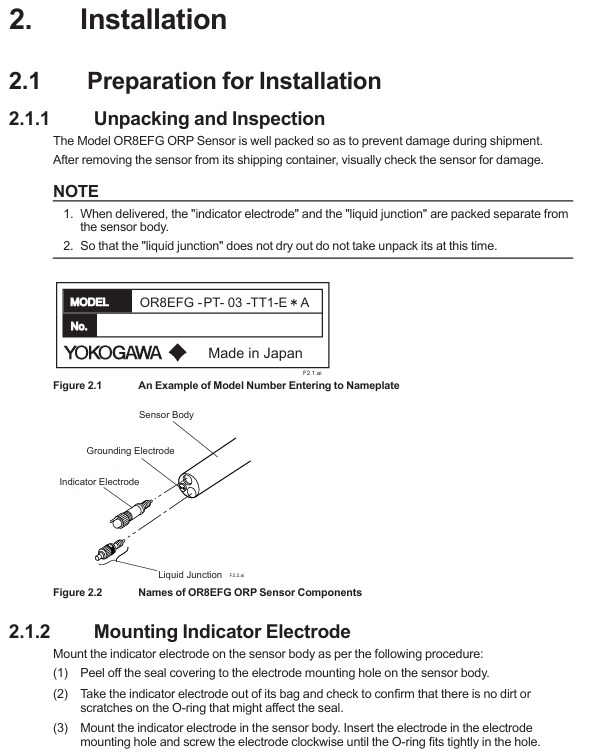
After unpacking, confirm that the sensor body, indicator electrode, liquid interface, and KCl storage tank (if ordered) are not damaged, and verify that the model suffix matches the order (such as electrode material and cable length);
The indicator electrode and the liquid interface are packaged separately, and the liquid interface should be kept moist. After unpacking, it should not be taken out temporarily to avoid drying and affecting performance;
Check the integrity of attachments: installation bracket (such as PH8HS), KCl solution/powder (accessory OR8AX contains 3 bags of 250mL powder), cable sealing glass, etc.
(2) Installation site selection requirements
Avoid installing in dead zones, bubble accumulation areas, or locations with high flow rates (>2 m/s) to prevent measurement response delays or electrode wear;
If the medium contains corrosive gases (such as ammonia and hydrogen sulfide) or the temperature is greater than 80 ℃, a flow-through or immersion bracket must be used and cannot be suspended separately;
The installation in hazardous areas must comply with local electrical regulations (such as ANSI/ISA-RP12.06.01), ensure that the grounding resistance is ≤ 1 Ω, and avoid potential difference sparks.
2. Core installation steps (taking a flow-through bracket as an example)
(1) Assembly of electrode and liquid interface
Installation indicator electrode: Remove the sealing tape from the installation hole of the sensor body electrode, take out the platinum/gold electrode, check that the O-ring is not damaged, and then screw it clockwise into the installation hole until the O-ring is tightly sealed;
Pre installed liquid interface: Remove the sealing tape from the installation hole of the liquid interface, gently screw the liquid interface into 2-3 turns (not tightened temporarily), and reserve a channel for filling with KCl solution;
Connect KCl storage tank: If it is a universal type (- TT1), fix the storage tank on a 2-inch pipe through a bracket, connect the KCl supply pipe of the sensor, and use the accompanying needle to puncture the top of the storage tank (balance air pressure); If it is a medium pressure type (- TT2), an external air pressure regulator (slightly higher than the maximum process pressure) is required, and an air pipeline should be connected.
(2) KCl solution filling
Invert the sensor (below the height of the storage tank) to allow KCl solution to flow from the storage tank into the sensor body;
When the solution overflows from the installation hole of the liquid interface, tighten the liquid interface clockwise (to avoid residual air) to complete the filling;
The medium pressure storage tank needs to be replenished to a distance of 30-40 mm from the top to prevent the solution from overflowing during pressurization.
(3) Bracket assembly and fixation
Remove the protective foam of the circulating bracket (PH8HF), insert the sensor tip into the bracket, and tighten the fixing nut (ensure the O-ring compression seal);
Connect the process pipeline: first open the inlet valve, then open the outlet valve to avoid medium impact on the sensor; Under medium pressure conditions, the storage tank needs to be pressurized first before the process medium is introduced.
3. Wiring specifications
The OR8EFG cable contains 4-core wires and needs to be connected to the transmitter (such as FLXA202) according to the terminal definition. The wiring method may vary slightly depending on the terminal type (pin/ring):
Corresponding terminal for cable core color function (taking FLXA202 as an example) Remarks
The red indicator electrode (GE) at terminal 15 is transmitting ORP signals, and it is necessary to ensure that the wiring is secure to avoid signal interference;
The brown reference electrode (RE) terminal 13 forms a measurement circuit with the indicator electrode and needs to be grounded separately;
The black liquid interface/grounding (SE) terminal 14 is used to eliminate the grounding potential difference and must be reliably grounded;
Connect the green common terminal (G) 16 to the transmitter common terminal to ensure the integrity of the circuit;
Cable sealing: When passing through the transmitter cable inlet, a matching glass should be used, and the nut should be tightened to the seal (to avoid damaging the cable due to over tightening);
Explosion proof area: After wiring, it is necessary to confirm that the terminal box is sealed properly to prevent flammable gases from entering, and the grounding resistance should be ≤ 1 Ω.
Operations and Calibration
1. Daily maintenance
(1) KCl solution supplementation
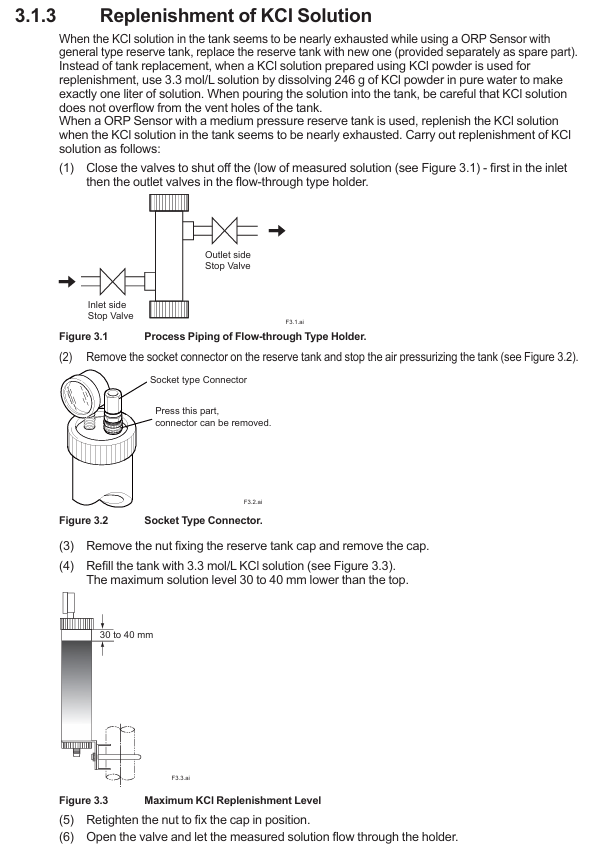
Universal Liquid Storage Tank (- TT1): When the remaining solution is less than 1/4, replace with a new liquid storage tank (accessory K9084KQ), or supplement with a 3.3mol/L solution (246g KCl dissolved in 1L pure water) prepared with KCl powder (K9020XU) to avoid reference electrode failure caused by an empty liquid storage tank;
Medium pressure storage tank (- TT2): Close the process pipeline valve → Remove the pressure of the storage tank → Add KCl solution to the specified height → Re pressurize (slightly higher than the process pressure) → Open the process valve, and the replenishment cycle depends on the consumption (usually 1-2 months).
(2) Cleaning of electrode and liquid interface
Choose the cleaning method based on the type of medium contamination, only clean the sensor tip (to avoid damaging the cable/reservoir):
Suspended solids/viscous pollutants: Wipe with a soft tissue and rinse with pure water;
Oil/organic matter: Soak in neutral detergent solution (for tens of minutes to several hours), then rinse with pure water;
Metal adsorption/chemical stains: Soak in 1-2% dilute hydrochloric acid solution (several minutes), then rinse with pure water;
Liquid junction blockage: If the measurement response slows down, the liquid junction can be immersed in a 3mol/L KCl solution at 70 ℃ and naturally cooled to restore conductivity.
2. Calibration process
ORP sensors need to be calibrated regularly with quinone hydroquinone standard solution to ensure measurement accuracy. It is recommended to calibrate every 3-6 months (shortened for severe pollution scenarios):
(1) Calibration preparation
Prepare quinone hydroquinone powder (accessory K9024EC), pH buffer solution (such as pH 4.01/6.87), pure water, and clean the beaker;
Prepare standard solution: Dissolve 1g of quinone hydroquinone powder in 200mL of pH buffer and stir until saturated;
Clean the sensor: Follow the above cleaning method to clean the interface between the indicator electrode and the liquid, rinse with pure water, and dry dry.
(2) Two point calibration steps
First point calibration (pH 6.87 buffer solution):
Immerse the sensor in a quinone hydroquinone pH 6.87 standard solution and wait for the reading to stabilize (usually 5-10 minutes);
Enter the "ORP Calibration" mode according to the transmitter manual (such as FLXA202), and input the theoretical value (ORP=96 mV, rH=23.6 at pH 6.87);
Second point calibration (pH 4.01 or 9.18 buffer solution):
Rinse the sensor with pure water, immerse it in a quinone hydroquinone solution of another pH, and wait for it to stabilize before inputting the corresponding theoretical value (such as ORP=265 mV at pH 4.01);
Verification and reset: After calibration, immerse the sensor in pure water, confirm that the reading drift is ≤± 10 mV, and install it back into the process pipeline.
3. Replacement of vulnerable parts
(1) Liquid interface replacement
When the liquid interface is severely blocked (still unresponsive after cleaning) or damaged, it needs to be replaced (accessories K9142TH/TH, etc.):
Drain the KCl solution from the sensor and unscrew the old liquid interface counterclockwise;
Apply a small amount of KCl solution to the new liquid interface and gently screw it into the sensor body 2-3 times;
Refill the KCl solution until it overflows, tighten the liquid interface, and confirm that the solution seeps out from the liquid interface (visually or through a transmitter to detect impedance 2 ≤ 50 k Ω).
(2) Indicator electrode replacement
If the electrode surface is severely oxidized (with large reading drift and slow response), replace the platinum/gold electrode (accessory K9142TS/TT, etc.):
Remove the old electrodes from the sensor body and check if the O-ring is damaged (replace them together);
Apply silicone grease to the new electrode O-ring and screw it clockwise into the installation hole until it is sealed;
Refill KCl solution, calibrate and put into use.
Troubleshooting and spare parts
1. Common faults and solutions
Possible causes and solutions for the fault phenomenon
ORP reading drift is large. 1. KCl solution depletion/contamination; 2. Blockage at the liquid interface; 3. Indicate electrode oxidation; 4. Poor grounding; 1. Supplement/replace KCl solution; 2. Clean/replace the liquid interface; 3. Clean or replace the electrode with hydrochloric acid; 4. Check that the grounding resistance is ≤ 1 Ω;
Slow response speed: 1. Blockage at the liquid interface; 2. The sensor is installed in the dead zone (no medium flow); 3. Poor cable contact; 1. Use hot KCl solution to regenerate the liquid interface; 2. Adjust the installation position to the location where the medium flows; 3. Check if the cable wiring is loose;
Reading no response 1. Electrode breakage (cable core wire breakage); 2. The transmitter has no power supply; 3. The liquid interface is not filled with KCl; 1. Measure the electrode resistance with a multimeter (about 10 Ω at room temperature for platinum electrodes), and replace the cable if it breaks; 2. Check the power supply of the transmitter; 3. Refill KCl solution;
Solution leakage: 1. The liquid interface is not tightened; 2. O-ring aging/damage; 3. Loose interface of the fluid storage tank; 1. Re tighten the liquid interface; 2. Replace the fluororubber O-ring; 3. Check the pipeline joints of the fluid storage tank and tighten them;
2. Key spare parts list
Spare parts model, purpose, applicable scenarios
K9142TS/K9142TT indicator electrodes TS (platinum electrode, universal), TT (gold electrode, resistant to sulfide contamination);
K9142TH/K9142HW liquid interface TH (universal ceramic type), HW (PTFE type, anti pollution);
K9084LP KCl solution 3.3mol/L, 6 × 250mL/group, directly supplemented for use;
K9020XU KCl powder 8 bags/group, each bag can be prepared with 250mL of 3.3mol/L solution;
K9024EC Quinone Hydroquinone Reagent 3 bags/set, used for preparing ORP calibration standard solution;
PH8HS/PH8HF installation bracket PH8HS (immersion type, PP/stainless steel material), PH8HF (flow type, suitable for pressurized conditions);
WTB10-PH1/PH3 terminal box is compatible with sensors of different terminal types (PH1: fork terminal, PH3: M3 ring terminal) for long-distance wiring;
- OMRON
- ABB
- General Electric
- EMERSON
- Honeywell
- HIMA
- ALSTOM
- Rolls-Royce
- MOTOROLA
- Rockwell
- Siemens
- Woodward
- YOKOGAWA
- FOXBORO
- KOLLMORGEN
- MOOG
- KB
- YAMAHA
- BENDER
- TEKTRONIX
- Westinghouse
- AMAT
- AB
- XYCOM
- Yaskawa
- B&R
- Schneider
- KONGSBERG
- NI
- WATLOW
- ProSoft
- SEW
- ADVANCED
- Reliance
- TRICONEX
- METSO
- MAN
- Advantest
- STUDER
- DANAHER MOTION
- Bently
- Galil
- EATON
- MOLEX
- DEIF
- B&W
- ZYGO
- Aerotech
- DANFOSS
- Beijer
- Moxa
- Rexroth
- Johnson
- WAGO
- TOSHIBA
- BMCM
- SMC
- HITACHI
- HIRSCHMANN
- Application field
- XP POWER
- CTI
- TRICON
- STOBER
- Thinklogical
- Horner Automation
- Meggitt
- Fanuc
- Baldor
- SHINKAWA
- Other Brands
- UniOP
- KUKA
- Iba
- Beckhoff
- ADLINK
-
 Sigmatek MDD111-1 DIAS Drive Axis Module
 -
 Sigmatek DKL042 05-024-042 Terminal Module
 -
 Sigmatek DM822 Control Module
 -
 Sigmatek CDM167 12-008-167-O Module
 -
 Sigmatek TAE151 Touch Display Unit
 -
 Sigmatek DCC041 SLIDES Module 05-700-041-D
 -
 Sigmatek AKM65M-ANC2GBB0 PM Servo Motor
 -
 Sigmatek ETT221 01-230-221 Operator Terminal
 -
 Sigmatek SLIDES DAM 124 Analog Module
 -
Sigmatek AKM31C-ANCNGBB0 Servo Motor
-
 Mannesmann Demag Sigmatek CP626 Central Unit
 -
 SIGMATEK 0332.554.03 Board 371071000154
 -
 SIGMATEK 12-250-021 Base Plate Back Panel CM5V020
 -
 SIGMATEK DM162 S-DIAS Digital Mix Module
 -
 DEMAG ERGOTECH 061 381 66 Sigmatek 9842.243.02 Circuit Board
 -
 SIGMATEK CP313-1 PLC Module
 -
Sigmatek ETV0551-2 VARAN Touch Terminal
-
 Sigmatek SDM 081 FS S-Dias Safety Module
 -
 DEMAG 05-250-023 Ergotech Motherboard with Sigmatek TMS012
 -
Sigmatek CM5V020 12-250-023-K Wiring Base
-
 Sigma Tek 5000B-37 Attitude Gyro Indicator
 -
 Sigmatek SDD120-2 DIAS Drive
 -
 Sigmatek CME221 Memory Module
 -
 Sigmatek DCP640 DIAS Central Unit
 -
 Sigmatek STO040 Safety Output Module
 -
Sigmatek CET281 Control Panel
-
 Sigmatek CIPC LX800 Demag NC5 CPU
 -
 Sigmatek DKL093 05-024-093 Terminal Module
 -
 Sigmatek AI088 20-009-088 Analog Input Module
 -
Sigmatek CAI888 Analog Input Module
-
SIGMATEK CCA021 12-025-021 Analog Output Module
-
SIGMATEK 1104.579.05 Control Module
-
SIGMATEK SDI100 Digital Input Module
-
 SIGMATEK C-IPC 256MB LX800 Compact Dias
 -
 SIGMATEK 9423.090.02 Control Module
 -
SIGMATEK C-IPC 256 Power Supply 148498
-
 SIGMATEK CAI025 Analog Input Module
 -
 SIGMATEK CTO166 Digital Output Module
 -
 SIGMATEK CP112 20-004-112 Processor Module
 -
SIGMATEK CAI887 12-009-887 Safety Module
-
 Sigma-Tek 4000B-31 Directional Gyro 1U262-002-42
 -
Sigmatek C-IPC 256MB LX800 IPC Controller
-
Sigmatek C-IPC 01-450-031 Industrial PC LX800
-
Sigmatek C-IPC 256 Industrial PC Controller
-
Sigmatek CCP-531 PLC Processor Module
-
Sigmatek CDI163 Digital Input Module
-
 Sigmatek ETV0501 VARAN Terminal 12-230-0501
 -
 Sigmatek CTMS020 C-DIAS Technology Module
 -
 Sigmatek CIV512 VARAN Switch Module
 -
 Sigmatek HU011 20-080-011 Interface Module
 -
SIGMATEK SLIDES DAM 124 Module
-
 SIGMATEK C-IPC 161 01-450-161L Industrial PC
 -
SIGMATEK C-IPC 128MB VIA 733MHz 01-450-024-K
-
 SIGMATEK 12-780-012 R8-IPC Geode LX800 Module
 -
SIGMATEK CAM124 Analog Module
-
 SIGMATEK S1 032-8AF61-R4 EZ Servo Motor
 -
 SIGMATEK CTO163 Digital Output Module
 -
 SIGMATEK CCP082 12-004-082 Processor Module
 -
 SIGMATEK CRCH081 C-DIAS Temperature Module
 -
 SIGMATEK PC322-K 01-310-322-K Industrial PC
 -
SIGMATEK SDD310-2 Servo Drive
-
 SIGMATEK AI084 Analog Input Module
 -
SIGMATEK CRCH081 12-752-081 Temperature Module
-
Sigma-Tek 5000L-4 Attitude Gyro 1U284-001-3
-
 SIGMATEK CM5V020 12-250-023-K Wiring Module
 -
Sigma-Tek 4000H-6 Directional Gyro IU262-035-7
-
 SIGMATEK Dias DCP160 05-004-160 Processor Module
 -
SIGMATEK 0147.395.02 Control Module
-
SIGMATEK A1084 Control Module
-
SIGMATEK DI200 20-006-2000 Digital Input Module
-
Sigmatek DNC115 Encoder Module
-
 Sigmatek DAM122 05-017-122 Analog Module
 -
Sigmatek 9802.289.01 Control Board TA71 Display
-
Sigmatek TO127 20-007-127 Digital Output Module
-
Sigmatek DNC031 05-011-031 Digital Module
-
Sigmatek VI022 20-003-022 Interface Module
-
Sigmatek CAI085 Analog Input Module
-
 Sigmatek CP111 S-DIAS CPU Module
 -
Sigmatek CTMS030 Krauss Maffei Module
-
 Sigmatek CAM123 Control Module
 -
 Sigmatek TAE732-P 01-240-732-P Touch Display Unit
 -
Sigmatek MDM021 Digital Mixed Module
-
Sigmatek DCP642 DIAS Central Unit
-
 Sigmatek CST022 12-014-022 C-DIAS Module
 -
 Sigmatek SRO021 20-893-021 Safety Relay Output
 -
 Krauss Maffei MC5 Control System Sigmatek
 -
 Sigmatek DC061 Module 18-24VDC 300mA
 -
 Herrmann EVT0855 Ultrasonic Welder Touch Panel
 -
Sigmatek CIV521 Control Module 1.4A 2W
-
Sigmatek DDI61 05-006-161 Digital Input Module
-
SIGMATEK ETT312-E Touch Terminal 01-230-312
-
Cessna S3326-1 Sigma Tek 5000B-67 Gyro 1U149-015-9
-
SIGMATEK PS101 Power Supply Module
-
SIGMATEK 0332.554.03 Control Module 371071000154
-
 SIGMATEK ETT312-E Touch Terminal 01-230-312
 -
SIGMATEK CDM163 Control Module
-
 SIGMATEK VSV046 16-023-046 Module
 -
SIGMATEK AM221 20-017-221 Analog Module
-
SIGMATEK CTS051 12-053-051 Control Module
-
SIGMATEK AM221 20-017-221 Analog Module
-
Sigmatek CSDI161 12-891-161 Safety Input Module
-
Sigma Tek 4000C-1 Directional Gyro Indicator
-
Sigmatek ETV0501 12-230-0501 VARAN Terminal
-
Sigmatek DDM165 SLIDES Module
-
Sigmatek N100 20-011-100 Control Module
-
Sigmatek AKM54K-ANC2R-B0 PM Servo Motor
-
Sigmatek CTO166 Digital Output Module
-
Sigmatek CP212-K 20-004-212-K CPU Module
-
Sigmatek CDI161 Digital Input Module
-
Sigmatek DCC080 05-700-080-2 Control Module
-
 SIGMATEK SCP011 S-DIAS Safety CPU
 -
SIGMATEK SCP011 S-DIAS Safety CPU
-
SIGMATEK SRO022 Relay Output Module
-
SIGMATEK MDD 121 Drive Axis Module
-
SIGMATEK DSI021 SLIDES Siemens Interface
-
SIGMATEK DIAS DCP161 Module 05-004-161
-
 Sigmatek ETT312 Built-in Touch Terminal
 -
SIGMATEK DCP 643 DIAS Controller System
-
SIGMATEK CIO021 Multi I/O Module
-
SIGMATEK CTMS020 Control Module
-
 Sigmatek CME 221 Memory Module
 -
Sigmatek 0420.615.01 Control Board
-
Sigmatek CP111 20-004-111 CPU Module
-
Sigmatek 9405.065.03 Control Board
-
Sigmatek ETEK 01-450-032-K C-IPC 256MB Industrial PC
-
Sigmatek CTO163 12-007-163 Safety Output Module
-
Sigmatek TO081 20-007-081 Digital Output Module
-
 Sigmatek SI021 20-022-021 Safety Input Module


